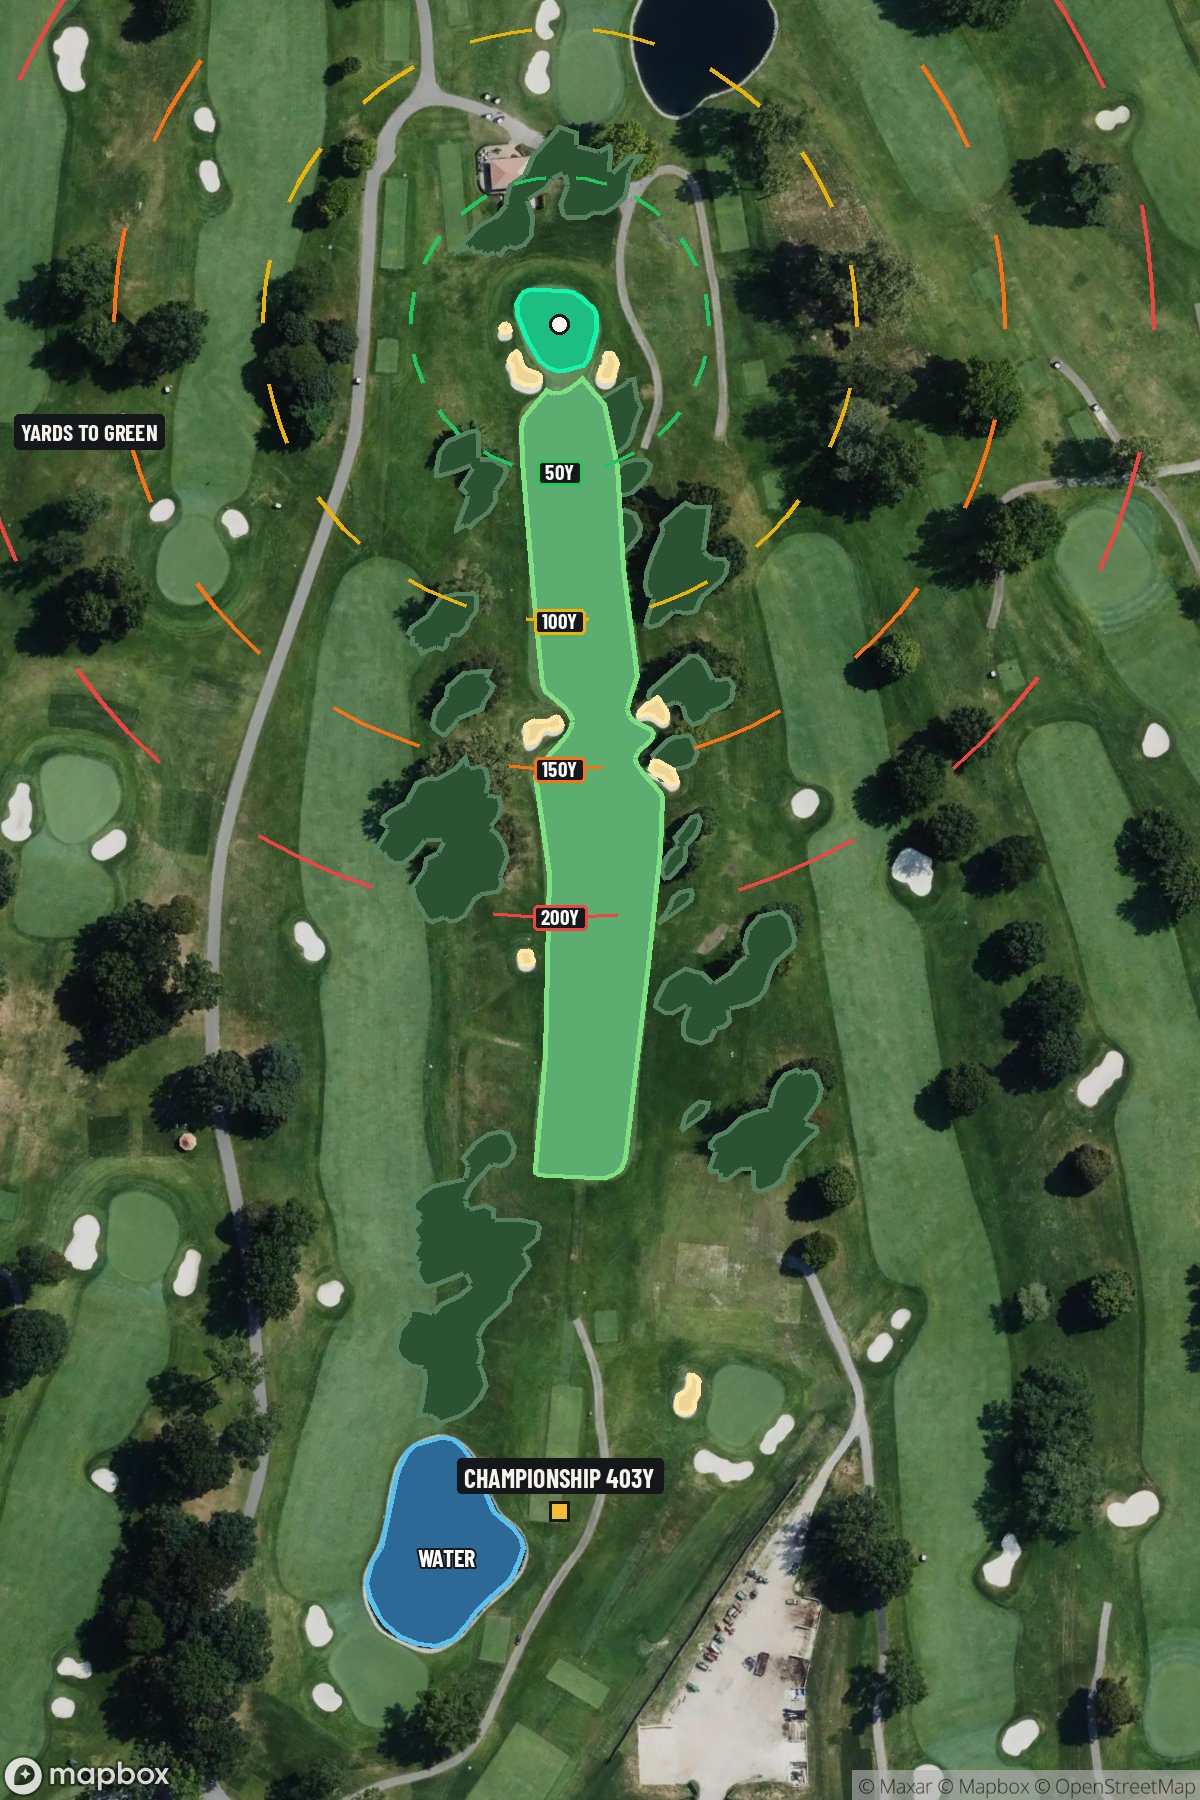
Hole 16 of 18 · Highland Park, Michigan

Hole 16 at Detroit Golf Club (North)

Par
4
Yards
403
Handicap
14
Bunkers, water
8
Hole 16 aerial at Detroit Golf Club (North)
Map distances from Championship tee · 403 yds

The map's printed distances are measured from the Championship tee to the green; they do not move when you change tees.

Green size: 29 yds deep × 28 yds wide

Mapbox Satellite composite · capture date not provided. Green at the top.

Where this map comes from

Satellite photo
Date not published
Mapbox satellite
Green contours
2017 survey
USGS lidar survey
Report a map problem
100%
Hole 16 aerial at Detroit Golf Club (North)

The plan for No. 16

The play: Detroit Golf Club (North) hole 16 presents a classic Donald Ross design challenge on this 403-yard par 4. The straight layout may appear straightforward, but Ross's architectural genius reveals itself through strategic fairway bunker placement that demands precise tee shot positioning. Players must navigate these well-positioned hazards to set up an optimal approach shot to a small, well-guarded green complex. The putting surface features Ross's signature undulations, rewarding accurate iron play while punishing wayward approaches. As part of the recent $16 million restoration focusing on Ross's original vision, this hole exemplifies the timeless strategic principles that make Detroit Golf Club a premier championship venue.

Shot by shot

  1. Off the tee

    The tee shot strategy revolves entirely around avoiding the three fairway bunkers while positioning yourself for the best approach angle. Study the bunker placement carefully - they're positioned to catch both conservative and aggressive drives. The ideal target line typically runs down the right-center of the fairway, giving you the widest margin for error while setting up a favorable approach angle. Club selection depends on your distance and the day's conditions, but many players find success taking one less club to ensure they stay short of trouble. A well-struck fairway wood or hybrid often provides the perfect combination of distance and control. Remember that finding the fairway is far more important than maximizing distance on this hole.

  2. Approach & recovery

    From a good fairway position, you'll typically face a short iron approach to the green - exactly what Ross intended. The green is well-guarded and features the undulating characteristics typical of Ross designs, so precision is crucial. Focus on the center of the green rather than attacking pins, especially when they're tucked behind bunkers or on severe slopes. Pay attention to pin position and choose your approach accordingly. The small green size means there's little room for error, making club selection critical. Take enough club to ensure you reach the putting surface, as coming up short often leaves difficult recovery shots from the greenside protection.

  3. On the green

    The undulating green presents the final test of this hole. Ross greens are known for their subtle breaks and challenging pin positions, so take time to read the slopes carefully. The putting surface will likely feature several tiers and collection areas that can make lag putting particularly challenging. Focus on speed control above all else - the undulations can turn a slightly firm putt into a long comeback attempt. When facing longer putts, prioritize leaving yourself an uphill second putt rather than risking a downhill slider past the hole. ## RISK VS REWARD While long hitters might be tempted to take an aggressive line over the bunkers, the risk rarely justifies the reward. The hole's moderate length means that even a conservative tee shot leaves a very manageable approach. The real scoring opportunity comes from executing two solid shots rather than trying to overpower the hole. The biggest reward comes from playing within your capabilities and avoiding the fairway bunkers entirely. A successful strategy here often involves taking less club off the tee to ensure proper positioning, then capitalizing with a precise approach shot. ## DIFFERENT SKILL LEVELS **High-handicap players** should prioritize fairway accuracy above all else. Consider using a fairway wood or hybrid off the tee to maximize your chances of avoiding the bunkers. From the fairway, take plenty of club on your approach and aim for the center of the green, regardless of pin position. **Low-handicap players** can be more aggressive with their target lines and pin hunting, but should still respect the bunker placement. You have the skills to work the ball around trouble, but the conservative play often yields the best results. Focus on executing your standard shots rather than attempting heroics. **Mid-handicap players** should adopt a hybrid approach - be aggressive when you have a clear advantage, but don't hesitate to play conservatively when the situation demands it. This hole rewards smart decision-making over raw talent, making it an excellent opportunity to practice course management skills that will serve you throughout your round.

  4. Watch for

    • Course conditioning and mapped hazards may affect line selection; confirm from the aerial.

The green on No. 16

Mapped boundary
Wide × deepyards
28×29
Areasq ft
5,141
Golfer feedback

How did Hole 16 play?

⚡ Quick Golfer Pulse

How did this hole play today?

1-tap anonymous vote

Frequently asked questions

Yardage reference: Championship tees · 403 yards.

What's the best strategy off the tee?

↓

For this 403-yard par 4, most players will hit driver to set up a comfortable approach. Be mindful of the bunker at 58.9 yards if you hit driver.

How difficult is hole 16?

↓

This hole is one of the tougher holes on the course for most golfers. Key challenges include: water in play, heavily bunkered.

How big is the green on hole 16?

↓

The green is medium-sized with moderate targets. Pay attention to pin placement when selecting your approach club.

Which side of the fairway is safer on hole 16?

↓

Aim for the right side of the fairway when possible. Missing left (water) brings more trouble into play.