Hole 9 of 18 · Highland Park, Michigan

Hole 9 at Detroit Golf Club (North)

Par
4
Yards
453
Handicap
3
Bunkers
8
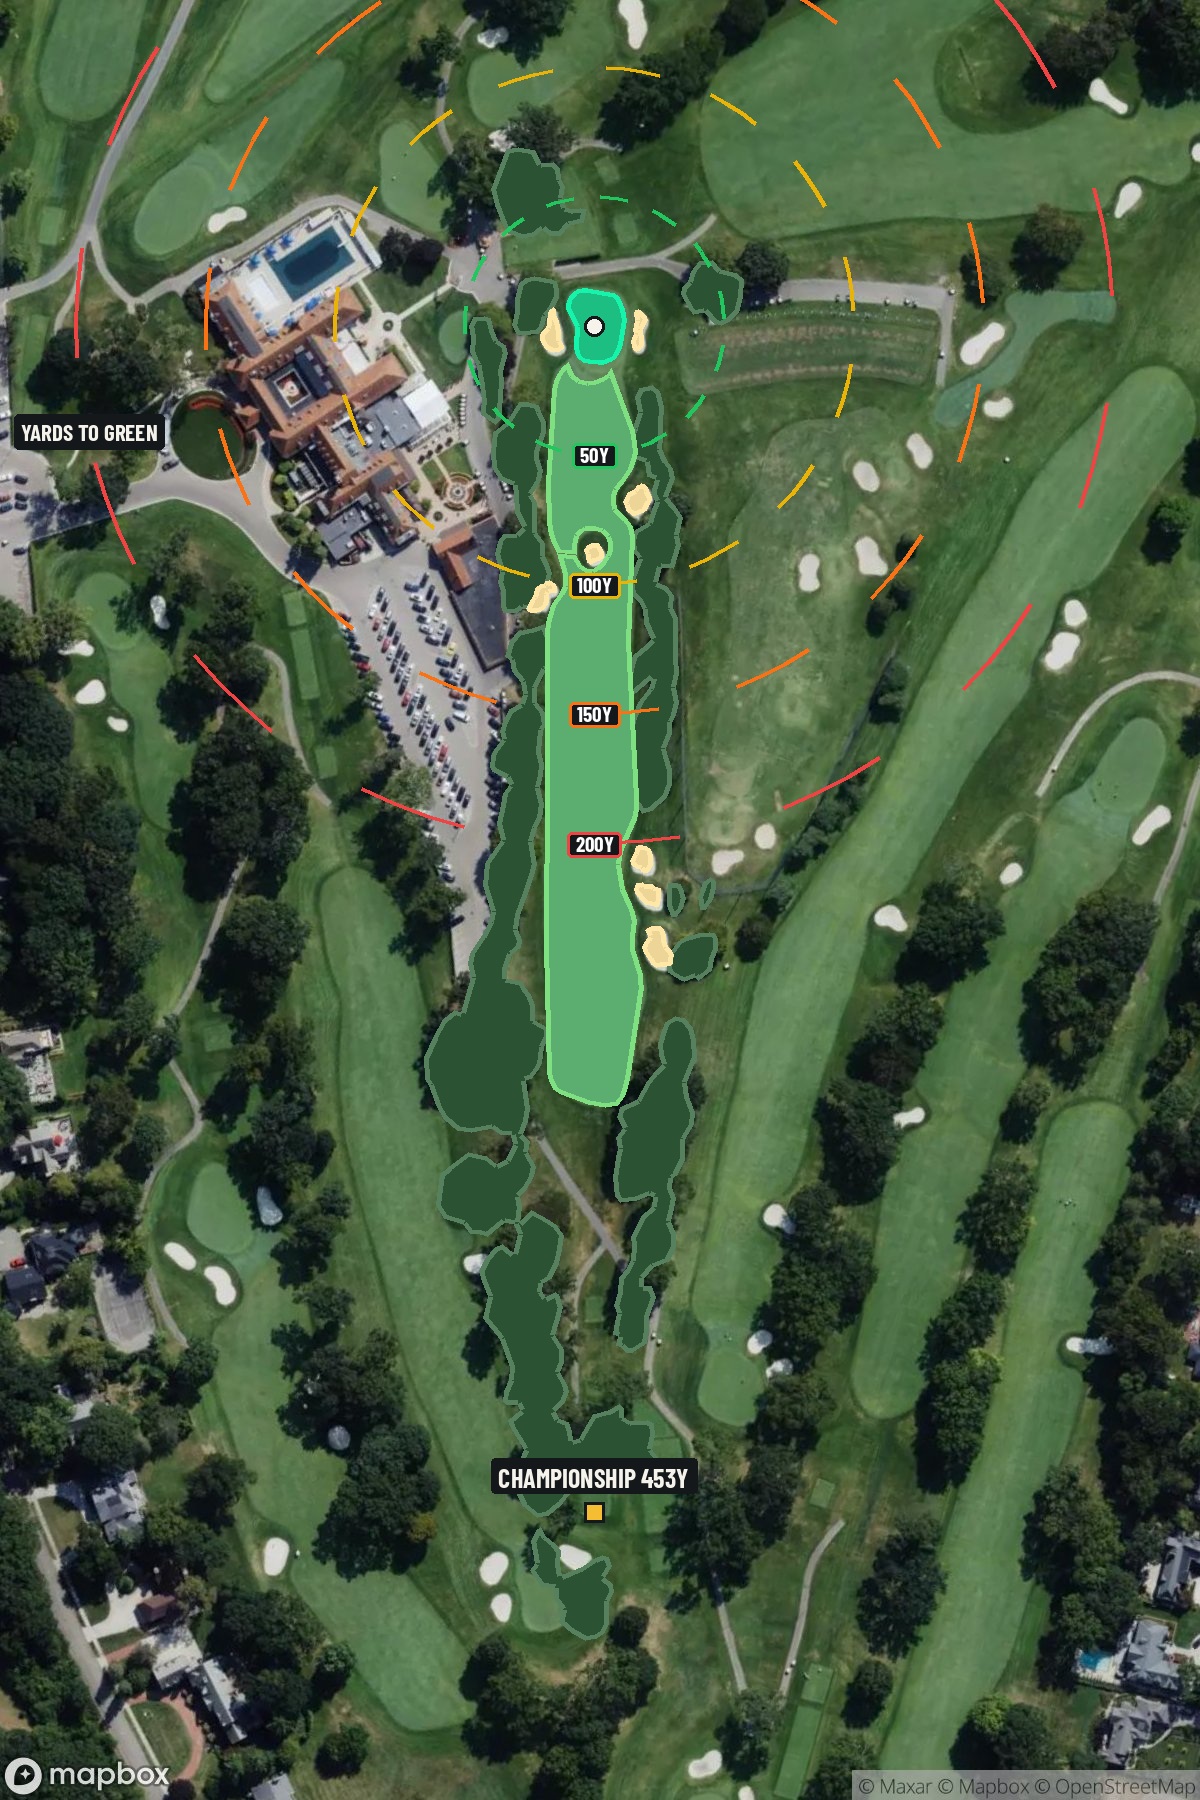
Hole 9 aerial at Detroit Golf Club (North)
Map distances from Championship tee · 453 yds

The map's printed distances are measured from the Championship tee to the green; they do not move when you change tees.

Green size: 30 yds deep × 23 yds wide

Mapbox Satellite composite · capture date not provided. Green at the top.

Where this map comes from

Satellite photo
Date not published
Mapbox satellite
Green contours
2017 survey
USGS lidar survey
Report a map problem
100%
Hole 9 aerial at Detroit Golf Club (North)

The plan for No. 9

The play: The ninth hole at Detroit Golf Club (North) serves as a demanding finale to the front nine, showcasing the timeless design principles of legendary architect Donald Ross. This straight par 4 stretches 453 yards and demands both precision and power from the championship tees. The hole's deceptively simple layout masks its true challenge - a tee shot that must navigate the ideal landing zone to set up the crucial approach shot. Without significant hazards cluttering the playing corridor, golfers face the pure test of execution that defines classic Ross design. The small green complex rewards accurate iron play while punishing anything less than committed swings. As players make the turn, this hole epitomizes the strategic golf that has made Detroit Golf Club's North Course a respected test for over a century.

Shot by shot

  1. Off the tee

    Your tee shot strategy centers on positioning for the optimal approach angle to the small green. While the hole plays straight, club selection should prioritize accuracy over distance. A well-struck driver can work here for longer hitters, but consider a 3-wood or long iron if accuracy has been inconsistent during your round. The key is finding the center of the fairway to give yourself the best angle into the green. Avoid any tendency to aim too far left or right, as this will complicate your approach shot significantly.

  2. Approach & recovery

    The approach shot is where this hole reveals its true character. The small green demands precise club selection and commitment to your target line. A mid-iron to long-iron will typically be required, depending on your tee shot placement and wind conditions. Focus on hitting the center of the green rather than chasing pins, especially if they're tucked in challenging positions. The green's undulating nature means even a well-struck shot to the wrong tier can leave a difficult two-putt. Take one extra club if you're between distances - being long is often better than coming up short on Ross greens.

  3. On the green

    Donald Ross greens are famous for their subtle breaks and challenging slopes, and this small putting surface is no exception. Spend time reading the overall slope and grain before your approach shot, as this knowledge will influence your target selection. Putts will generally break more than they appear, particularly on longer attempts. Focus on getting your first putt to the correct level of the green, as two-putting from the wrong tier can be extremely challenging. Lag putting is crucial here - aggressive attempts at distant pins often result in three-putts. ## RISK VS REWARD This hole offers limited risk/reward opportunities, which is typical of Ross design philosophy. The primary decision point comes with tee shot club selection - driver for a shorter approach versus accuracy-focused club for better positioning. Given the small green target, the reward for aggressive play is minimal compared to the penalty for missing your spots. The smart play is conservative positioning off the tee followed by a committed approach to the center of the green. ## DIFFERENT SKILL LEVELS **High-handicap players** should focus entirely on finding the fairway with their tee shot, even if it means using a hybrid or long iron. From there, aim for the center of the green regardless of pin position. Don't be tempted to attack tight pins - par is an excellent score on this challenging hole. **Low-handicap players** can be more aggressive with driver off the tee if they're striking it well, but should still respect the small green on the approach. Consider pin position more carefully, but remember that even tour professionals often aim for the fat part of Ross greens. The key is committing fully to your chosen target and accepting that par is often a good score here. This hole exemplifies why Detroit Golf Club's North Course is considered one of the finest Donald Ross designs in the Midwest - it rewards thoughtful play while punishing poor execution, making it a true test of golf strategy and skill.

  4. Watch for

    • Course conditioning and mapped hazards may affect line selection; confirm from the aerial.

The green on No. 9

Mapped boundary
Wide × deepyards
23×30
Areasq ft
4,369
Golfer feedback

How did Hole 9 play?

⚡ Quick Golfer Pulse

How did this hole play today?

1-tap anonymous vote

Frequently asked questions

Yardage reference: Championship tees · 453 yards.

What's the best strategy off the tee?

↓

For this 453-yard par 4, most players will hit driver to set up a comfortable approach.

How difficult is hole 9?

↓

This hole is one of the tougher holes on the course for most golfers. Key challenges include: long par 4, heavily bunkered, small green.

How big is the green on hole 9?

↓

The green is small and requires precision. Expect challenging pin positions with limited room for error.

What's a good score on hole 9?

↓

This hole is one of the tougher holes where par feels like birdie. A challenging par 4. Accept that bogey happens and avoid big numbers.