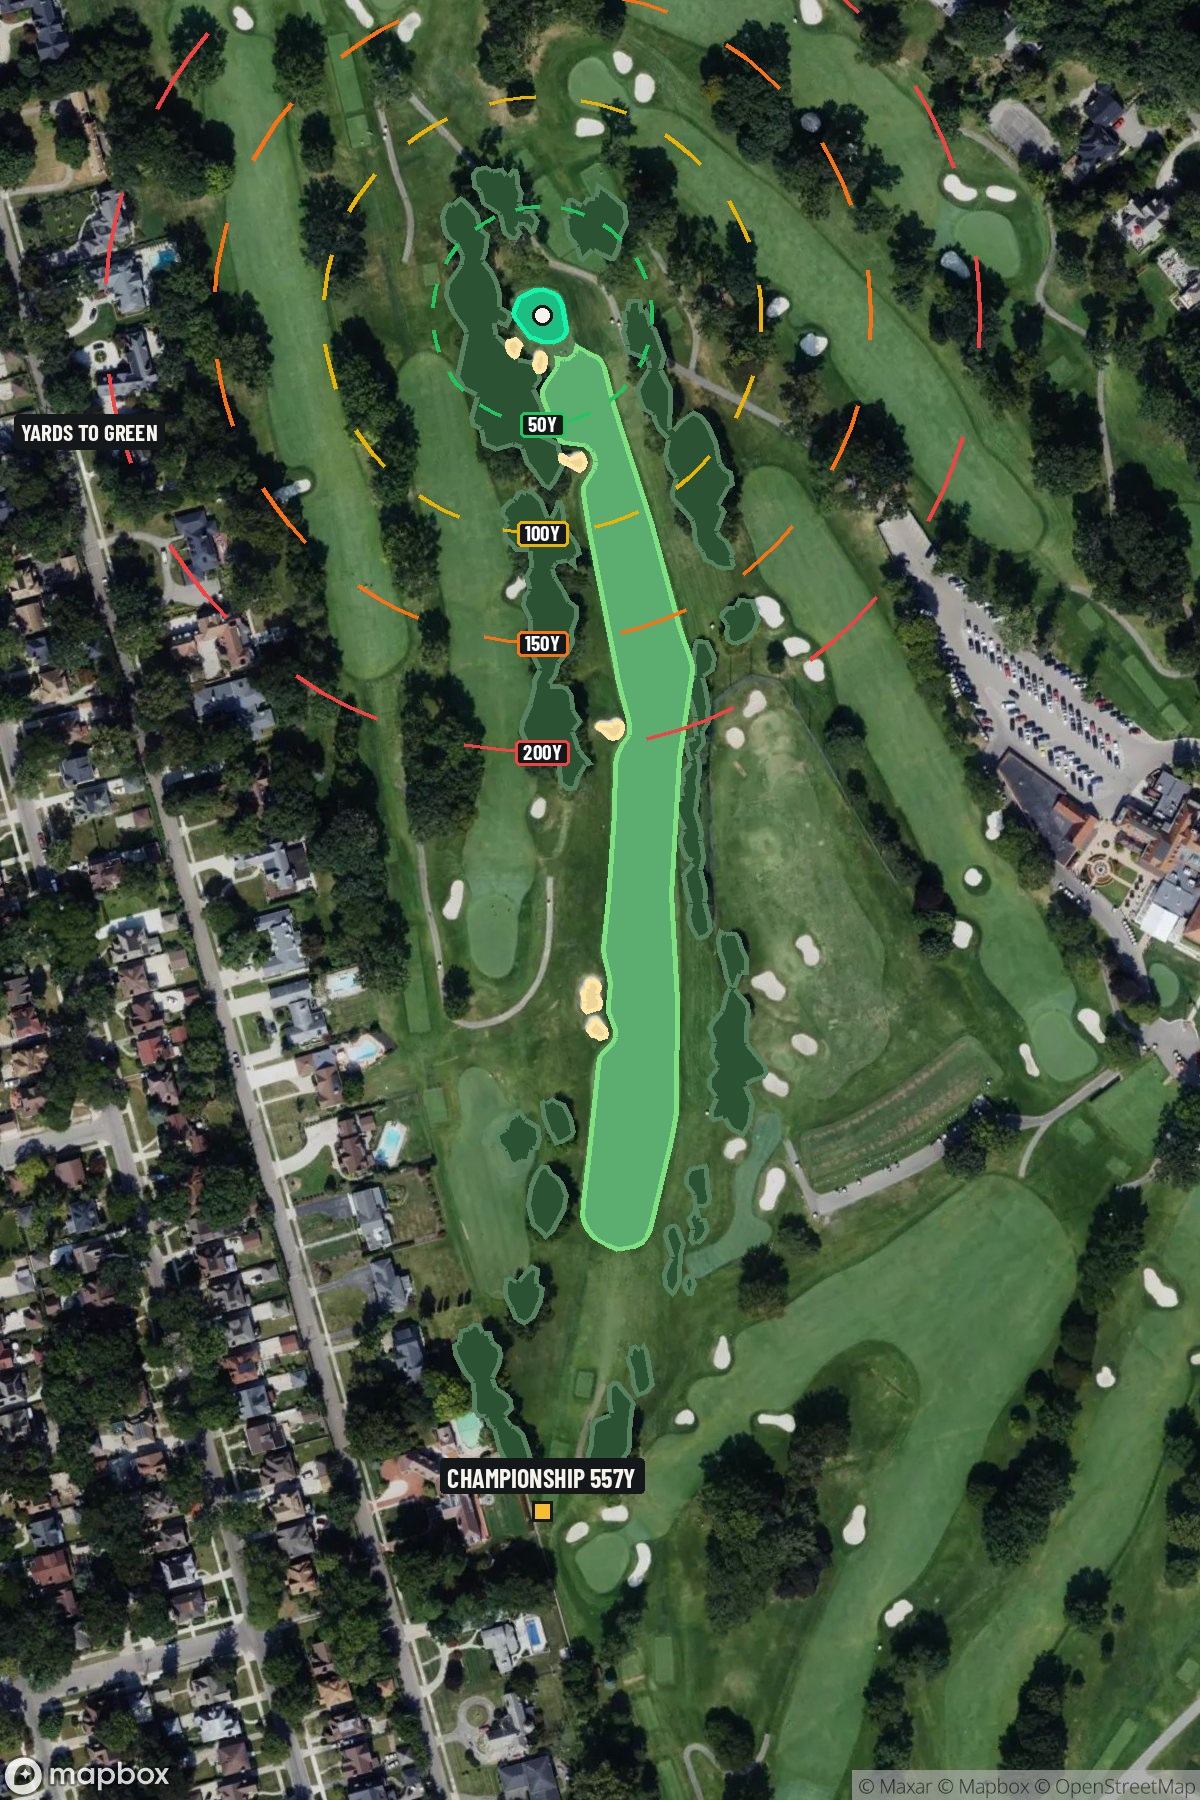
Hole 2 of 18 · Highland Park, Michigan

Hole 2 at Detroit Golf Club (North)

Par
5
Yards
557
Handicap
1
Bunkers
6
Hole 2 aerial at Detroit Golf Club (North)
Map distances from Championship tee · 557 yds

The map's printed distances are measured from the Championship tee to the green; they do not move when you change tees.

Green size: 26 yds deep × 26 yds wide

Mapbox Satellite composite · capture date not provided. Green at the top.

Where this map comes from

Satellite photo
Date not published
Mapbox satellite
Green contours
2017 survey
USGS lidar survey
Report a map problem
100%
Hole 2 aerial at Detroit Golf Club (North)

The plan for No. 2

The play: Detroit Golf Club (North) hole 2 presents a classic Donald Ross par 5 design that demands strategic thinking from the championship tees. This 557-yard test features three strategically placed fairway bunkers that make tee shot placement critical for setting up scoring opportunities. Long hitters can attempt to reach the well-guarded green in two, but must navigate the bunker complex with precision. Conservative players face their own challenge - a left-side cross bunker lurking inside the scoring zone that punishes poorly positioned lay-ups. The small, undulating green complex requires an accurate approach shot regardless of strategy, with Ross's signature contouring making distance control paramount. As the number one handicap hole, this early examination sets the tone for the round ahead.

Shot by shot

  1. Off the tee

    Your tee shot strategy should focus on finding the optimal position between the fairway bunkers rather than maximum distance. The three strategically placed bunkers create distinct landing zones, making club selection and target line crucial. Consider using a 3-wood or hybrid off the tee to ensure you stay in the fairway and set up the best angle for your second shot. Long hitters may be tempted to challenge the bunkers, but the risk rarely justifies the reward given the hole's uphill nature and well-guarded green.

  2. Approach & recovery

    For most players, this becomes a three-shot hole where your second shot sets up a short iron into the green. The key consideration is avoiding the left-side cross bunker located inside 100 yards - this hazard can destroy your scoring opportunity if you're laying up. Position your second shot to the right side of the fairway, leaving yourself a comfortable wedge distance to the green. Long hitters attempting to reach in two must navigate both the fairway bunkers and the challenging green complex, making this a high-risk proposition.

  3. On the green

    The small, contoured green features significant undulation that makes putting challenging even from close range. The green is well-guarded, meaning approach shots must be precise to avoid difficult recovery shots. Focus on hitting to the center of the green rather than attacking pins, as the undulations can help funnel well-struck shots toward the hole. Pay careful attention to the slope when reading putts - Ross greens are known for subtle breaks that can fool even experienced players. ## RISK VS REWARD The primary risk/reward decision comes on the second shot for long hitters considering going for the green in two. While the potential birdie or eagle is enticing, the combination of fairway bunkers, the uphill lie, and the small target makes this a low-percentage play. The smarter play is positioning your second shot for an optimal wedge angle, avoiding the left-side cross bunker and setting up a straightforward birdie opportunity. ## DIFFERENT SKILL LEVELS **High-handicap players** should treat this as a comfortable three-shot hole, using fairway woods or hybrids off the tee and for the second shot to ensure they stay in play. Focus on avoiding the bunkers entirely and leaving yourself a manageable third shot from inside 100 yards. **Low-handicap players** can be more aggressive with driver off the tee if they have confidence in their accuracy, but should still respect the strategic bunker placement. The decision to go for the green in two should depend on wind conditions, lie quality, and pin position - often the percentage play is still laying up to your favorite wedge distance. The uphill nature of this hole means it plays longer than the yardage suggests, so factor this into your club selection throughout. Remember, par is a good score on the #1 handicap hole, and smart course management will lead to more birdies than aggressive play.

  4. Watch for

    • Course conditioning and mapped hazards may affect line selection; confirm from the aerial.

The green on No. 2

Mapped boundary
Wide × deepyards
26×26
Areasq ft
4,177
Golfer feedback

How did Hole 2 play?

⚡ Quick Golfer Pulse

How did this hole play today?

1-tap anonymous vote

Frequently asked questions

Yardage reference: Championship tees · 557 yards.

Can this par 5 be reached in two?

↓

At 557 yards, A true three-shot hole for most players. Position your layup to leave a comfortable wedge distance.

How big is the green on hole 2?

↓

The green is small and requires precision. Expect challenging pin positions with limited room for error.