Hole 12 of 18 · Highland Park, Michigan

Hole 12 at Detroit Golf Club (North)

Par
4
Yards
459
Handicap
2
Bunkers
4
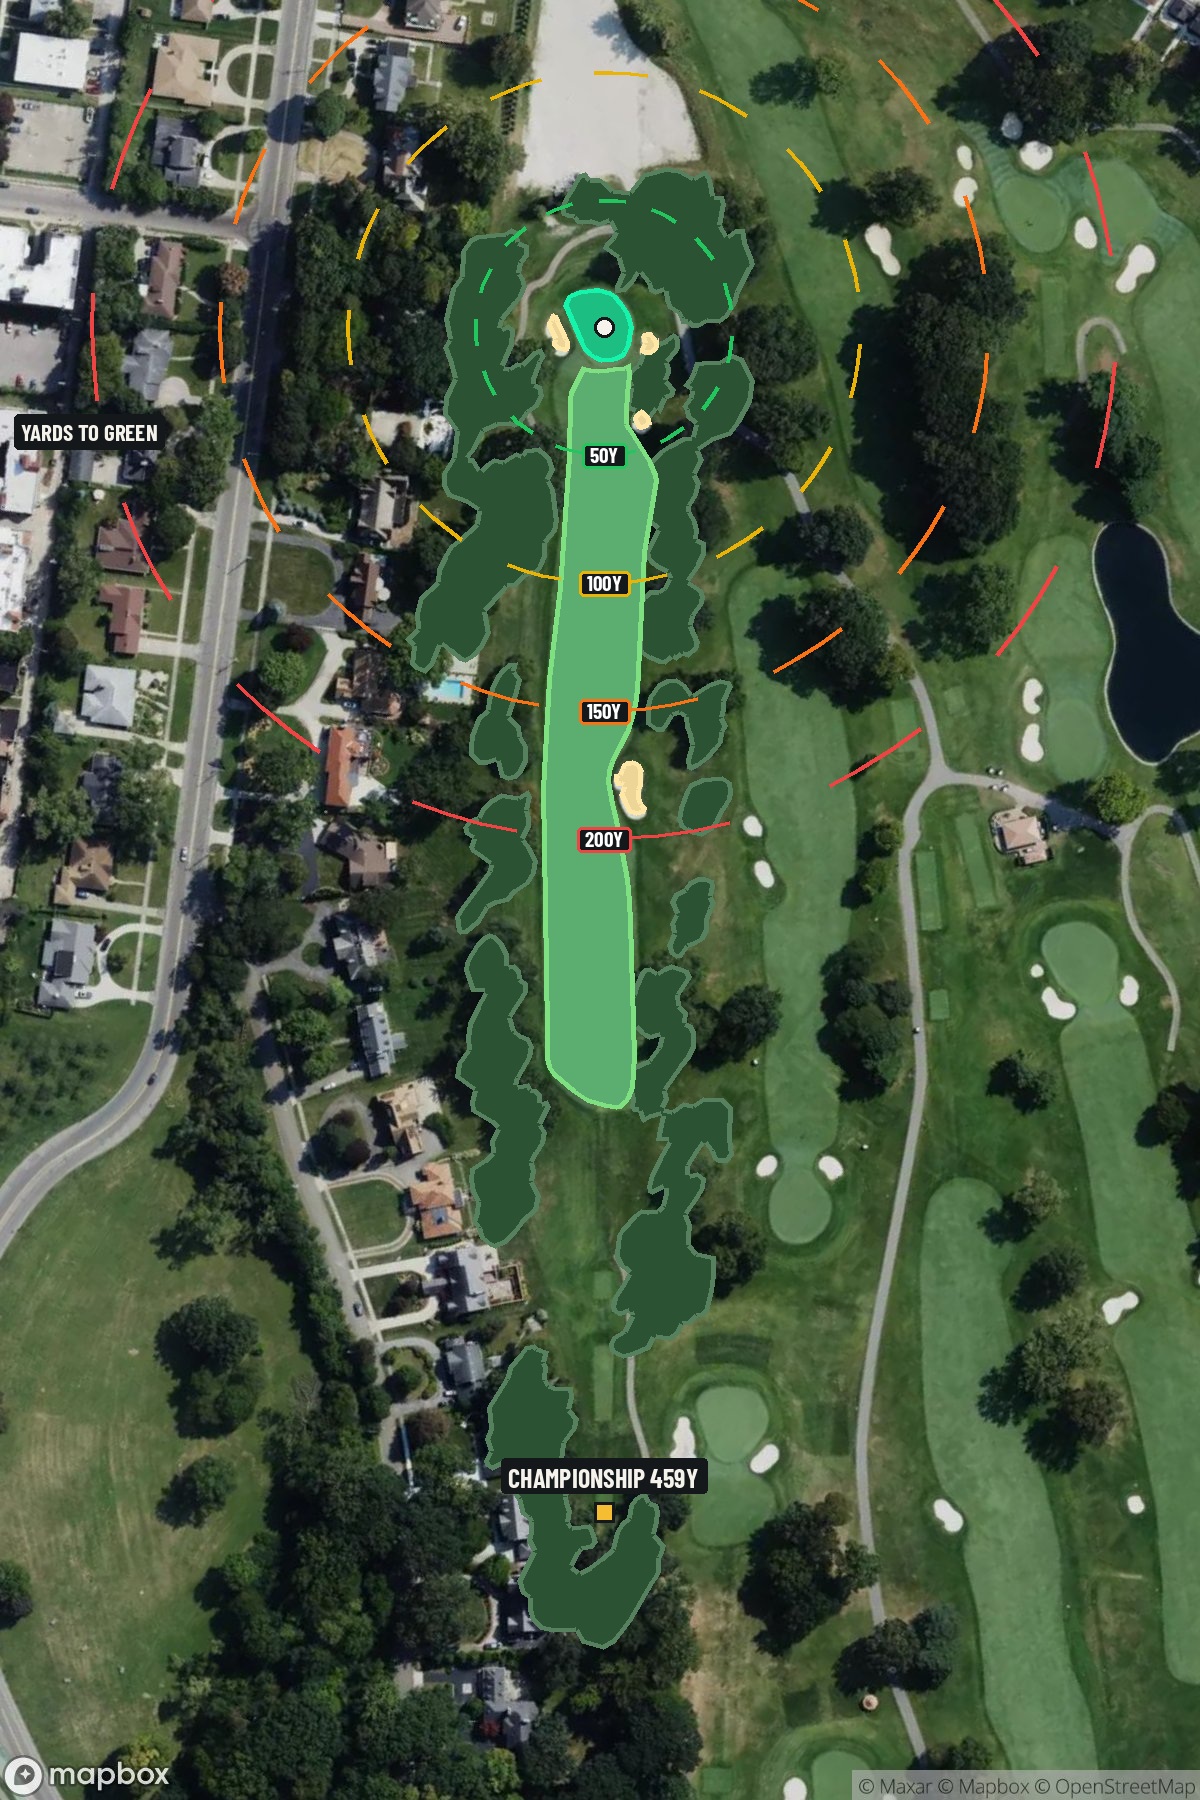
Hole 12 aerial at Detroit Golf Club (North)
Map distances from Championship tee · 459 yds

The map's printed distances are measured from the Championship tee to the green; they do not move when you change tees.

Green size: 29 yds deep × 27 yds wide

Mapbox Satellite composite · capture date not provided. Green at the top.

Where this map comes from

Satellite photo
Date not published
Mapbox satellite
Green contours
2017 survey
USGS lidar survey
Report a map problem
100%
Hole 12 aerial at Detroit Golf Club (North)

The plan for No. 12

The play: Detroit Golf Club (North) hole 12 stands as the course's second-most challenging par 4, demanding both precision and power across its 459 yards. This straight, no-nonsense test requires a committed tee shot down a generous fairway that gradually narrows toward the landing area. The absence of traditional hazards makes club selection and course management paramount, as players must position themselves for the optimal approach angle. The small, undulating green complex punishes wayward approach shots, rewarding only the most precise iron play. With its deceptively simple layout masking genuine difficulty, this hole epitomizes the strategic design principles that have made Detroit Golf Club a respected test of championship golf for over a century.

Shot by shot

  1. Off the tee

    The key to this hole begins with a well-positioned drive that sets up the optimal approach angle. With no significant hazards to navigate, focus shifts to finding the ideal section of fairway that provides the best angle into the small green. Favor the center-left portion of the fairway if possible, as this typically offers the most favorable approach angle to most pin positions. Club selection should prioritize accuracy over distance—a smooth driver or strong 3-wood that finds the fairway center is far more valuable than a longer drive that strays into the rough. The straight layout rewards commitment to your target line, so pick a specific spot in the fairway and execute with confidence.

  2. Approach & recovery

    The approach shot to this small green demands precision and proper club selection. With the green's compact size, there's little margin for error on distance control. Take one extra club and make a smooth, controlled swing rather than forcing a shot that might come up short or fly long. Pay close attention to pin position, as the small green means even a well-struck shot to the wrong section can leave a challenging putt. When the pin is tucked, resist the temptation to fire directly at it—instead, aim for the center of the green and rely on your putting to get close.

  3. On the green

    The small green size means most putts will be makeable, but don't underestimate the importance of speed control. With limited real estate, putts that roll too far past the hole can quickly find themselves off the putting surface or in difficult positions. Read the green carefully from multiple angles, as subtle breaks can be magnified on a smaller surface. Focus on getting your first putt close to the hole rather than trying to make everything—two-putting from anywhere on this green represents solid execution. ## RISK VS REWARD This hole offers a more subtle risk/reward proposition than many others. The reward comes from aggressive accuracy rather than aggressive distance. Players who can consistently find the fairway and hit the green in regulation will find scoring opportunities, while those who miss their spots will struggle to save par. The temptation might be to attack with driver and go for a shorter iron in, but the smart play often involves taking a more conservative approach that prioritizes position over pure distance. ## DIFFERENT SKILL LEVELS **Low Handicappers:** Should view this as a birdie opportunity with proper execution. Focus on finding the optimal section of fairway and being aggressive to the correct portion of the green. Don't settle for safe shots when you have the skills to be more precise. **Mid Handicappers:** Play to the center of everything—center of fairway, center of green. This hole rewards steady, consistent play over heroic shots. A well-executed bogey is better than a double bogey from trying to do too much. **High Handicappers:** Embrace the straightforward nature of this hole. Use it as an opportunity to play within your capabilities and focus on solid contact and course management. The lack of major hazards means you can play aggressively within your comfort zone. The 12th hole at Detroit Golf Club rewards the fundamental skills of golf—driving accuracy, approach shot precision, and smart decision-making. Master these elements, and you'll find this challenging par 4 becomes a genuine scoring opportunity.

  4. Watch for

    • Course conditioning and mapped hazards may affect line selection; confirm from the aerial.

The green on No. 12

Mapped boundary
Wide × deepyards
27×29
Areasq ft
4,716
Golfer feedback

How did Hole 12 play?

⚡ Quick Golfer Pulse

How did this hole play today?

1-tap anonymous vote

Frequently asked questions

Yardage reference: Championship tees · 459 yards.

What's the best strategy off the tee?

↓

For this 459-yard par 4, most players will hit driver to set up a comfortable approach.

How difficult is hole 12?

↓

This hole is a moderate challenge for most golfers. Key challenges include: long par 4, heavily bunkered.

How big is the green on hole 12?

↓

The green is medium-sized with moderate targets. Pay attention to pin placement when selecting your approach club.

What's a good score on hole 12?

↓

This hole is one of the tougher holes where par feels like birdie. A challenging par 4. Accept that bogey happens and avoid big numbers.