Hole 6 of 18 · Brewster, Washington

Hole 6 at Gamble Sands Golf and Inn

Par
3
Yards
264
Handicap
9
Bunker
1
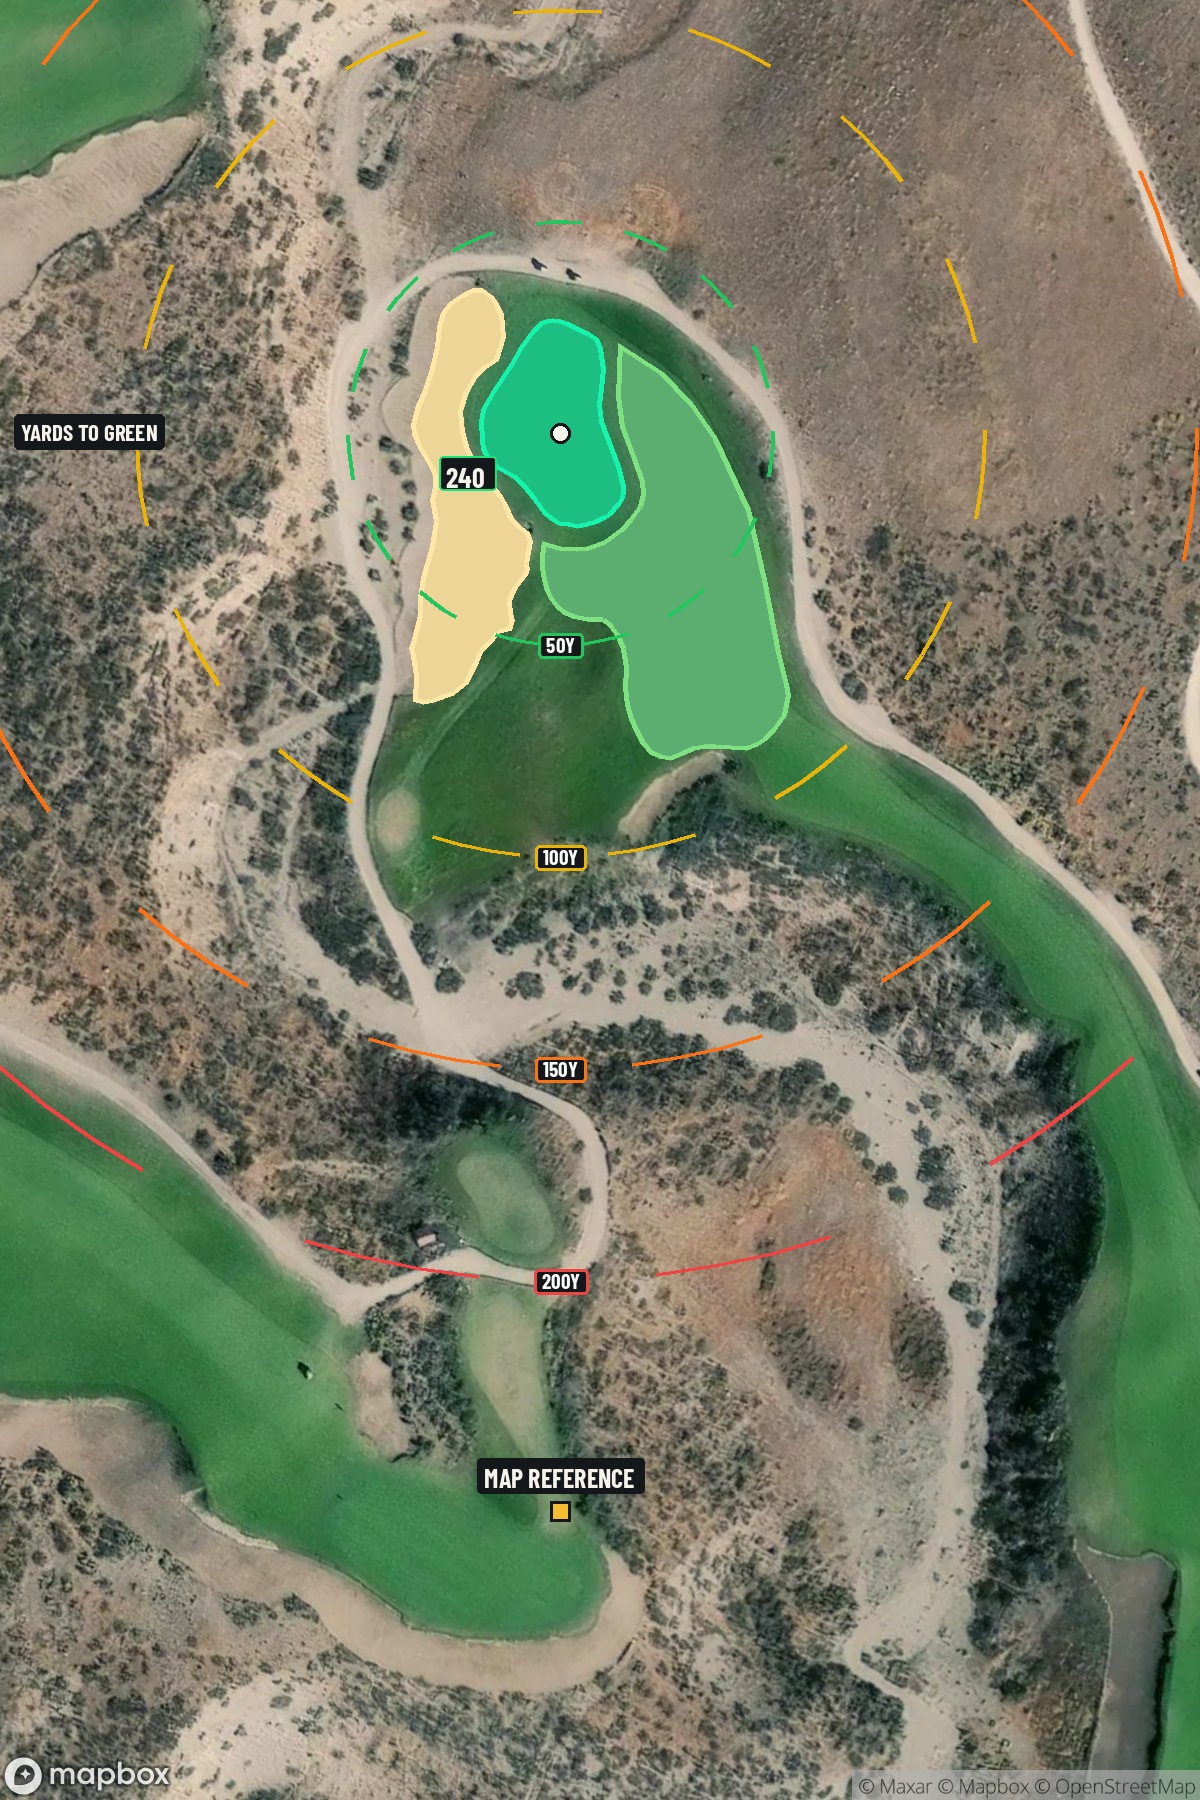
Hole 6 aerial at Gamble Sands Golf and Inn
Map distances from Map reference tee

The map's printed distances are measured from the Map reference tee to the green; they do not move when you change tees. Your Championship yardage is in the tiles above.

Green size: 50 yds deep × 35 yds wide

Mapbox Satellite composite · capture date not provided. Green at the top.

Where this map comes from

Satellite photo
Date not published
Mapbox satellite
Report a map problem
100%
Hole 6 aerial at Gamble Sands Golf and Inn

The plan for No. 6

These notes were written before the current map. Where their distances differ, trust the map.

The play: The 6th hole at Gamble Sands Golf and Inn presents a commanding par 3 that stretches 264 yards across the dramatic Columbia River valley landscape. This lengthy one-shotter demands a confident tee shot with a mid-to-long iron, where club selection becomes critical in the often-windy conditions of central Washington. The small target green sits beautifully framed against the expansive high desert terrain that makes Gamble Sands a premier destination golf experience. With minimal hazards protecting the putting surface, accuracy rather than course management defines success here. The hole's straightforward design allows golfers to focus purely on execution, making it a true test of ball-striking ability that perfectly captures the wide-open, scenic character of this remote Washington gem.

Shot by shot

  1. Off the tee

    Your tee shot strategy should prioritize reaching the green in regulation over trying to get close to the pin. Given the 264-yard distance, most players will need a long iron, hybrid, or fairway wood depending on conditions and personal distance. The target line should aim for the center of the green, as the small size leaves little margin for error on either side. Wind conditions are crucial at this elevated desert location - take an extra club if there's any headwind, and don't be afraid to swing smoothly rather than forcing the shot. The straight layout means there's no dogleg to navigate, so focus entirely on distance control and solid contact.

  2. Approach & recovery

    Since this is a par-3, your tee shot is your approach shot. The small green demands accuracy, so favor the center of the putting surface regardless of pin position. If the pin is tucked in a corner, resist the temptation to attack it directly - instead, play to the middle and rely on your putting to make up the difference. The elevated nature of many holes at Gamble Sands means you may need to account for shots playing slightly longer than the yardage suggests, especially in cooler morning conditions when the ball doesn't carry as far.

  3. On the green

    The small green size means most putts will be relatively short, but the compact nature can create subtle breaks that are easy to misread. Take time to read the green from multiple angles, as the desert terrain can create unexpected slopes. Focus on speed control - with a smaller target, leaving putts short is often preferable to running them well past the hole. Pay attention to the grain direction, which can be influenced by the prevailing winds in this exposed location. The putting surface, while small, should hold well-struck shots if you've selected the proper club. ## RISK VS REWARD This hole offers a clear risk/reward scenario: the reward of a birdie opportunity exists for players who can execute the proper distance, while the risk lies in missing the green entirely with such a long shot required. The absence of major hazards means a missed shot typically results in a manageable chip rather than a penalty stroke, making this a hole where aggressive play can pay dividends. The primary risk is coming up short and leaving a difficult uphill chip, or flying the green and facing a delicate downhill recovery shot. ## DIFFERENT SKILL LEVELS **High-handicap players** should focus on simply reaching the green in regulation. Select a club you're confident you can hit solidly - even if it means potentially going over the back of the green. A long putt or chip from behind the green is often easier than a short pitch shot from well in front. **Low-handicap players** can be more aggressive with pin hunting, especially when the flag is in the center portion of the green. These players should factor in the wind conditions more precisely and may consider attacking pins that are accessible based on their ball flight tendencies. **Mid-handicap players** should adopt a conservative-aggressive approach: aim for the center of the green but don't be afraid to take an extra club to ensure you reach the putting surface. This hole rewards course management over hero shots. The 6th hole at Gamble Sands exemplifies the strategic golf design that makes this central Washington destination so appealing - it's a hole where smart club selection and committed execution are more valuable than raw power.

  4. Watch for

    • Course conditioning and mapped hazards may affect line selection; confirm from the aerial.

The green on No. 6

Mapped boundary
Wide × deepyards
35×50
Areasq ft
10,500

Gear for Hole 6

We may earn a commission when you buy through these links.

Golfer feedback

How did Hole 6 play?

⚡ Quick Golfer Pulse

How did this hole play today?

1-tap anonymous vote

Frequently asked questions

Yardage reference: Championship tees · 264 yards.

What club should I use on this par 3?

↓

At 264 yards, most golfers will need a fairway wood or hybrid to reach this green. Adjust for elevation, wind, and pin position.

How difficult is hole 6?

↓

This hole is a moderate challenge for most golfers. Key challenges include: long par 3, large green requiring good lag putting.

What hazards should I watch out for on hole 6?

↓

Key hazards include: 1 greenside bunker. Plan your shots to avoid these trouble spots.

How big is the green on hole 6?

↓

The green is large and can play quite long. Three-putt territory if you don't manage your approach distance well.

What's a good score on hole 6?

↓

This hole is a challenging par where bogey is acceptable. This longer par 3 will test your long iron or hybrid game. Par is a good score.