Hole 14 of 18 · Brewster, Washington

Hole 14 at Gamble Sands Golf and Inn

Par
4
Yards
445
Handicap
2
Bunkers
5
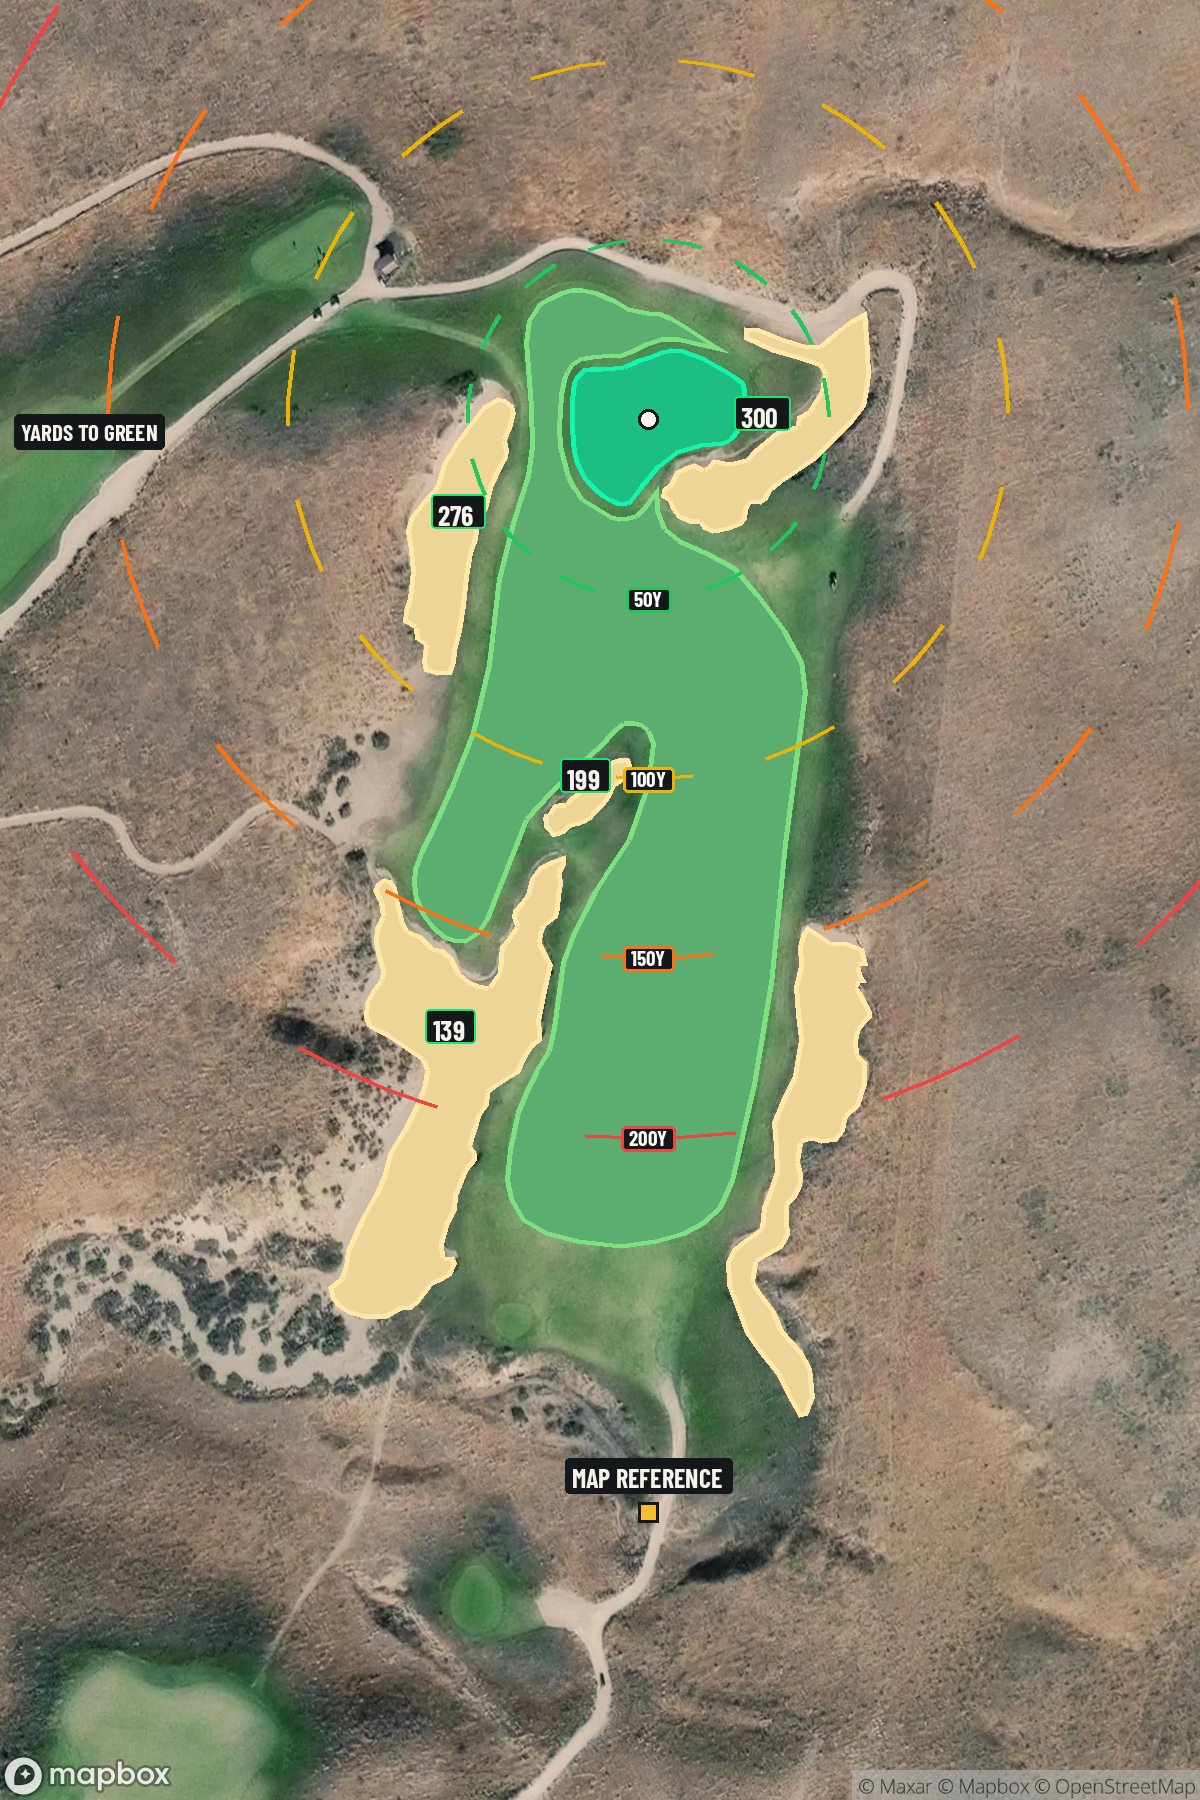
Hole 14 aerial at Gamble Sands Golf and Inn
Map distances from Map reference tee

The map's printed distances are measured from the Map reference tee to the green; they do not move when you change tees. Your Championship yardage is in the tiles above.

Green size: 44 yds deep × 49 yds wide

Mapbox Satellite composite · capture date not provided. Green at the top.

Where this map comes from

Satellite photo
Date not published
Mapbox satellite
Report a map problem
100%
Hole 14 aerial at Gamble Sands Golf and Inn

The plan for No. 14

These notes were written before the current map. Where their distances differ, trust the map.

The play: The 14th hole at Gamble Sands Golf and Inn stands as the course's second-most challenging test, demanding precision and power across its 445 yards. This straight par 4 epitomizes the firm, fast conditions that made Gamble Sands Golf Digest's Best New Public course, with sandy soil and fescue grasses rewarding creative shot-making. The tee shot must navigate the demanding fairway conditions that characterize this acclaimed Eastern Washington layout, where the ground game becomes crucial. The approach shot to the small green requires precise distance control, as the compact target offers little margin for error. With its intimidating handicap rating and unforgiving green complex, this hole separates contenders from pretenders in the dramatic Columbia River valley setting that defines Gamble Sands' unforgettable character.

Shot by shot

  1. Off the tee

    Your tee shot strategy should prioritize position over distance on this lengthy par 4. The firm fescue fairways will provide extra roll, so focus on finding the center of the fairway with a controlled swing. A driver or strong 3-wood will be needed to set up a manageable approach shot, but accuracy is paramount. Aim for the middle of the fairway and let the firm conditions work in your favor. The straight layout means there's no preferred side, making center-line the safest and most strategic target line.

  2. Approach & recovery

    With the green's small size being the primary defense, your approach shot requires pinpoint accuracy. The firm conditions mean shots will release upon landing, so plan for extra roll when selecting your club. A mid-iron to long-iron will typically be required from the landing area, depending on wind conditions and pin placement. Focus on the center of the green rather than attacking pins, as the small target leaves little margin for error. The fescue surrounds will grab any shot that misses the putting surface.

  3. On the green

    The small green at the 14th demands respect with your putter. Firm conditions mean putts will roll true but potentially faster than expected. Focus on getting your first putt close rather than being overly aggressive, as three-putts can quickly turn a good hole into a bogey or worse. Read the subtle breaks carefully, as the fescue grasses around the green can create optical illusions that affect your perception of slope. ## RISK VS REWARD This hole offers limited risk/reward opportunities, instead demanding steady, strategic play. The primary reward comes from executing your game plan rather than taking chances. Aggressive play is rarely rewarded here - the small green and firm conditions favor conservative, well-planned shots. The scoring opportunity lies in two solid shots rather than one heroic effort. ## DIFFERENT SKILL LEVELS **Low Handicappers:** Attack this hole with precision. Use the firm conditions to your advantage off the tee, then focus on distance control with your approach. The small green rewards players who can consistently hit their numbers. **Mid Handicappers:** Play conservatively and aim for the center of everything. Use one less club than normal to account for the firm conditions and focus on avoiding the fescue. Two-putt pars are excellent scores here. **High Handicappers:** Consider laying up if your second shot would require a long iron or hybrid. The small green makes it difficult to hold from distance, so a shorter approach with a more lofted club might yield better results. Focus on keeping the ball in play and avoiding big numbers. The key to conquering this challenging hole lies in embracing the firm, fast conditions that define Gamble Sands while respecting the precision required by the small green target.

  4. Watch for

    • Course conditioning and mapped hazards may affect line selection; confirm from the aerial.

The green on No. 14

Mapped boundary
Wide × deepyards
49×44
Areasq ft
13,155

Gear for Hole 14

We may earn a commission when you buy through these links.

Golfer feedback

How did Hole 14 play?

⚡ Quick Golfer Pulse

How did this hole play today?

1-tap anonymous vote

Frequently asked questions

Yardage reference: Championship tees · 445 yards.

What's the best strategy off the tee?

↓

For this 445-yard par 4, most players will hit driver to set up a comfortable approach.

How difficult is hole 14?

↓

This hole is a moderate challenge for most golfers. Key challenges include: heavily bunkered, large green requiring good lag putting.

How big is the green on hole 14?

↓

The green is large and can play quite long. Three-putt territory if you don't manage your approach distance well.

What's a good score on hole 14?

↓

This hole is a demanding hole where bogey is not unusual. This longer par 4 will test most golfers. Focus on position over distance.