Hole 15 of 18 · Brewster, Washington

Hole 15 at Gamble Sands Golf and Inn

Par
4
Yards
470
Handicap
4
Bunkers
3
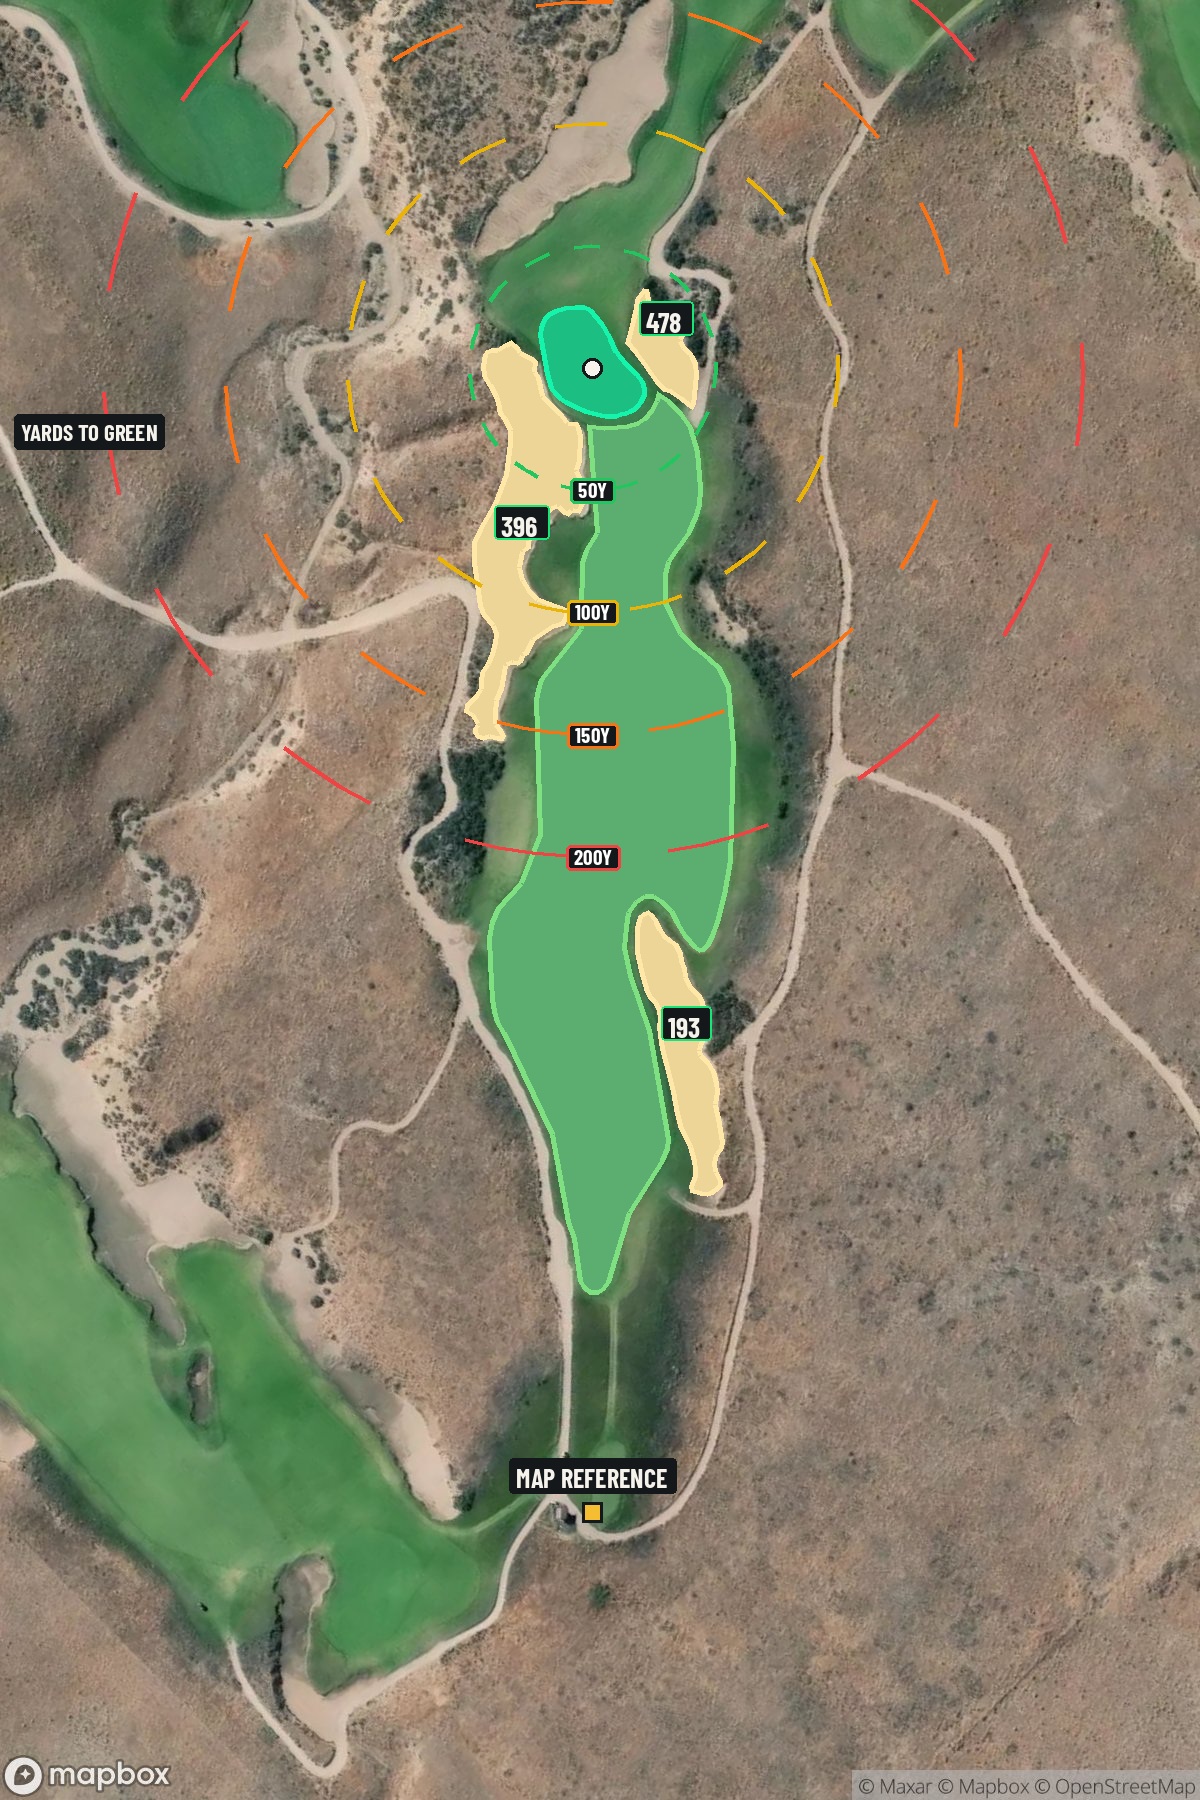
Hole 15 aerial at Gamble Sands Golf and Inn
Map distances from Map reference tee

The map's printed distances are measured from the Map reference tee to the green; they do not move when you change tees. Your Championship yardage is in the tiles above.

Green size: 46 yds deep × 44 yds wide

Mapbox Satellite composite · capture date not provided. Green at the top.

Where this map comes from

Satellite photo
Date not published
Mapbox satellite
Report a map problem
100%
Hole 15 aerial at Gamble Sands Golf and Inn

The plan for No. 15

These notes were written before the current map. Where their distances differ, trust the map.

The play: The 15th at Gamble Sands Golf and Inn marks a dramatic transition as David McLay Kidd's design descends toward the Columbia River, where pivotal canyon features define this challenging 470-yard par 4. This straight hole demands precision from the tee shot, as the terrain's natural undulations and fine fescue playing surfaces require strategic positioning for the lengthy approach shot. The small green complex sits beautifully framed against the expansive river views and distant Cascade Mountains, creating one of the course's most visually striking moments. As part of the final third where canyons become integral to play, the 15th tests every aspect of your game while rewarding accurate shots with stunning Pacific Northwest vistas that make this hole unforgettable.

Shot by shot

  1. Off the tee

    The tee shot strategy centers on finding the optimal position for your approach while respecting the canyon terrain. With the fairway running straight toward the green, focus on hitting your driver or strong 3-wood to a landing zone around 250-270 yards from the tee. The key is committing to your swing and avoiding the temptation to steer the ball, as the fine fescue turf will punish tentative swings. Target the center-left portion of the fairway to provide the best angle into the small green, and trust that Kidd's design rewards aggressive but accurate driving on this hole.

  2. Approach & recovery

    From a good drive, you'll face a mid-iron to long-iron approach into a small green that demands precision. The compact target requires you to commit fully to your club selection and swing, as coming up short or missing the green entirely will leave difficult recovery shots. Focus on taking enough club to ensure you reach the putting surface, as the bouncy fescue conditions can help a well-struck shot that lands just short. The straight layout means there's no preferred side to approach from, making accuracy more important than angle.

  3. On the green

    The small green size makes lag putting crucial, as three-putts can quickly derail your score on this challenging hole. Read the slopes carefully and focus on getting your first putt within a comfortable two-putt range rather than being overly aggressive. The putting surface likely features subtle breaks that become more pronounced in the afternoon winds common to this Columbia River location. Pay attention to grain direction, as the fine fescue surrounds can influence ball roll near the edges. ## RISK VS REWARD This hole presents a classic risk/reward scenario where aggressive play can yield birdies but conservative strategy ensures par. The primary reward comes from hitting driver to set up a shorter approach, but this requires precise execution given the canyon features. The safer play involves hitting 3-wood or hybrid off the tee, accepting a longer approach shot in exchange for finding the fairway. With the small green, the reward for aggressive approach shots is limited, making course management the key to success. ## DIFFERENT SKILL LEVELS **Low Handicap Players:** Attack this hole with driver, aiming for the optimal landing zone to leave a mid-iron approach. Focus on committing to your lines and trusting your distance control into the small green. Consider the pin position when selecting your approach club, and don't be afraid to take one extra club to ensure you reach the target. **High Handicap Players:** Play conservatively with 3-wood or hybrid off the tee to ensure you find the fairway. From there, take plenty of club on your approach and aim for the center of the green regardless of pin position. The small target makes precision more important than distance control, so focus on solid contact and let the yardage take care of itself. The 15th hole exemplifies Gamble Sands' ability to blend natural beauty with strategic golf, requiring both physical and mental commitment to score well in this dramatic canyon setting.

  4. Watch for

    • Course conditioning and mapped hazards may affect line selection; confirm from the aerial.

The green on No. 15

Mapped boundary
Wide × deepyards
44×46
Areasq ft
12,621

Gear for Hole 15

We may earn a commission when you buy through these links.

Golfer feedback

How did Hole 15 play?

⚡ Quick Golfer Pulse

How did this hole play today?

1-tap anonymous vote

Frequently asked questions

Yardage reference: Championship tees · 470 yards.

What's the best strategy off the tee?

↓

For this 470-yard par 4, most players will hit driver to set up a comfortable approach.

How difficult is hole 15?

↓

This hole is a moderate challenge for most golfers. Key challenges include: long par 4, large green requiring good lag putting.

How big is the green on hole 15?

↓

The green is large and can play quite long. Three-putt territory if you don't manage your approach distance well.

What's a good score on hole 15?

↓

This hole is one of the tougher holes where par feels like birdie. A challenging par 4. Accept that bogey happens and avoid big numbers.