Hole 11 of 18 · Brewster, Washington

Hole 11 at Gamble Sands Golf and Inn

Par
4
Yards
426
Handicap
10
Bunkers
4
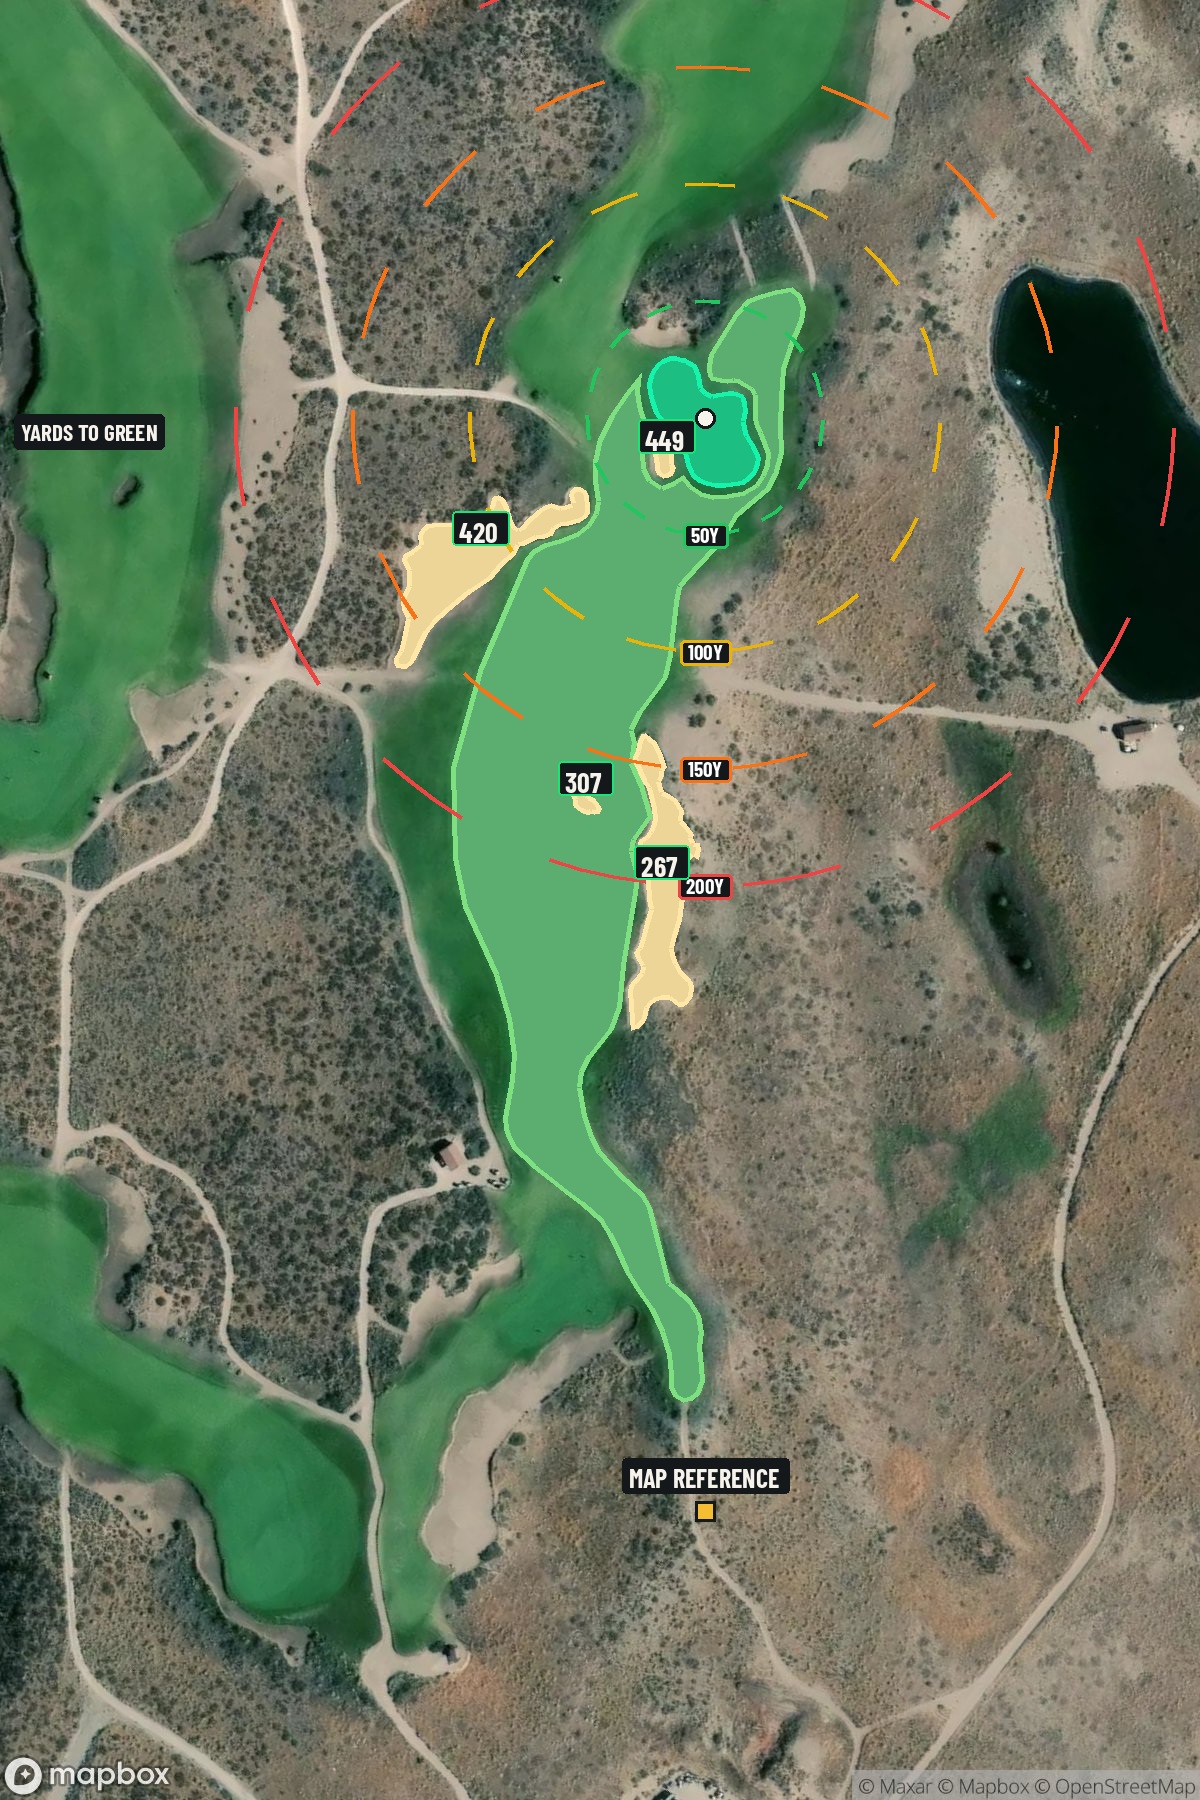
Hole 11 aerial at Gamble Sands Golf and Inn
Map distances from Map reference tee

The map's printed distances are measured from the Map reference tee to the green; they do not move when you change tees. Your Championship yardage is in the tiles above.

Green size: 56 yds deep × 48 yds wide

Mapbox Satellite composite · capture date not provided. Green at the top.

Where this map comes from

Satellite photo
Date not published
Mapbox satellite
Report a map problem
100%
Hole 11 aerial at Gamble Sands Golf and Inn

The plan for No. 11

These notes were written before the current map. Where their distances differ, trust the map.

The play: The 11th hole at Gamble Sands Golf and Inn presents a classic mid-length par 4 that exemplifies the course's strategic design philosophy in Washington's Columbia River valley. At 426 yards, this straight hole demands precision over power, with the tee positioned strategically just left of the 10th green creating a unique transitional moment in the round. The generous fairway invites an aggressive tee shot, but the compact green complex requires careful approach shot planning. Without major hazards to navigate, success depends on course management and reading the subtle contours of the small green. This hole showcases Gamble Sands' commitment to wide-open playing corridors that maximize enjoyment while still testing every aspect of your game, making it a memorable test of accuracy and touch.

Shot by shot

  1. Off the tee

    Focus on finding the fairway center with a controlled swing rather than trying to maximize distance. A driver or 3-wood should leave you in prime position, typically around 150-170 yards from the green depending on your length. The generous fairway allows for some margin of error, but staying in the short grass is essential for controlling your approach to the small target ahead. Consider the wind conditions, which can be significant in this exposed Columbia River valley location, and club accordingly.

  2. Approach & recovery

    Your approach shot is where this hole's true challenge reveals itself. The small green requires pinpoint accuracy, making club selection and tempo critical. A mid-iron to long-iron will typically be your weapon of choice, but focus on committing to a smooth, controlled swing. Aim for the center of the green regardless of pin position - the small target makes aggressive pin-hunting a risky proposition. Take one extra club if you're between distances to ensure you carry any front-edge trouble and give yourself the best chance at a makeable putt.

  3. On the green

    The compact putting surface demands respect and precision. Read your putts carefully, as subtle breaks can be magnified on a smaller green. Focus on getting your first putt close rather than being overly aggressive, as three-putting from longer distances becomes more likely on a small target. Pay attention to grain direction, which can be influenced by the prevailing winds in this valley setting. ## RISK VS REWARD This hole rewards conservative, strategic play over aggressive tactics. The risk/reward equation favors accuracy and course management - there's little benefit to taking unnecessary chances when par represents a solid score. The small green acts as the hole's primary defense, making your approach shot the critical scoring moment rather than the tee shot. ## DIFFERENT SKILL LEVELS **High-Handicap Players:** Focus on keeping the ball in play off the tee with whatever club gives you confidence. From the fairway, prioritize hitting the green over getting close to the pin. A bogey here isn't catastrophic, so avoid the big numbers by playing within your abilities. **Low-Handicap Players:** Use this hole as a scoring opportunity through precise execution. Consider position A on your tee shot based on typical pin locations, and be aggressive with your approach only when you have a comfortable yardage and good lie. This is where superior short-iron play can create birdie chances. The 11th hole at Gamble Sands exemplifies strategic golf design - rewarding thoughtful play while punishing careless execution through its demanding small green target.

  4. Watch for

    • Course conditioning and mapped hazards may affect line selection; confirm from the aerial.

The green on No. 11

Mapped boundary
Wide × deepyards
48×56
Areasq ft
14,788

Gear for Hole 11

We may earn a commission when you buy through these links.

Golfer feedback

How did Hole 11 play?

⚡ Quick Golfer Pulse

How did this hole play today?

1-tap anonymous vote

Frequently asked questions

Yardage reference: Championship tees · 426 yards.

What's the best strategy off the tee?

↓

For this 426-yard par 4, most players will hit driver to set up a comfortable approach.

How difficult is hole 11?

↓

This hole is a moderate challenge for most golfers. Key challenges include: heavily bunkered, large green requiring good lag putting.

How big is the green on hole 11?

↓

The green is large and can play quite long. Three-putt territory if you don't manage your approach distance well.