Hole 18 of 18 · Brewster, Washington

Hole 18 at Gamble Sands Golf and Inn

Par
5
Yards
578
Handicap
6
Bunkers
4
Hole 18 aerial at Gamble Sands Golf and Inn
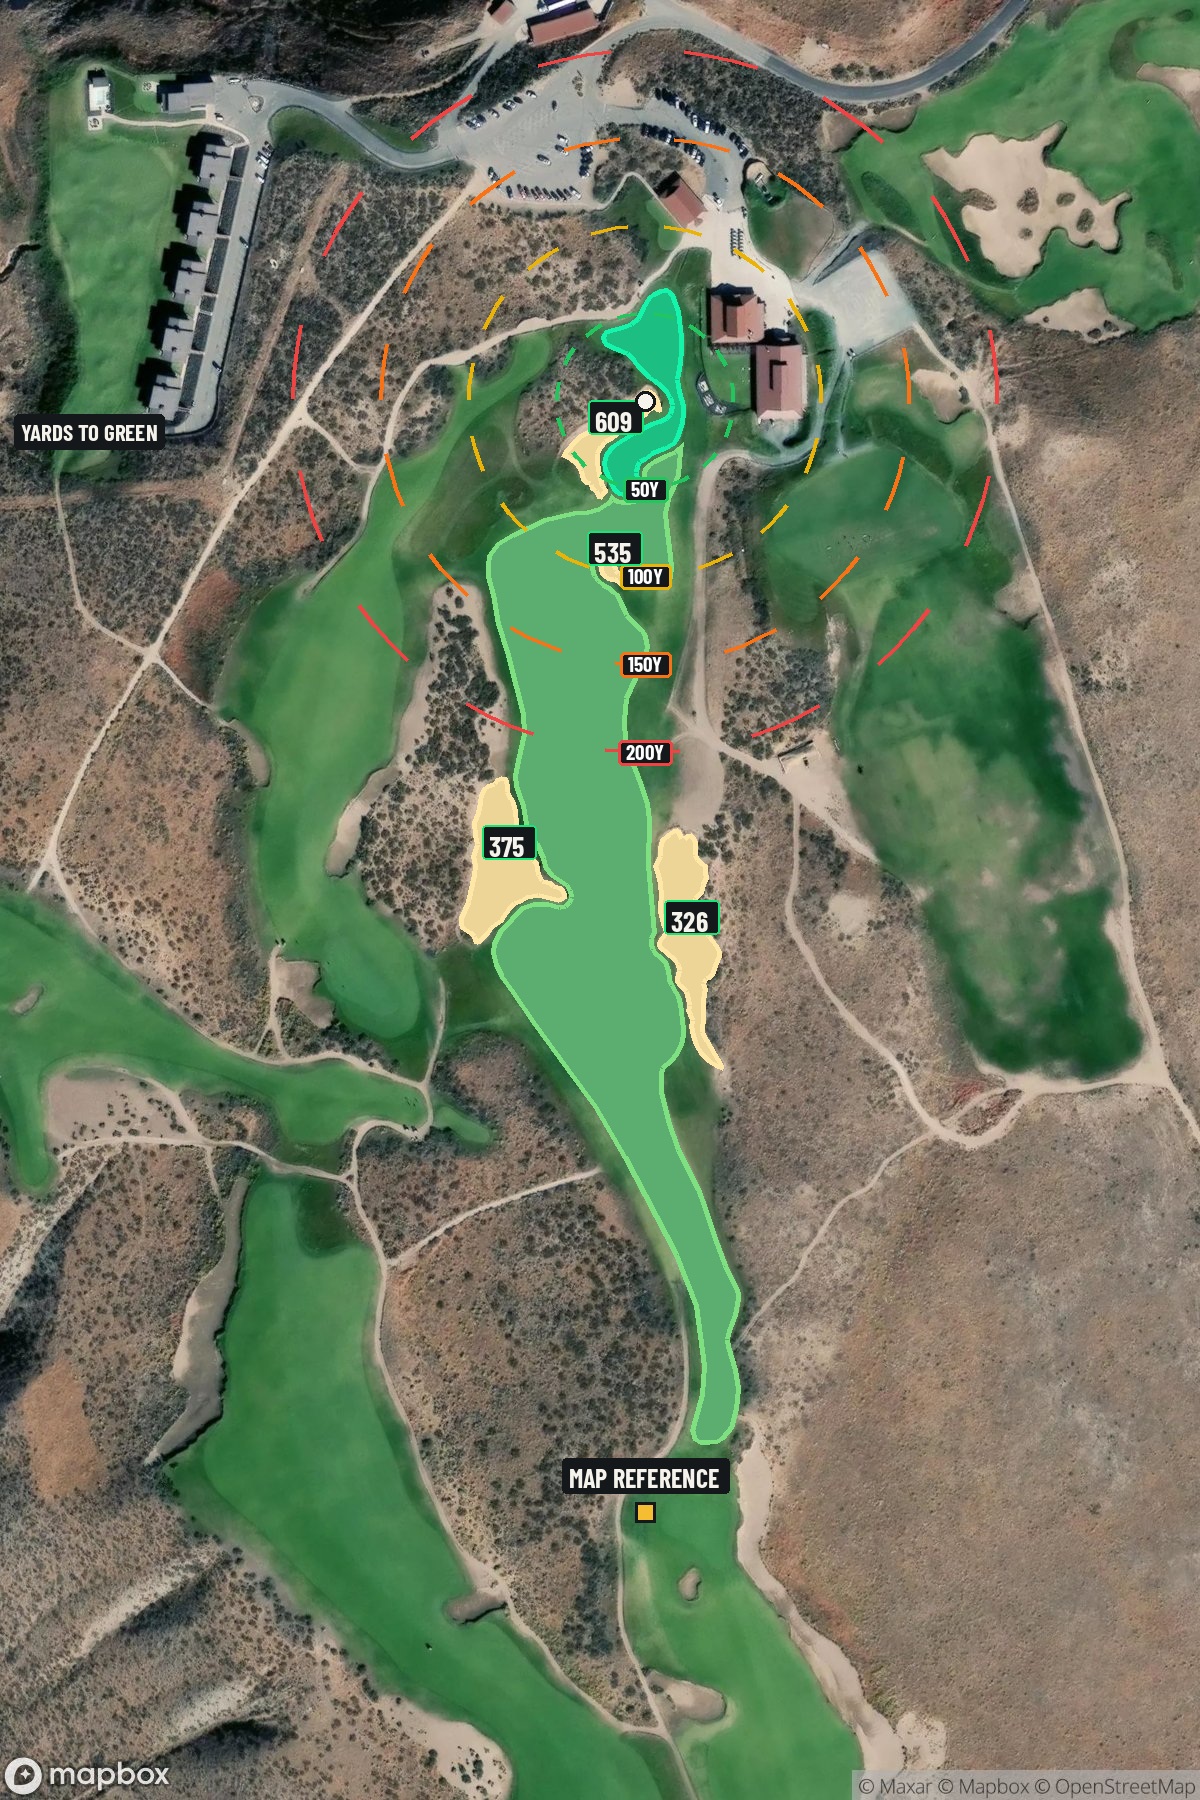
Map distances from Map reference tee

The map's printed distances are measured from the Map reference tee to the green; they do not move when you change tees. Your Championship yardage is in the tiles above.

Green size: 119 yds deep × 48 yds wide

Mapbox Satellite composite · capture date not provided. Green at the top.

Where this map comes from

Satellite photo
Date not published
Mapbox satellite
Report a map problem
100%
Hole 18 aerial at Gamble Sands Golf and Inn

The plan for No. 18

These notes were written before the current map. Where their distances differ, trust the map.

The play: The closing hole at Gamble Sands Golf and Inn delivers a fitting finale to McLay Kidd's acclaimed Sands Course design. This 578-yard par 5 presents a straightforward challenge that rewards aggressive play while punishing wayward shots. The generous fairway invites confident tee shots, but precision becomes paramount as golfers navigate toward the compact green complex. With minimal hazards protecting the target, the hole's defense lies in its demanding length and the premium placed on accurate approach shots into the small putting surface. The straight layout allows players to unleash their power, making eagle opportunities possible for those who execute properly. As the 6th handicap hole, it provides a thrilling conclusion where both birdies and bogeys remain in play, embodying the strategic variety that has earned this Washington gem widespread recognition since its 2014 opening.

Shot by shot

  1. Off the tee

    Your tee shot strategy should focus on finding the optimal position in the landing zone, typically around the 250-280 yard mark depending on your distance capabilities. With the fairway relatively open, driver is often the right choice for most players, but the key is accuracy over pure distance. Aim for the center-right portion of the fairway to set up the best angle for your second shot. The straight layout means you can be aggressive off the tee, but don't let the lack of obvious trouble lull you into complacency - position is everything on this hole.

  2. Approach & recovery

    Your approach shot options will largely depend on your tee shot execution and personal distance capabilities. Longer hitters may have a legitimate chance to reach the small green in two, but this requires perfect positioning and club selection. For most players, laying up to your favorite wedge distance (typically 80-120 yards) is the smart play. When going for the green in two, target the center and play for par with an outside chance at eagle. The small green size means precision trumps power - a well-struck mid-iron to the heart of the green beats a poorly executed fairway wood every time.

  3. On the green

    The small green demands respect with your putting approach. Without specific knowledge of the green's contours, focus on getting your approach shots to the center of the putting surface to minimize challenging reads. Speed control becomes critical on smaller greens, as there's less margin for error. Take extra time to read the break and commit to your line - this is your chance to capitalize on good approach play or salvage par after a wayward shot. ## RISK VS REWARD This hole epitomizes classic risk/reward golf strategy. The temptation to go for the green in two is strong, especially as the finishing hole, but the small target requires honest self-assessment. If you're within comfortable range with a mid-iron or less, the reward often justifies the risk. However, if you're between clubs or facing a long iron/fairway wood, the percentage play is laying up. Remember, a comfortable birdie putt after three well-executed shots often beats a difficult up-and-down after an aggressive miss. ## DIFFERENT SKILL LEVELS **High-handicap players** should view this as a three-shot hole and focus on advancing the ball safely with each swing. Driver off the tee for distance, then a comfortable iron or hybrid to set up a short wedge approach. Don't be tempted by the green-in-two option unless you're hitting it exceptionally well that day. **Low-handicap players** can be more aggressive, especially if they've positioned themselves well off the tee. With precise distance control and confidence in their iron play, going for the green becomes a viable scoring opportunity. However, even scratch players should respect the small green and have a clear bail-out strategy if the shot doesn't feel right. The 18th at Gamble Sands rewards smart target line selection and disciplined club selection while punishing overaggressive play with its demanding small green. Make your decisions early, commit to your strategy, and finish your round at this acclaimed McLay Kidd design with confidence.

  4. Watch for

    • Course conditioning and mapped hazards may affect line selection; confirm from the aerial.

The green on No. 18

Mapped boundary
Wide × deepyards
48×119
Areasq ft
25,280

Gear for Hole 18

We may earn a commission when you buy through these links.

Golfer feedback

How did Hole 18 play?

⚡ Quick Golfer Pulse

How did this hole play today?

1-tap anonymous vote

Frequently asked questions

Yardage reference: Championship tees · 578 yards.

Can this par 5 be reached in two?

↓

At 578 yards, A true three-shot hole for most players. Position your layup to leave a comfortable wedge distance.

How difficult is hole 18?

↓

This hole is a moderate challenge for most golfers. Key challenges include: long par 5, heavily bunkered, large green requiring good lag putting.

How big is the green on hole 18?

↓

The green is large and can play quite long. Three-putt territory if you don't manage your approach distance well.

What's a good score on hole 18?

↓

This hole is a true three-shot hole where birdie requires execution. This longer par 5 demands patience. Two good shots set up the scoring opportunity.