Hole 13 of 18 · Brewster, Washington

Hole 13 at Gamble Sands Golf and Inn

Par
5
Yards
562
Handicap
8
Bunkers
4
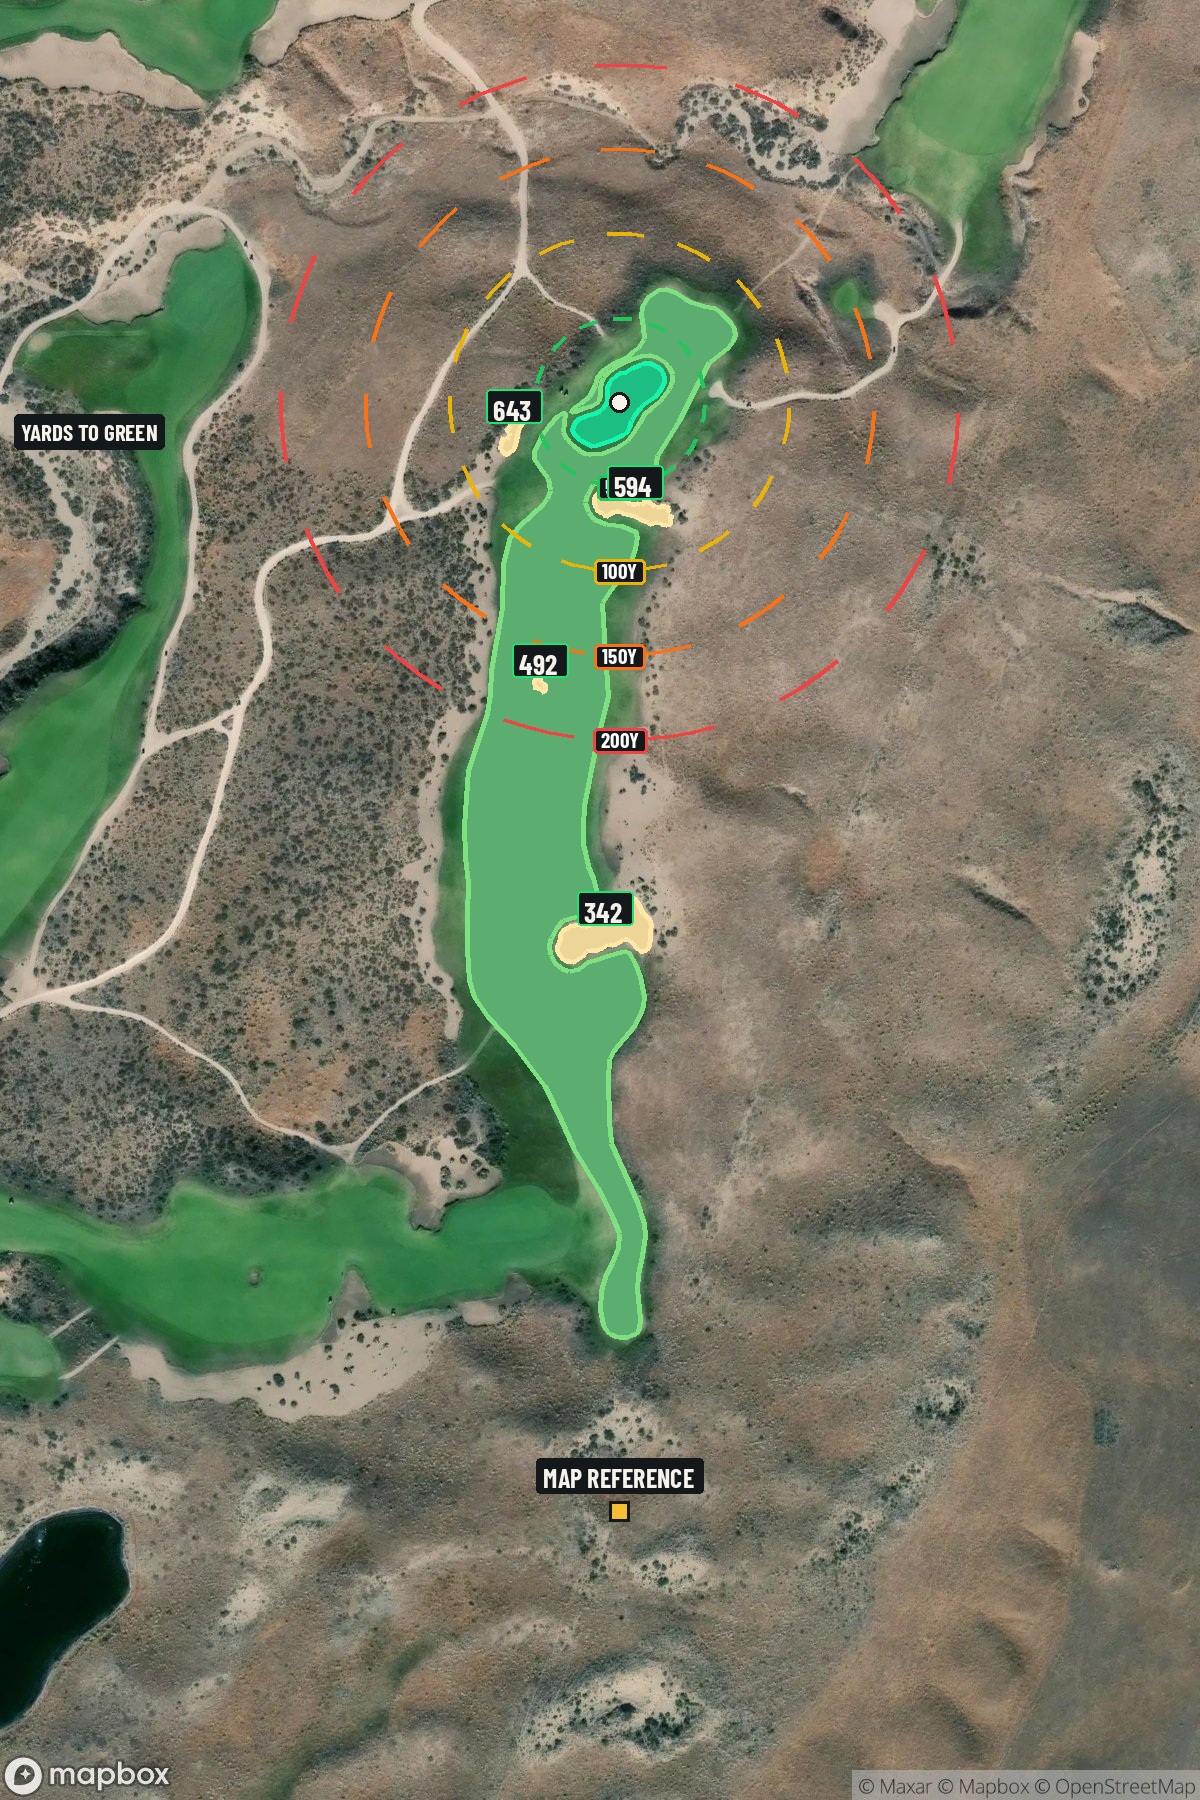
Hole 13 aerial at Gamble Sands Golf and Inn
Map distances from Map reference tee

The map's printed distances are measured from the Map reference tee to the green; they do not move when you change tees. Your Championship yardage is in the tiles above.

Green size: 51 yds deep × 57 yds wide

Mapbox Satellite composite · capture date not provided. Green at the top.

Where this map comes from

Satellite photo
Date not published
Mapbox satellite
Report a map problem
100%
Hole 13 aerial at Gamble Sands Golf and Inn

The plan for No. 13

These notes were written before the current map. Where their distances differ, trust the map.

The play: The 13th hole at Gamble Sands Golf and Inn stands as one of the course's signature par 5 challenges, stretching 562 yards through the dramatic Washington landscape. This wickedly contoured hole features two imposing bunkers guarding the right side, creating a strategic puzzle that demands careful course management. The straight layout allows aggressive players to unleash their driver, but the small green complex requires precision on the approach shot. With its moderate handicap rating of 8, this hole rewards bold play while punishing wayward shots. The combination of length, strategic bunkering, and the demanding green makes this par 5 a true test of skill and one of Gamble Sands' most memorable holes.

Shot by shot

  1. Off the tee

    Your tee shot strategy should prioritize finding the center-left portion of the fairway to avoid the influence of those intimidating right-side bunkers on your approach. A controlled driver or strong 3-wood will set up the ideal position, keeping you away from any rough areas while maintaining enough distance for a comfortable second shot. Focus on a smooth tempo rather than maximum distance - the real scoring happens with precise positioning for your approach shots. Target the left-center of the landing zone to open up the best angle to the green.

  2. Approach & recovery

    The approach phase is where this hole reveals its true character. With the small green heavily contoured and those massive bunkers lurking right, your second shot should focus on getting into the optimal position for your final approach - typically within 100-120 yards of the green. Favor the left side of the fairway to create the best angle away from the bunkers. Your final approach demands pinpoint accuracy; aim for the center of the green regardless of pin position, as the severe contours will funnel errant shots into trouble. A controlled mid-iron that lands softly will serve you better than a aggressive wedge that might spin back off the green.

  3. On the green

    The wickedly contoured putting surface requires careful study before your first putt. These undulations can create dramatic breaks that aren't immediately apparent from ground level. Focus on speed control above all else - the contours will amplify any pace errors. When facing challenging pin positions, especially those near the edges, prioritize getting your first putt to the fat part of the green rather than attacking the flag. Two-putting from the center is always preferable to three-putting from an aggressive position. ## RISK VS REWARD This hole offers a classic risk/reward scenario disguised as a straightforward par 5. The temptation to attack the green in two exists for longer hitters, but the small target and severe bunkers make this a dangerous gamble. The smart play is laying up to your favorite wedge distance, then attacking with a controlled approach. The reward for patience is significant - a well-positioned wedge shot can create legitimate birdie opportunities, while aggressive play often leads to bogey or worse. ## DIFFERENT SKILL LEVELS **High Handicappers:** Play this as a three-shot hole without exception. Use a fairway wood or hybrid off the tee for accuracy, then advance the ball with your most reliable club for the second shot. Focus on avoiding the right-side bunkers entirely by aiming left of center on all shots. Accept par as an excellent score and don't let the par 5 designation tempt you into risky decisions. **Low Handicappers:** While you have the distance to potentially reach in two, carefully assess conditions and your lie before attempting this. The small green and severe contours make this a low-percentage play unless conditions are perfect. Most scratch players will lay up to create a full wedge shot, as this provides the best control for attacking the demanding green complex. The key is recognizing when to be aggressive and when to play for a comfortable birdie chance.

  4. Watch for

    • Course conditioning and mapped hazards may affect line selection; confirm from the aerial.

The green on No. 13

Mapped boundary
Wide × deepyards
57×51
Areasq ft
13,258

Gear for Hole 13

We may earn a commission when you buy through these links.

Golfer feedback

How did Hole 13 play?

⚡ Quick Golfer Pulse

How did this hole play today?

1-tap anonymous vote

Frequently asked questions

Yardage reference: Championship tees · 562 yards.

Can this par 5 be reached in two?

↓

At 562 yards, A true three-shot hole for most players. Position your layup to leave a comfortable wedge distance.

How difficult is hole 13?

↓

This hole is a moderate challenge for most golfers. Key challenges include: long par 5, heavily bunkered, large green requiring good lag putting.

How big is the green on hole 13?

↓

The green is large and can play quite long. Three-putt territory if you don't manage your approach distance well.

What's a good score on hole 13?

↓

This hole is a true three-shot hole where birdie requires execution. This longer par 5 demands patience. Two good shots set up the scoring opportunity.