Hole 7 of 18 · Brewster, Washington

Hole 7 at Gamble Sands Golf and Inn

Par
5
Yards
493
Handicap
7
Bunkers
5
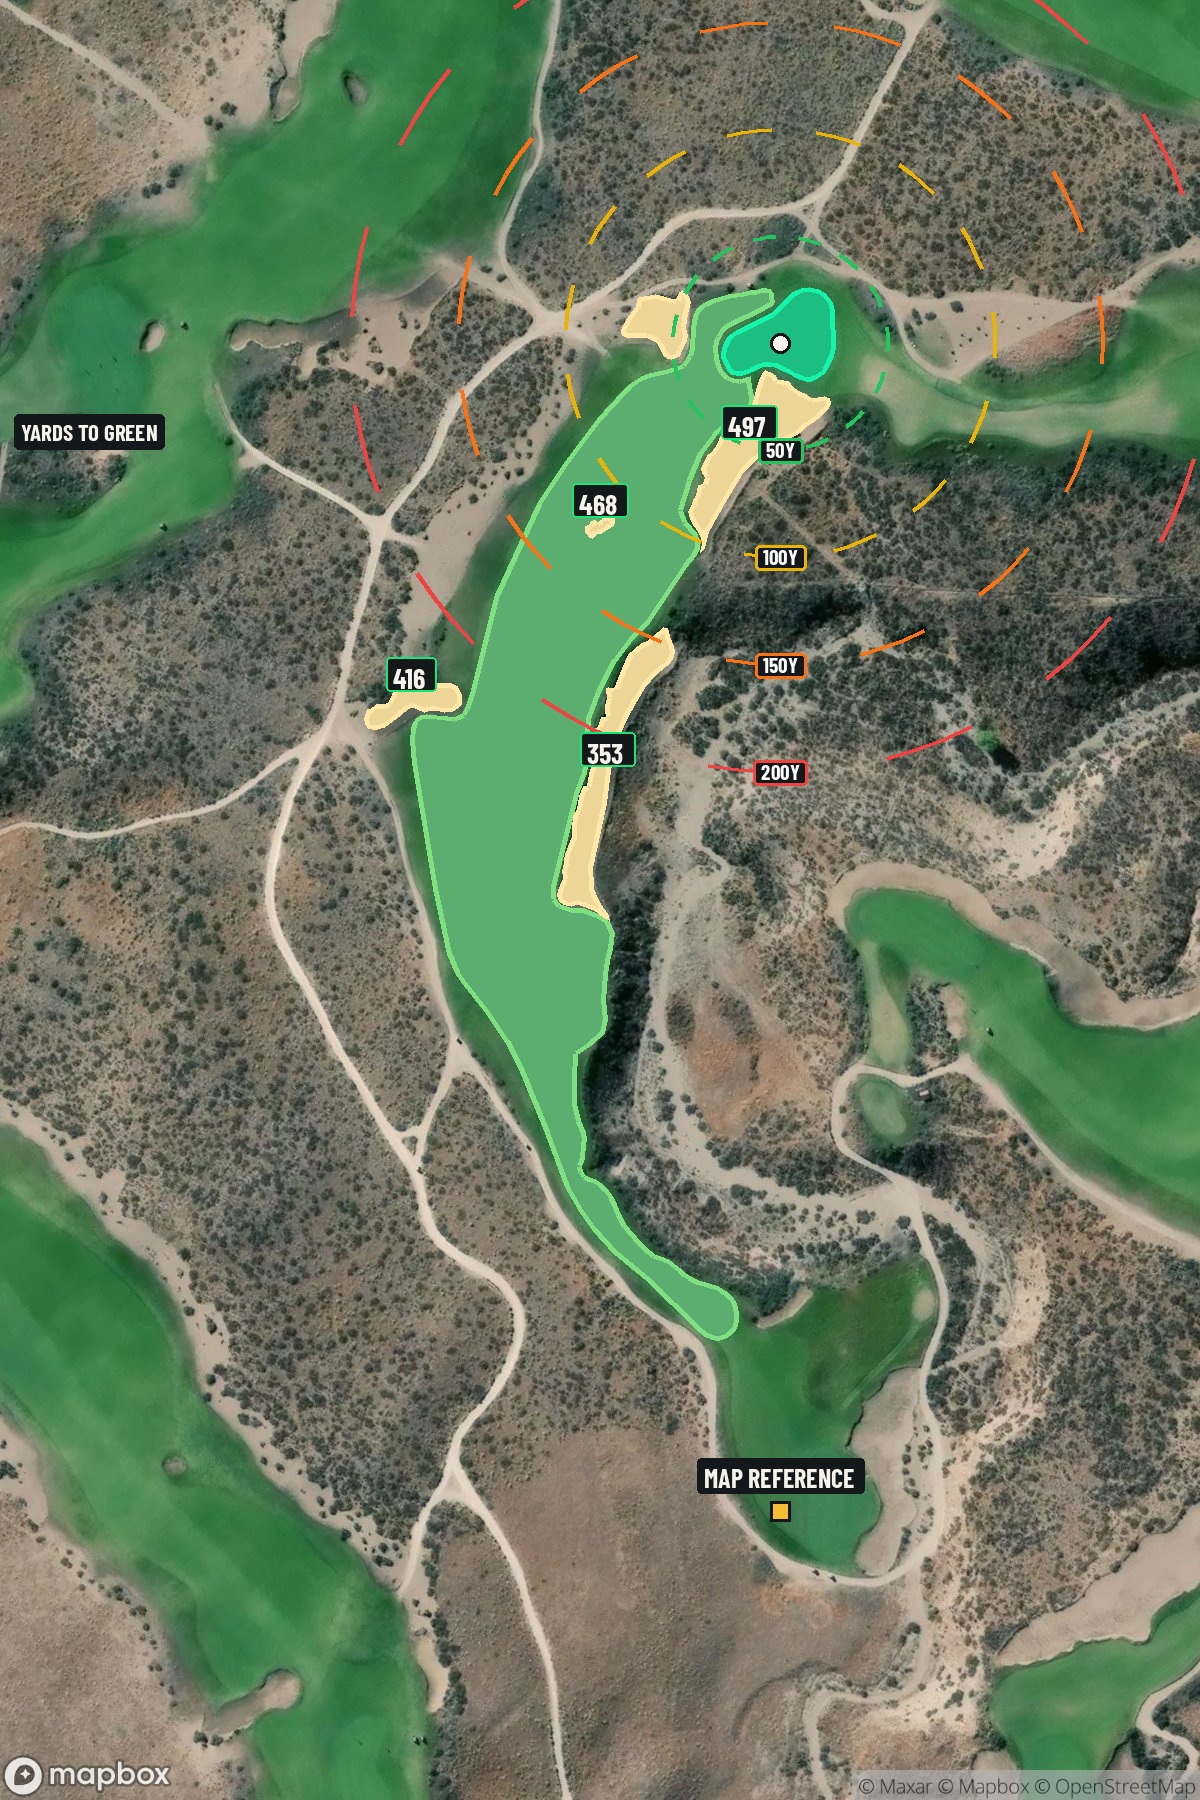
Hole 7 aerial at Gamble Sands Golf and Inn
Map distances from Map reference tee

The map's printed distances are measured from the Map reference tee to the green; they do not move when you change tees. Your Championship yardage is in the tiles above.

Green size: 44 yds deep × 53 yds wide

Mapbox Satellite composite · capture date not provided. Green at the top.

Where this map comes from

Satellite photo
Date not published
Mapbox satellite
Report a map problem
100%
Hole 7 aerial at Gamble Sands Golf and Inn

The plan for No. 7

These notes were written before the current map. Where their distances differ, trust the map.

The play: The seventh hole at Gamble Sands Golf and Inn presents a deceptively strategic par 5 that embodies McLay Kidd's masterful design philosophy across this premier Washington resort. At 493 yards, this straight-away hole invites aggressive play while demanding precision throughout. The generous fairway welcomes a confident tee shot, but the true test emerges on the approach to the compact green complex. Without significant hazards protecting the landing areas, golfers must rely on course management and club selection to navigate this seemingly straightforward challenge. The small green rewards accurate iron play and punishes overly aggressive approaches. This hole perfectly captures the essence of Gamble Sands' championship pedigree, where strategic thinking trumps raw power in McLay Kidd's thoughtfully crafted desert landscape.

Shot by shot

  1. Off the tee

    Your tee shot strategy should prioritize finding the fairway center while setting up an ideal approach distance. A well-struck driver or 3-wood down the middle gives you maximum flexibility for your second shot. The straight layout means you can be aggressive with your target line, aiming directly at the fairway's heart. Without hazards to avoid, focus on achieving good distance while maintaining control - this hole rewards position over pure length. Consider the wind conditions carefully, as the open terrain of eastern Washington can significantly impact ball flight. A smooth, controlled swing will serve you better than an all-out effort, especially given that reaching the green in two isn't necessary for scoring well.

  2. Approach & recovery

    The approach shot presents the hole's primary strategic decision. The small green size makes accuracy paramount, whether you're going for the green in two or laying up for a wedge. If attempting to reach in two, target the center of the green regardless of pin position - the compact target leaves little margin for error. For most players, a strategic layup to your favorite wedge distance proves the smarter play. Position your second shot to leave a comfortable approach shot, typically in the 80-120 yard range where you can attack the pin with confidence. The small green rewards precise distance control, so choose a layup distance that matches your most reliable scoring club.

  3. On the green

    The small putting surface demands respect and conservative putting strategy. With limited green space, approach putts should prioritize getting close rather than hunting pins. Focus on the center of the green on your approach, then read the subtle breaks carefully - McLay Kidd's greens often feature more movement than initially apparent. Distance control becomes crucial on putts, as running past the hole on this compact surface can leave challenging return putts. Play for the fat part of the hole and trust your read rather than trying to be too precise with your line. ## RISK VS REWARD This hole offers a classic risk/reward scenario. Going for the green in two provides an eagle opportunity and almost guarantees birdie if executed properly. However, the small target significantly increases the difficulty, with missed approaches potentially leaving challenging up-and-downs. The conservative layup approach virtually guarantees a birdie opportunity with proper execution and removes big numbers from play. Given the hole's moderate length, most players benefit from the percentage play, especially considering this is just one scoring opportunity among many at Gamble Sands. ## DIFFERENT SKILL LEVELS **High-handicap players** should embrace the three-shot approach without hesitation. Use this hole as a confidence builder by playing within your capabilities - fairway, layup to comfortable distance, wedge to center of green. The lack of hazards makes this an ideal hole to focus on solid fundamentals and course management. **Low-handicap players** can be more aggressive, particularly in favorable conditions. Consider going for the green if you can carry your approach shot at least 200 yards with accuracy. However, don't let ego override smart golf strategy - even skilled players benefit from the high-percentage layup when conditions or lie aren't ideal. The key for all skill levels is recognizing that this hole rewards patience and precision over power. At a premier destination like Gamble Sands, taking advantage of scoring opportunities through smart course management will lead to more memorable rounds than forcing difficult shots.

  4. Watch for

    • Course conditioning and mapped hazards may affect line selection; confirm from the aerial.

The green on No. 7

Mapped boundary
Wide × deepyards
53×44
Areasq ft
14,186

Gear for Hole 7

We may earn a commission when you buy through these links.

Golfer feedback

How did Hole 7 play?

⚡ Quick Golfer Pulse

How did this hole play today?

1-tap anonymous vote

Frequently asked questions

Yardage reference: Championship tees · 493 yards.

Can this par 5 be reached in two?

↓

At 493 yards, Reachable in two for longer hitters. Consider laying up short of hazards if going for it is risky.

How difficult is hole 7?

↓

This hole is a good scoring opportunity for most golfers. Key challenges include: heavily bunkered, large green requiring good lag putting.

How big is the green on hole 7?

↓

The green is large and can play quite long. The green is wider than it is deep, rewarding shots that find the correct tier. Three-putt territory if you don't manage your approach distance well.

What's a good score on hole 7?

↓

This hole is a reachable par 5 with eagle chances for longer hitters. Birdie is very much in play here if you can set up a good approach.