Hole 10 of 18 · Brewster, Washington

Hole 10 at Gamble Sands Golf and Inn

Par
3
Yards
147
Handicap
18
Bunkers
2
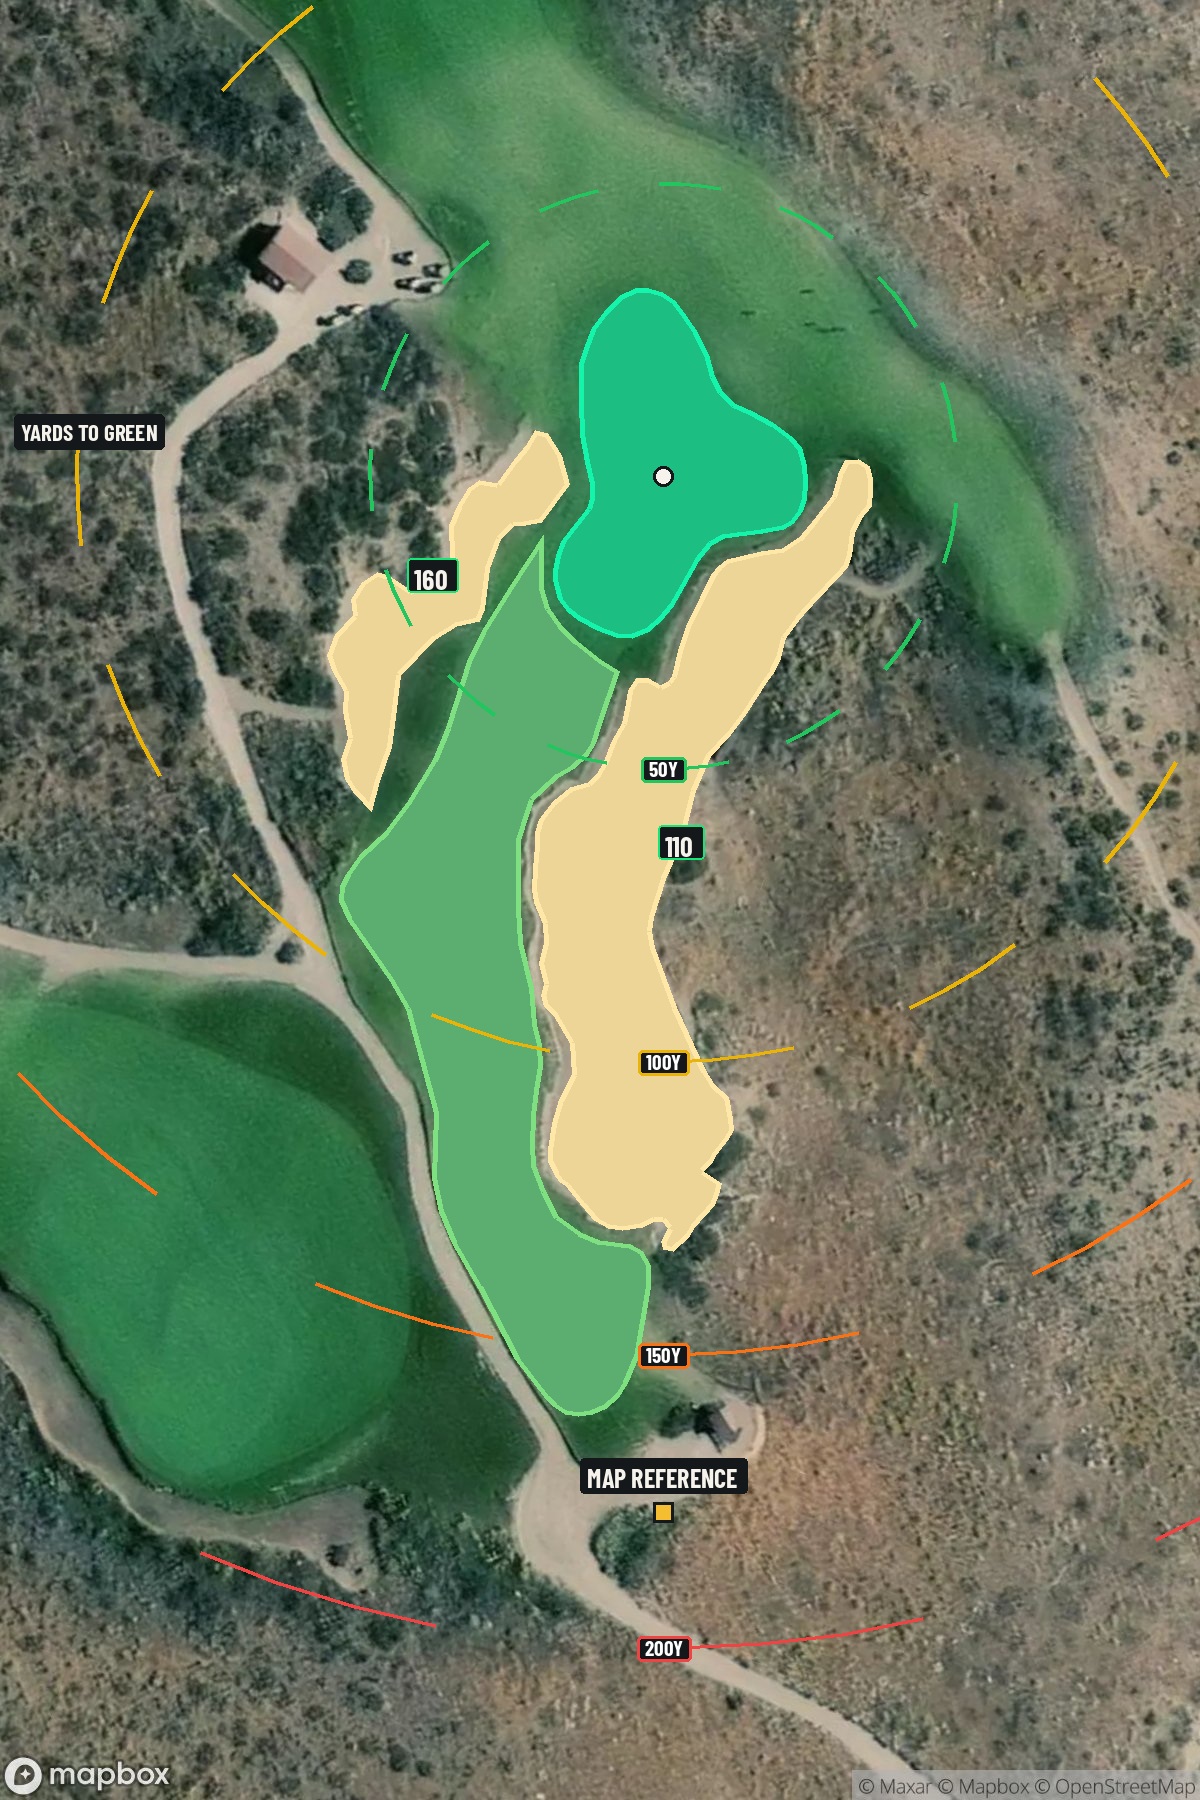
Hole 10 aerial at Gamble Sands Golf and Inn
Map distances from Map reference tee

The map's printed distances are measured from the Map reference tee to the green; they do not move when you change tees. Your Championship yardage is in the tiles above.

Green size: 60 yds deep × 43 yds wide

Mapbox Satellite composite · capture date not provided. Green at the top.

Where this map comes from

Satellite photo
Date not published
Mapbox satellite
Report a map problem
100%
Hole 10 aerial at Gamble Sands Golf and Inn

The plan for No. 10

These notes were written before the current map. Where their distances differ, trust the map.

The play: The 10th hole at Gamble Sands Golf and Inn presents a deceptively straightforward par 3 that embodies the course's Scottish links character across 147 yards of pristine Washington landscape. This short iron test demands precision over power, with its small green target requiring golfers to commit fully to their club selection and execution. The hole's strategic positioning as the easiest handicap suggests accessibility, yet the compact putting surface punishes anything but crisp, accurate strikes. Set against the dramatic Columbia River valley backdrop that defines Gamble Sands' visual appeal, this par 3 offers a moment of tranquil focus before the back nine's challenges intensify. The absence of significant hazards places premium emphasis on distance control and green-reading skills.

Shot by shot

  1. Off the tee

    Club selection is everything on this 147-yard par-3. Most golfers will be looking at a mid-iron to short-iron, but the key is choosing a club that allows you to make a confident, controlled swing. Take one extra club and swing smoothly rather than forcing a shorter iron. The small green rewards precision, so focus on tempo and balance throughout your swing. Aim for the center of the green unless you have a clear read on the pin position and feel confident about your distance control.

  2. Approach & recovery

    Since this is a par-3, your tee shot is your approach. The absence of significant hazards means you can be aggressive with your target line, but the small green size demands respect. Pay close attention to wind conditions, as they'll have a greater impact on a mid-iron shot than you might expect. If the pin is tucked to one side, consider whether your current form and confidence level warrant attacking it or if the smart play is the fat part of the green.

  3. On the green

    The small green means most putts will be relatively short, but don't let that fool you into complacency. Take time to read the subtle breaks and grain direction. With Gamble Sands' links-style design, expect the putting surfaces to have more character than they initially appear. Focus on speed control, as short putts on small greens can still get away from you if you're not careful with pace. ## RISK VS REWARD The primary risk/reward decision comes in club selection and pin hunting. The reward of attacking a tucked pin for a close birdie opportunity must be weighed against the penalty of missing the small green entirely. Given the handicap rating of 18, this hole is designed to give back strokes, so the smart play usually favors the center of the green over hero shots. ## DIFFERENT SKILL LEVELS **High-Handicap Players:** Take the safe route to the center of the green with a club that ensures you won't come up short. A bogey here hurts more than usual given the handicap rating, so prioritize finding the putting surface. Don't worry about pin position – just get on the green and two-putt for par. **Low-Handicap Players:** This is a hole where you should be thinking birdie. Use your distance control skills to attack pins when conditions allow, but maintain discipline when the pin position or conditions suggest playing to the fat part of the green. Your short game skills should allow you to be more aggressive, but remember that even scratch golfers need to respect small greens. The 10th hole at Gamble Sands exemplifies the resort's philosophy of offering "wide open viewing and playing for maximum enjoyment" while still demanding thoughtful golf strategy. Make the smart play here, and you'll walk to the next tee with momentum on your side.

  4. Watch for

    • Course conditioning and mapped hazards may affect line selection; confirm from the aerial.

The green on No. 10

Mapped boundary
Wide × deepyards
43×60
Areasq ft
13,848

Gear for Hole 10

We may earn a commission when you buy through these links.

Golfer feedback

How did Hole 10 play?

⚡ Quick Golfer Pulse

How did this hole play today?

1-tap anonymous vote

Frequently asked questions

Yardage reference: Championship tees · 147 yards.

What club should I use on this par 3?

↓

At 147 yards, most golfers will need a short iron (9-iron to PW) to reach this green. Adjust for elevation, wind, and pin position.

How difficult is hole 10?

↓

This hole is a good scoring opportunity for most golfers. Key challenges include: large green requiring good lag putting.

How big is the green on hole 10?

↓

The green is large and can play quite long. The green is wider than it is deep, rewarding shots that find the correct tier. Three-putt territory if you don't manage your approach distance well.

What's a good score on hole 10?

↓

This hole is a legitimate birdie opportunity for accurate iron players. Most golfers should target par, with birdie chances if you hit the green in regulation.