Hole 16 of 18 · Brewster, Washington

Hole 16 at Gamble Sands Golf and Inn

Par
3
Yards
220
Handicap
14
Bunkers
3
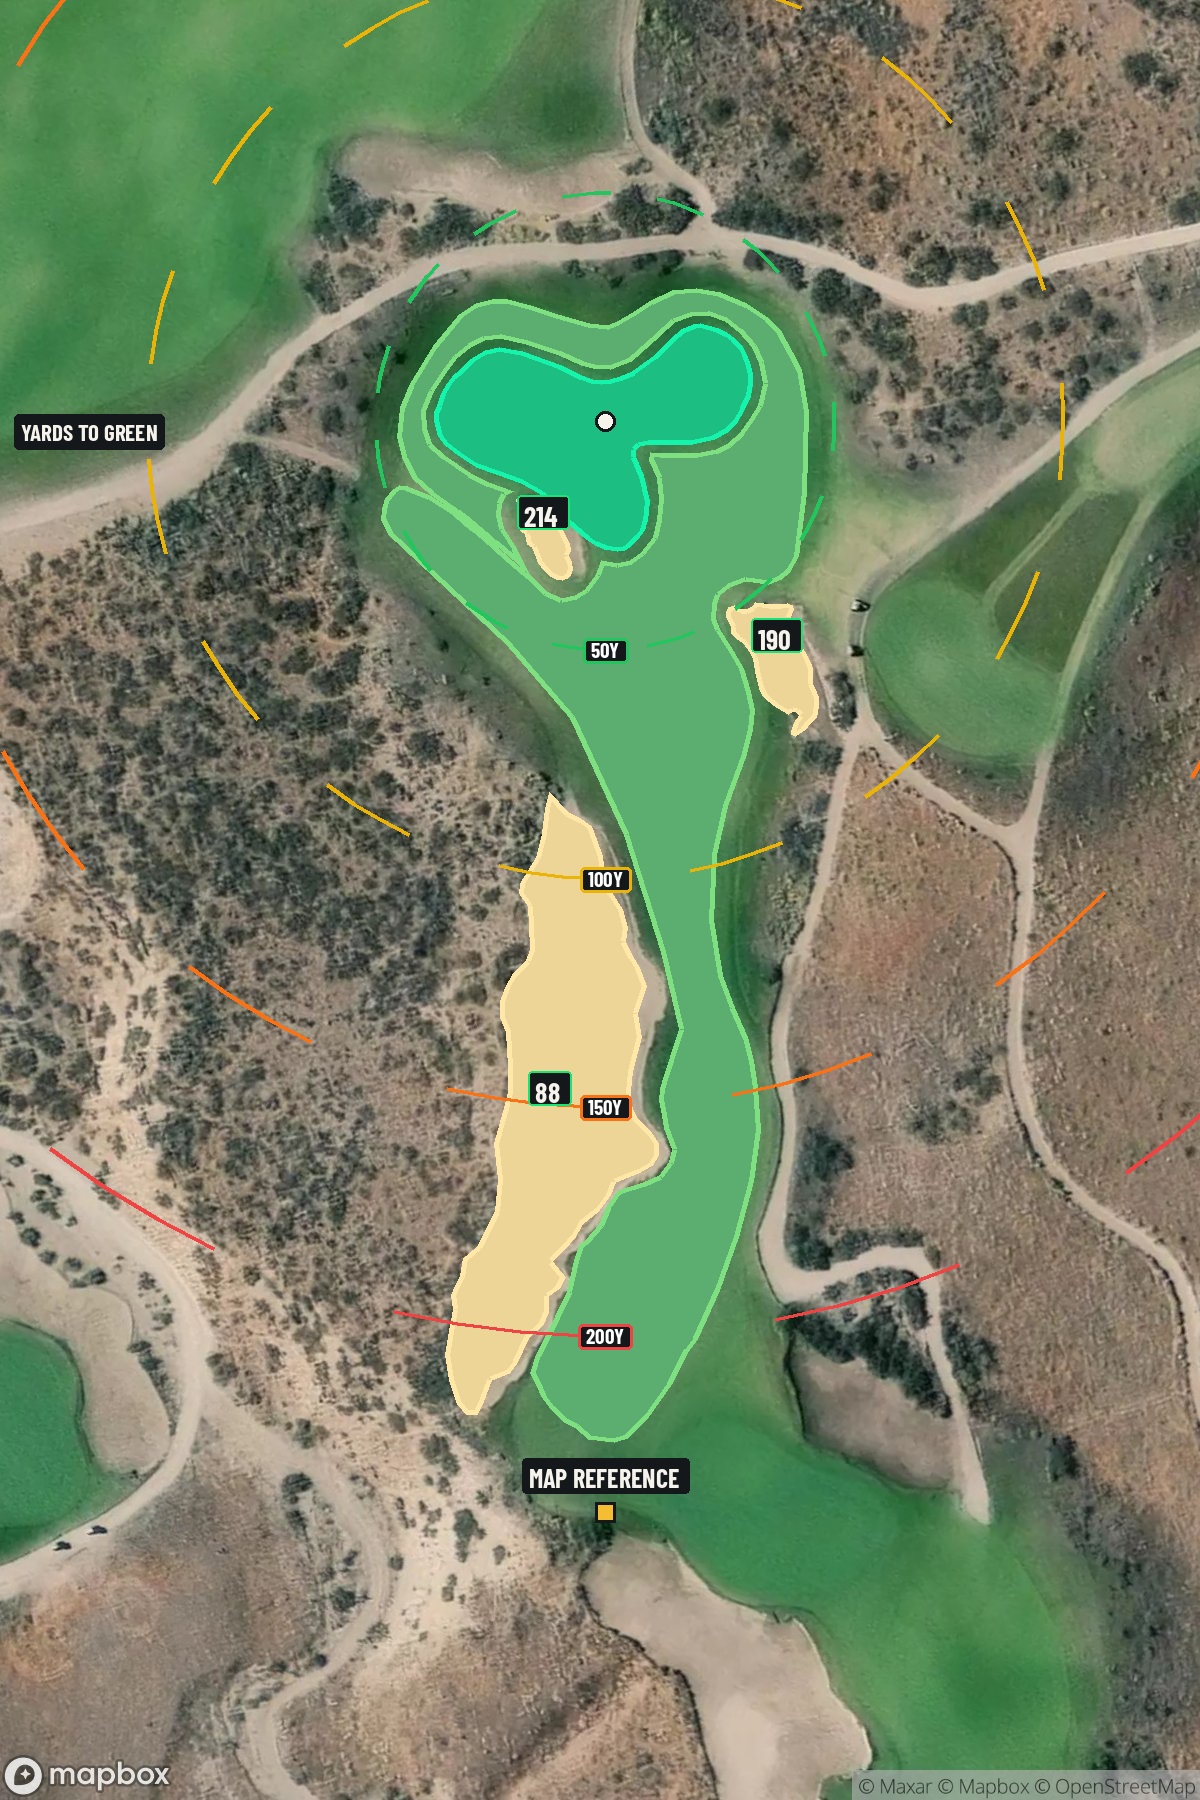
Hole 16 aerial at Gamble Sands Golf and Inn
Map distances from Map reference tee

The map's printed distances are measured from the Map reference tee to the green; they do not move when you change tees. Your Championship yardage is in the tiles above.

Green size: 50 yds deep × 70 yds wide

Mapbox Satellite composite · capture date not provided. Green at the top.

Where this map comes from

Satellite photo
Date not published
Mapbox satellite
Report a map problem
100%
Hole 16 aerial at Gamble Sands Golf and Inn

The plan for No. 16

These notes were written before the current map. Where their distances differ, trust the map.

The play: The 16th at Gamble Sands Golf and Inn presents a demanding 220-yard par 3 that epitomizes McLay Kidd's strategic design philosophy in the Columbia River valley. This lengthy one-shotter challenges golfers with a precise tee shot to a small, well-protected green complex surrounded by strategically placed bunkers that guard both front and sides. The hole's straightforward layout belies its difficulty, as the compact green demands accuracy over distance, leaving little margin for error on approach shots. Set against the dramatic backdrop of Washington's high desert landscape, this par 3 requires thoughtful club selection and committed execution. The bunker protection creates multiple recovery scenarios, making par a satisfying achievement on one of Gamble Sands' most honest and unforgiving tests.

Shot by shot

  1. Off the tee

    Your tee shot is everything on this par-3, requiring a committed swing with proper club selection. Depending on wind conditions and pin position, expect to hit anything from a 5-iron to a 3-iron or hybrid. The key is selecting enough club to carry the bunkers protecting the green while avoiding the temptation to swing too hard. Aim for the center of the green regardless of pin position - the small target demands a conservative approach. Take one extra club and make a smooth, controlled swing rather than forcing a shot that could find the sand.

  2. Approach & recovery

    Since this is a par-3, your tee shot serves as your approach. Focus on trajectory and landing angle, as the small green will require the ball to land softly and hold. The bunkers mentioned in course reviews suggest greenside protection that penalizes anything short or offline. Consider the wind patterns common in this Columbia River valley location, as elevated tees can be deceiving regarding actual playing conditions at green level.

  3. On the green

    The small green size means putting will be relatively straightforward once you're on the surface, but getting there is the challenge. Expect subtle breaks that follow the natural terrain toward the Columbia River valley. Two-putt pars should be the goal, as the difficulty lies in hitting and holding this green rather than navigating complex putting contours. Focus on lag putting to the center of the green if you face a lengthy first putt. ## RISK VS REWARD This hole offers a classic risk/reward scenario for aggressive players. While the conservative play is aiming for the center of the green, skilled players might attack certain pin positions when conditions allow. However, the bunker protection and small green size heavily favor the conservative approach. The reward for aggressive play is a potential birdie opportunity, but the risk of finding sand or missing the green entirely makes center-green strategy the percentage play. ## DIFFERENT SKILL LEVELS **High Handicappers:** Take plenty of club and aim for the center of the green. Don't be tempted to attack pins - a bogey from the middle of the green beats a double bogey from the bunkers. Consider using a hybrid or fairway wood if it provides more confidence than a long iron. **Low Handicappers:** You can be more aggressive with pin hunting, especially on front pins or when wind conditions favor your natural ball flight. Still respect the bunkers, but don't be afraid to take dead aim when you have the right club and conditions. This is a scoring opportunity if you execute properly. The 16th at Gamble Sands exemplifies McLay Kidd's design philosophy of rewarding precision while providing stunning visual appeal. Make solid contact, trust your club selection, and enjoy one of the most scenic holes in Washington state golf.

  4. Watch for

    • Course conditioning and mapped hazards may affect line selection; confirm from the aerial.

The green on No. 16

Mapped boundary
Wide × deepyards
70×50
Areasq ft
16,795

Gear for Hole 16

We may earn a commission when you buy through these links.

Golfer feedback

How did Hole 16 play?

⚡ Quick Golfer Pulse

How did this hole play today?

1-tap anonymous vote

Frequently asked questions

Yardage reference: Championship tees · 220 yards.

What club should I use on this par 3?

↓

At 220 yards, most golfers will need a fairway wood or hybrid to reach this green. Adjust for elevation, wind, and pin position.

How difficult is hole 16?

↓

This hole is a moderate challenge for most golfers. Key challenges include: long par 3, large green requiring good lag putting.

How big is the green on hole 16?

↓

The green is large and can play quite long. Three-putt territory if you don't manage your approach distance well.

What's a good score on hole 16?

↓

This hole is a challenging par where bogey is acceptable. This longer par 3 will test your long iron or hybrid game. Par is a good score.