Hole 8 at Cog Hill Golf & CC (Dubsdread)
- Par
- 4
- Yardage
- 379 yds
- Stroke index
- 13
- Hazards
- 4 bunkers
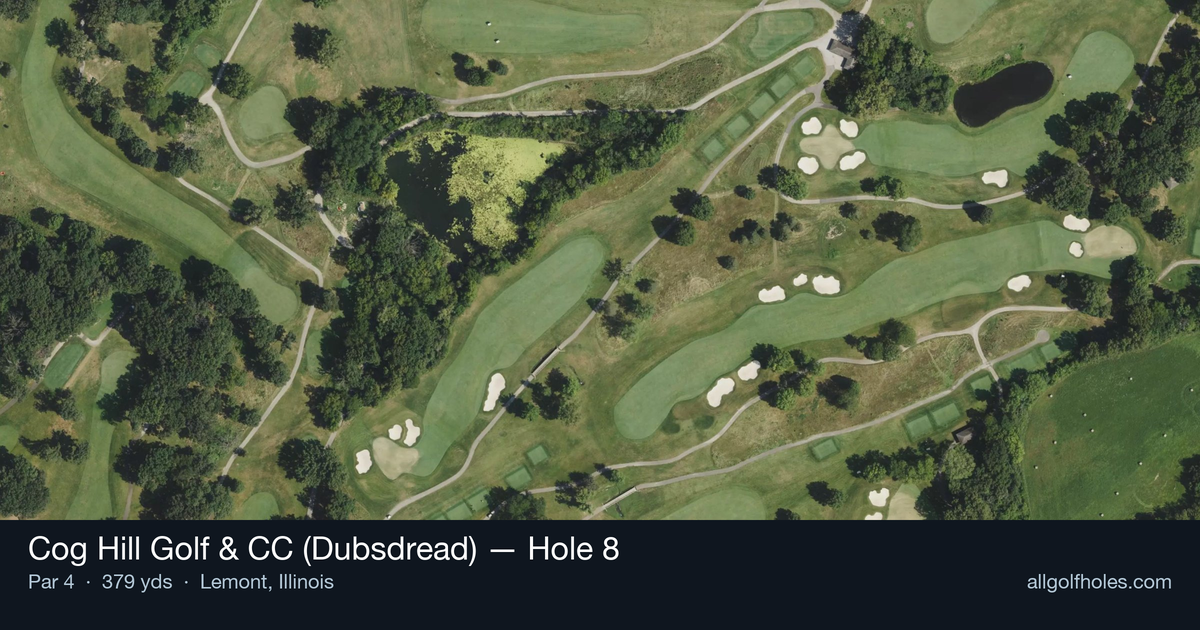
Aerial source not provided
Green size: 27 yds deep × 30 yds wide
Scorecard yardage is for Championship tees. The aerial shows its labeled reference position; distance rings measure to the green.
Championship tees · Par 4 · 379 yards
The plan for No. 8
The eighth hole at Cog Hill Golf & CC (Dubsdread) presents a deceptively challenging par 4 that embodies the course's reputation for testing every aspect of a golfer's game. At 379 yards, this straight-away hole demands precision over power, with its compact green complex serving as the primary defense. The tee shot plays to a generous fairway that invites aggressive play, but the approach shot reveals the hole's true character. The small green requires pinpoint accuracy with mid-to-short irons, leaving little margin for error on approach shots. Without significant hazards to distract, golfers must focus entirely on distance control and green-reading skills. This hole exemplifies Dubsdread's philosophy of championship-caliber golf accessible to the public, where strategic thinking trumps raw distance in the pursuit of par.
Off the tee
Your tee shot strategy should prioritize finding the optimal distance for your approach shot rather than maximum distance. Most players will benefit from a controlled driver or strong 3-wood that leaves a comfortable mid-iron to short-iron into the green. The straight layout allows for an aggressive target line down the center of the fairway. Consider the wind conditions and pin position when selecting your tee club. If the pin is tucked behind a slope or in a difficult section of the small green, leaving yourself a full wedge shot might provide better spin control than a longer iron from closer range.
Approach & recovery
The approach shot is where this hole's true challenge emerges. The small green size means there's little margin for error, making club selection and target line critical. Aim for the center of the green unless you're confident in your iron play and the pin position offers a clear advantage. Pay attention to the green's surroundings and any subtle slopes that might affect ball roll. With a small target, focus on a smooth, controlled swing rather than trying to attack every pin position. Missing the green here likely means a challenging up-and-down for par.
On the green
The compact green size suggests that most putts will be relatively short, but don't underestimate the importance of lag putting. Small greens often feature more pronounced slopes and breaks to compensate for their size. Take time to read the green carefully, as a three-putt on a small surface can be particularly frustrating. Position your approach shots below the hole when possible, as uphill putts on small greens are generally more manageable than downhill attempts where speed control becomes critical. ## RISK VS REWARD This hole offers a classic risk/reward scenario for your approach shot. The reward is clear - a small green means shorter putts and better birdie opportunities when you hit it close. The risk lies in the precision required; missing a small target often results in more difficult recovery shots. Consider your confidence level with mid-irons and the importance of the hole in your round. Early in the round, aggressive play might pay dividends. Later, when protecting a score, the center of the green becomes increasingly attractive. ## DIFFERENT SKILL LEVELS **High-handicap players** should focus on two-putt pars. Use a conservative tee shot that ensures a comfortable approach distance, then aim for the heart of the green regardless of pin position. The goal is avoiding big numbers while giving yourself chances at shorter putts. **Low-handicap players** can be more aggressive with both tee shot positioning and approach shot target selection. Use your distance control to leave specific yardages that match your favorite clubs, and don't hesitate to attack favorable pin positions when your ball-striking is sharp. **Mid-handicap players** should adjust their strategy based on current form. When hitting irons well, play aggressively to the pin. When struggling with precision, adopt the high-handicap approach and focus on finding the green consistently. The key to success on Dubsdread's eighth hole is recognizing it as a scoring opportunity while respecting the precision required. Smart course management and confident execution will serve you well on this straightforward but demanding par 4.
Watch for
- 4 mapped bunkers guard landing zones and/or the green.
- Tree-lined areas (8 mapped woodland zones) punish offline tee shots.
Hole 8 Green Complex
Mapped green boundary
Green size: 4,544 sq ft
How did Hole 8 play?
How did this hole play today?
Frequently asked questions
Yardage reference: Championship tees · 379 yards.
What's the best strategy off the tee?
↓
For this 379-yard par 4, most players will hit 3-wood or driver to set up a comfortable approach.
How difficult is hole 8?
↓
This hole is a good scoring opportunity for most golfers. Key challenges include: heavily bunkered.
How big is the green on hole 8?
↓
The green is medium-sized with moderate targets. Pay attention to pin placement when selecting your approach club.
What's a good score on hole 8?
↓
This hole is a medium-length test where par is a solid result. A straightforward par 4 where course management pays off.