Hole 14 at Cog Hill Golf & CC (Dubsdread)
- Par
- 3
- Yardage
- 215 yds
- Stroke index
- 16
- Hazards
- 4 bunkers
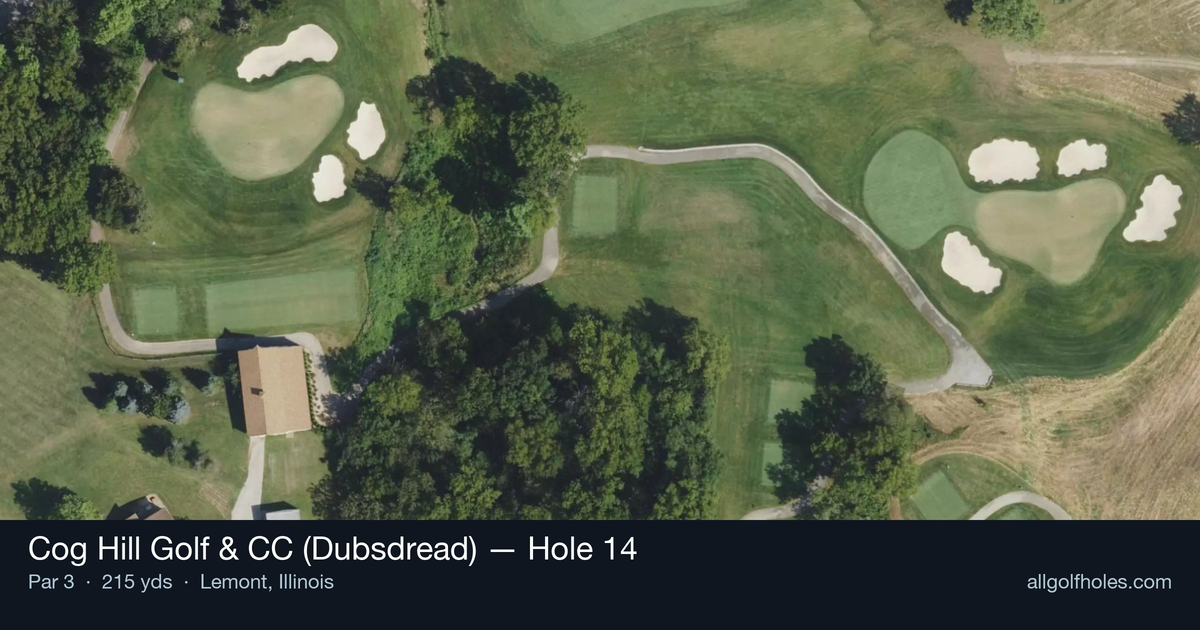
Aerial source not provided
Green size: 37 yds deep × 28 yds wide
Scorecard yardage is for Championship tees. The aerial shows its labeled reference position; distance rings measure to the green.
Championship tees · Par 3 · 215 yards
The plan for No. 14
The 14th hole at Cog Hill Golf & CC (Dubsdread) presents a deceptively challenging par 3 that embodies the course's fearsome reputation. At 215 yards, this straightaway one-shot hole demands precision and confidence from the championship tees on Dick Wilson's masterpiece layout. The tee shot plays to a compact green complex that requires golfers to commit fully to their club selection, as the small target leaves little margin for error. Without major hazards to distract the eye, players must focus entirely on distance control and accuracy, making it a true test of iron play. This hole exemplifies why Dubsdread has earned its intimidating nickname and continues to challenge golfers at all levels on one of Illinois' premier championship courses.
Off the tee
Club selection is absolutely critical on this hole. Most golfers will need anything from a mid-iron to a hybrid depending on wind conditions and pin position. Take extra time to assess wind direction and strength, as the 215-yard distance leaves little margin for error with the small green. Aim for the center of the green regardless of pin position - the compact target makes chasing pins a risky proposition. Focus on making solid contact with a smooth, controlled swing rather than trying to muscle up or dial back your normal distance. The straight layout means alignment is straightforward, so use this to your advantage by picking a clear intermediate target.
Approach & recovery
Since this is a par 3, your tee shot IS your approach shot. The key is committing fully to your club selection and swing. With no hazards to complicate matters, the primary miss to avoid is coming up short or flying the green entirely. The small green size means precision trumps power - a well-struck shot to the center of the green will always be better than an aggressive play at a tucked pin. Pay attention to the firmness of the green, as this will affect how your ball reacts upon landing. In firm conditions, consider taking one less club and letting the ball run onto the green.
On the green
The small putting surface means most approach shots that find the green will leave relatively manageable putts. However, the compact nature also means that subtle breaks can be more pronounced. Take time to read the green carefully, as even seemingly straight putts may have movement. Focus on speed control - with limited green space, running putts well past the hole can leave difficult comeback putts. When the pin is positioned toward the edges, lag putting to the center of the green is often the smart play to ensure two-putt success. ## RISK VS REWARD This hole offers a clear risk/reward scenario in pin selection strategy. The reward of attacking pins close to the edges of the small green is a potential birdie opportunity, but the risk is missing the green entirely and facing a difficult up-and-down. The safer play of aiming for the center of the green virtually guarantees finding the putting surface, with par being a solid result. Given the handicap rating, most golfers should lean toward the conservative approach and take their chances with the putter. ## DIFFERENT SKILL LEVELS **High-Handicap Players**: Focus entirely on finding the green with your most reliable iron or hybrid. Don't worry about pin position - aim dead center and commit to a smooth swing. Take one extra club if you're between selections, as missing short is often more challenging than being slightly long. Accept that par is an excellent score here. **Low-Handicap Players**: You can be more aggressive with pin hunting, especially when the flag is in the center portion of the green. Use your distance control skills to dial in the exact yardage, factoring in wind and green firmness. Consider the hole location in your pre-shot routine, but still favor the fat part of the green when pins are tucked tight to edges. This is a hole where your superior ball-striking should create legitimate birdie opportunities. The 14th at Dubsdread exemplifies why this course has earned its fearsome reputation - even seemingly straightforward holes demand respect and precise execution to score well.
Watch for
- 4 mapped bunkers guard landing zones and/or the green.
- Tree-lined areas (5 mapped woodland zones) punish offline tee shots.
Hole 14 Green Complex
Mapped green boundary
Green size: 5,415 sq ft
How did Hole 14 play?
How did this hole play today?
Frequently asked questions
Yardage reference: Championship tees · 215 yards.
What club should I use on this par 3?
↓
At 215 yards, most golfers will need a fairway wood or hybrid to reach this green. Adjust for elevation, wind, and pin position.
How difficult is hole 14?
↓
This hole is a moderate challenge for most golfers. Key challenges include: long par 3, heavily bunkered.
What hazards should I watch out for on hole 14?
↓
Key hazards include: 4 greenside bunkers. Plan your shots to avoid these trouble spots.
How big is the green on hole 14?
↓
The green is medium-sized with moderate targets. The green is wider than it is deep, rewarding shots that find the correct tier. Pay attention to pin placement when selecting your approach club.
What's a good score on hole 14?
↓
This hole is a challenging par where bogey is acceptable. This longer par 3 will test your long iron or hybrid game. Par is a good score.