Hole 15 at Cog Hill Golf & CC (Dubsdread)
- Par
- 5
- Yardage
- 523 yds
- Stroke index
- 4
- Hazards
- 4 bunkers
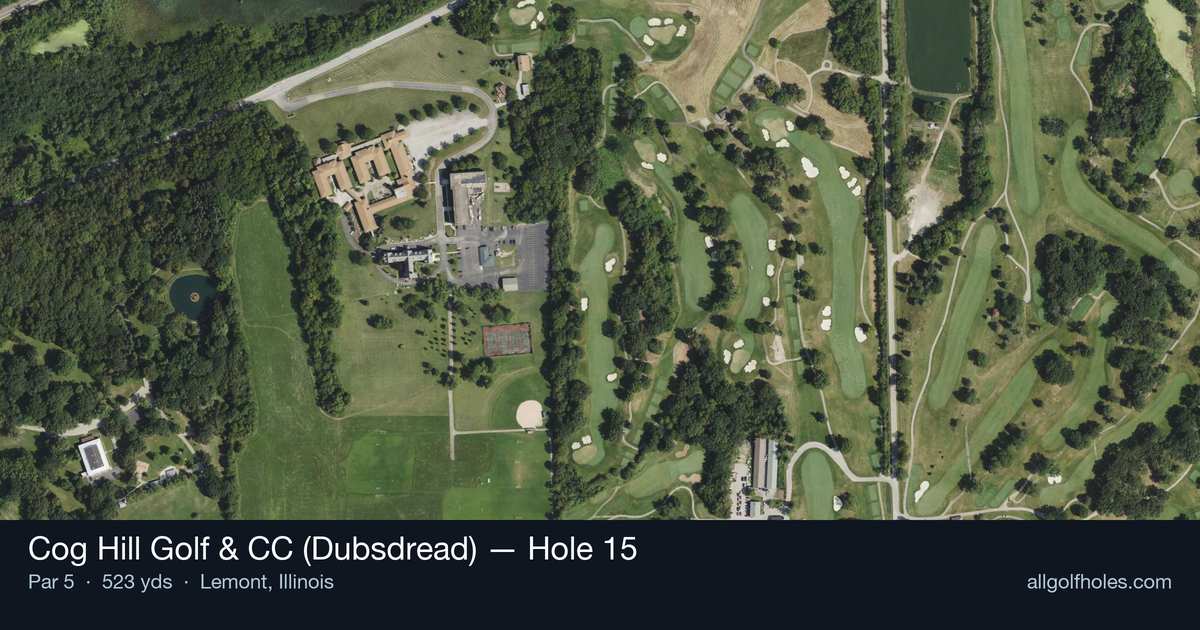
Aerial source not provided
Green size: 25 yds deep × 32 yds wide
Scorecard yardage is for Championship tees. The aerial shows its labeled reference position; distance rings measure to the green.
Championship tees · Par 5 · 523 yards
The plan for No. 15
The 15th hole at Cog Hill Golf & CC (Dubsdread) presents a deceptively challenging par 5 that embodies the championship pedigree of this storied PGA Tour venue. Stretching 523 yards in a straight line, this hole demands precision over power, with its small green creating the ultimate test for approach shots. The generous fairway invites aggressive tee shots, but the real challenge emerges as players navigate their way toward the compact target. With no significant hazards to distract, golfers must rely on course management and accurate iron play to set up scoring opportunities. The tight green complex rewards those who can execute under pressure, making it a true examination of skill that separates contenders from pretenders on Dubsdread's demanding layout.
Off the tee
Your tee shot strategy should focus on finding the center of the fairway to set up optimal positioning for your second shot. With no major hazards threatening the landing zone, you can be aggressive with your driver, aiming down the middle of the fairway. The straight layout allows you to play your natural shot shape without concern for severe trouble. Focus on solid contact and distance control rather than trying to squeeze out every yard - a well-positioned drive around 260-280 yards will leave you in prime position for your approach strategy.
Approach & recovery
The approach shot presents the hole's primary strategic decision point. Longer hitters may have the opportunity to reach the green in two, but the small green size demands exceptional accuracy. For most players, laying up to a comfortable wedge distance - typically around 100-120 yards from the pin - provides the best scoring opportunity. When going for the green in two, aim for the center of the putting surface and avoid being short, as recovery shots around this small green can be challenging. If laying up, position your ball in the fairway's center to ensure a clear angle to any pin position.
On the green
The small green at the 15th requires precise distance control on your approach shots. While specific break patterns aren't documented, the compact putting surface means that lag putting becomes crucial - getting your first putt close is more important than being aggressive with longer putts. Focus on leaving yourself uphill putts when possible, as the small target makes downhill putts particularly treacherous. Pay attention to green firmness throughout your round, as this will significantly impact how your approach shots react on this tight target. ## RISK VS REWARD This hole presents classic risk/reward decision-making. The absence of major hazards encourages aggressive play, but the small green punishes imprecision. Going for the green in two offers clear birdie and even eagle opportunities, but missing the target can leave difficult recovery shots. The conservative play - laying up to wedge distance - still provides excellent birdie chances while virtually eliminating big numbers. Consider your current round situation, confidence level, and pin position when making this crucial strategic decision. ## DIFFERENT SKILL LEVELS **Low Handicap Players:** Should consider going for the green in two when conditions are favorable and they're hitting the ball well. Focus on committing fully to the shot and aiming for the green's center. When laying up, be precise with distance control to leave preferred yardages. **High Handicap Players:** Should almost always lay up to a comfortable wedge distance, as the small green makes successful long approaches extremely difficult. Focus on two solid shots to reach wedge range, then attack the pin with a short iron. This conservative approach maximizes birdie chances while avoiding the doubles and triples that can derail a round on Dubsdread. The 15th hole rewards patience and smart course management - exactly the kind of strategic thinking that separates good scores from great ones on this championship layout.
Watch for
- 4 mapped bunkers guard landing zones and/or the green.
- Tree-lined areas (2 mapped woodland zones) punish offline tee shots.
Hole 15 Green Complex
Mapped green boundary
Green size: 4,566 sq ft
How did Hole 15 play?
How did this hole play today?
Frequently asked questions
Yardage reference: Championship tees · 523 yards.
Can this par 5 be reached in two?
↓
At 523 yards, A true three-shot hole for most players. Position your layup to leave a comfortable wedge distance.
How difficult is hole 15?
↓
This hole is a good scoring opportunity for most golfers. Key challenges include: heavily bunkered.
How big is the green on hole 15?
↓
The green is medium-sized with moderate targets. The green is wider than it is deep, rewarding shots that find the correct tier. Pay attention to pin placement when selecting your approach club.
What's a good score on hole 15?
↓
This hole is a solid birdie opportunity with smart layup strategy. Most golfers can reach in three. Position your layup to leave a comfortable wedge.