Hole 3 at Pasatiempo Golf Club
- Par
- 3
- Yardage
- 214 yds
- Stroke index
- 2
- Hazards
- 6 bunkers
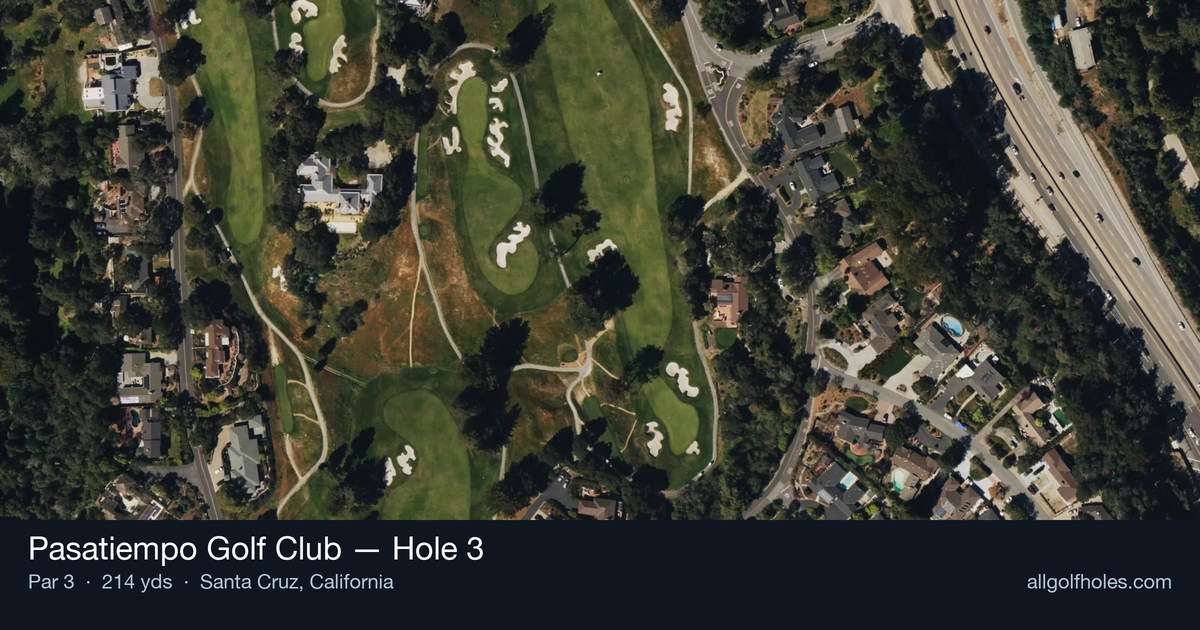
Aerial source not provided
Green size: 35 yds deep × 23 yds wide
Scorecard yardage is for Championship tees. The aerial shows its labeled reference position; distance rings measure to the green.
Championship tees · Par 3 · 214 yards
The plan for No. 3
The third hole at Pasatiempo Golf Club showcases Alister MacKenzie's genius in a deceptively challenging par 3 that plays 214 yards to a small, elevated green. This straightforward tee shot demands precision over power, as the compact target leaves little margin for error. The hole's understated elegance reflects MacKenzie's philosophy of strategic simplicity, where club selection becomes critical given the green's size and positioning. With a handicap rating of 2, this is one of the course's most demanding tests, requiring golfers to commit fully to their approach shot. The absence of major hazards places the entire emphasis on accuracy and distance control, making it a pure test of iron play that has challenged golfers since Bobby Jones first experienced MacKenzie's handiwork in 1929.
Off the tee
Club selection is paramount on this lengthy par 3. Most golfers will need anywhere from a long iron to a hybrid or fairway wood, depending on wind conditions and pin position. Take one extra club and swing smoothly rather than forcing a shorter iron. The target line should favor the center of the green, as the small putting surface leaves little margin for error on either side. Pay careful attention to wind direction, as the exposed nature of this hole can significantly affect ball flight. When in doubt, take more club and focus on solid contact rather than trying to manufacture distance. A controlled swing with proper club selection will serve you better than an aggressive swing with insufficient club.
Approach & recovery
Since this is a par 3, your tee shot IS your approach shot. The key is committing fully to your club selection and target line. Aim for the heart of the green regardless of pin position - the small green size makes pin-hunting a risky proposition for most golfers. Focus on a smooth, balanced swing that promotes solid contact. The length of this hole means many players will be hitting at or near their maximum comfortable distance, making tempo and balance even more critical. Trust your club selection and avoid the temptation to swing harder if you're between clubs.
On the green
MacKenzie's greens are known for their subtle undulations and strategic contours. While specific break information isn't available, expect the putting surface to reward careful green reading and speed control. The small size means most putts will be relatively short, but don't underestimate the importance of lag putting if you find yourself on the wrong portion of the green. Take time to study the green during your approach, noting any slopes or tiers that might affect your putt. Speed control becomes crucial on smaller greens where running putts past the hole can leave difficult comeback attempts. ## RISK VS REWARD This hole offers limited risk/reward opportunities due to its straightforward design. The primary strategic decision involves club selection and target selection. The reward for aggressive pin-hunting is minimal compared to the risk of missing the small green entirely. The smart play is always center green, regardless of pin position. Par is an excellent score on this hole, and bogey won't significantly damage your round. The risk of attempting to get too close to challenging pin positions far outweighs the potential reward. ## DIFFERENT SKILL LEVELS **High Handicap Players:** Focus entirely on finding the green. Take plenty of club and aim for the center, regardless of pin position. A two-putt par is an outstanding result. Don't be afraid to use a hybrid or fairway wood if that's your most reliable long club. Getting on the green in regulation is far more important than getting close to the pin. **Low Handicap Players:** While you have more options for pin-hunting, remain selective about when to be aggressive. Only attack pins in the center portion of the green or when conditions are ideal. Your superior ball-striking ability allows for more precise club selection, but the small target still demands respect. Focus on solid contact and commit fully to your club choice. The historical significance of this MacKenzie masterpiece, where Bobby Jones once played, should inspire respect for the strategic challenges it presents. Course management and smart decision-making will serve you far better than heroic attempts on this demanding par 3.
Hole 3 Green Complex
Mapped green boundary
Green size: 4,066 sq ft
How did Hole 3 play?
How did this hole play today?
Frequently asked questions
Yardage reference: Championship tees · 214 yards.
What club should I use on this par 3?
↓
At 214 yards, most golfers will need a fairway wood or hybrid to reach this green. Adjust for elevation, wind, and pin position.
How difficult is hole 3?
↓
This hole is one of the tougher holes on the course for most golfers. Key challenges include: long par 3, heavily bunkered, small green.
How big is the green on hole 3?
↓
The green is small and requires precision. The green is deeper than wide, so club selection is crucial. Expect challenging pin positions with limited room for error.
What's a good score on hole 3?
↓
This hole is a challenging par where bogey is acceptable. This longer par 3 will test your long iron or hybrid game. Par is a good score.