Hole 2 at Pasatiempo Golf Club
- Par
- 4
- Yardage
- 437 yds
- Stroke index
- 8
- Hazards
- 5 bunkers
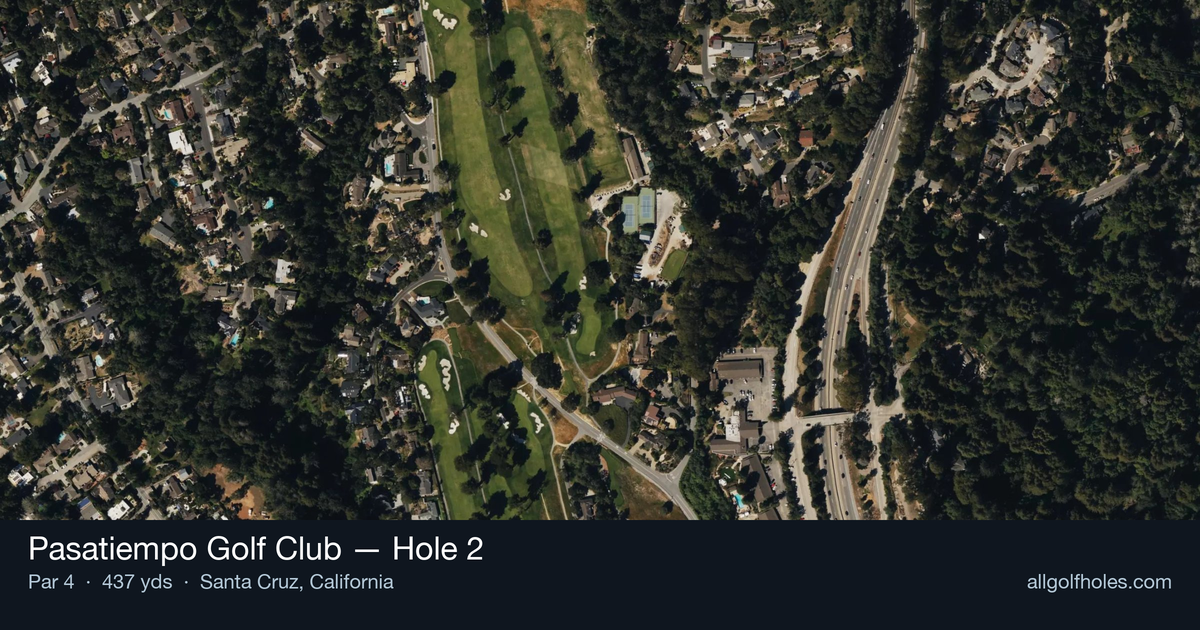
Aerial source not provided
Green size: 38 yds deep × 23 yds wide
Scorecard yardage is for Championship tees. The aerial shows its labeled reference position; distance rings measure to the green.
Championship tees · Par 4 · 437 yards
The plan for No. 2
This downhill par 4 at Pasatiempo Golf Club showcases Dr. Alister MacKenzie's architectural brilliance in deceptively simple fashion. At 437 yards, the hole opens serenely with a generous fairway that invites aggressive play, but strategic bunkers guard both sides of the landing area. Big hitters face a critical decision: flirt with the right-side bunker for optimal positioning, or play safely left and risk the restored fairway bunker that welcomes visitors entering the course. The downhill terrain adds distance but complicates club selection for the approach shot to a small, elevated green. MacKenzie's restored design perfectly balances risk and reward, making this straightaway hole a memorable early test of course management and precision at one of California's most breathtaking golf destinations.
Off the tee
The downhill nature of this hole means club selection becomes critical for proper distance control. While the temptation exists to bomb driver, consider that the elevation will add significant carry and roll. Big hitters should be particularly aware of the bunker on the right side of the fairway, which comes into play for aggressive drives. A bunker on the left also threatens longer hitters who stray from the target line. Your optimal strategy depends on your driving distance: longer players may benefit from a controlled 3-wood or hybrid to stay short of trouble, while shorter hitters can be more aggressive with driver. The key is finding the widest part of the fairway while avoiding the bunkers that frame the landing zone. Aim for the center-left portion of the fairway to give yourself the best angle into the small green.
Approach & recovery
With a small green as your target, precision trumps distance on your approach shot. The elevation drop means your ball will come in at a steeper angle, which can help with stopping power but requires accurate distance calculation. Factor in the downhill lie and adjust your club selection accordingly - the ball will likely fly farther than normal. Focus on the center of the green regardless of pin position, as the small target leaves little margin for error. Avoid the temptation to attack tight pin positions; instead, play to the fat part of the green and rely on your putting to make up any distance. Missing the green here will present difficult up-and-down opportunities.
On the green
The small green size means every putt becomes crucial for scoring. While specific break patterns aren't detailed, expect subtle slopes that can be tricky to read given the overall downhill nature of the hole. Take extra time to read putts from below the hole, as these will be particularly challenging. Focus on lag putting to the correct level, as three-putts can easily derail a good score. The compact green means you're never facing extremely long putts, but the premium on accuracy makes every stroke count. ## RISK VS REWARD This hole presents a classic risk/reward scenario with club selection off the tee. The aggressive play is driver for maximum distance, potentially leaving a short iron approach. However, this brings the fairway bunkers into play and can leave awkward distances if you fly the optimal landing area. The conservative approach involves laying back with 3-wood or long iron, accepting a longer approach shot in exchange for better positioning and avoiding trouble. Given the small green target, this conservative strategy often proves more effective for consistent scoring. ## DIFFERENT SKILL LEVELS **High Handicappers:** Focus on finding the fairway with whatever club gives you the most confidence. Don't worry about distance - a 7-iron from 150 yards is better than a wedge from the rough. Aim for the center of the green and two-putt for par. **Low Handicappers:** You can be more aggressive with driver if you have good distance control, but respect the bunker placement. Consider the pin position when selecting your approach club, but don't get too cute with a small target. Your short game skills give you more options if you do miss the green. **Mid Handicappers:** This hole rewards smart course management. Take one less club off the tee than you might normally hit, ensuring you stay in the fairway. Play your approach to the center of the green and trust your putting to make up any extra distance to the pin. The key to mastering Pasatiempo's 2nd hole lies in understanding that Dr. MacKenzie designed it to reward thoughtful play over raw power - a lesson that will serve you well throughout this magnificent course.
Hole 2 Green Complex
Mapped green boundary
Green size: 4,613 sq ft
How did Hole 2 play?
How did this hole play today?
Frequently asked questions
Yardage reference: Championship tees · 437 yards.
What's the best strategy off the tee?
↓
For this 437-yard par 4, most players will hit driver to set up a comfortable approach.
How difficult is hole 2?
↓
This hole is a moderate challenge for most golfers. Key challenges include: heavily bunkered.
How big is the green on hole 2?
↓
The green is medium-sized with moderate targets. The green is deeper than wide, so club selection is crucial. Pay attention to pin placement when selecting your approach club.
What's a good score on hole 2?
↓
This hole is a demanding hole where bogey is not unusual. This longer par 4 will test most golfers. Focus on position over distance.