Hole 13 at Pasatiempo Golf Club
- Par
- 5
- Yardage
- 531 yds
- Stroke index
- 15
- Hazards
- 8 bunkers
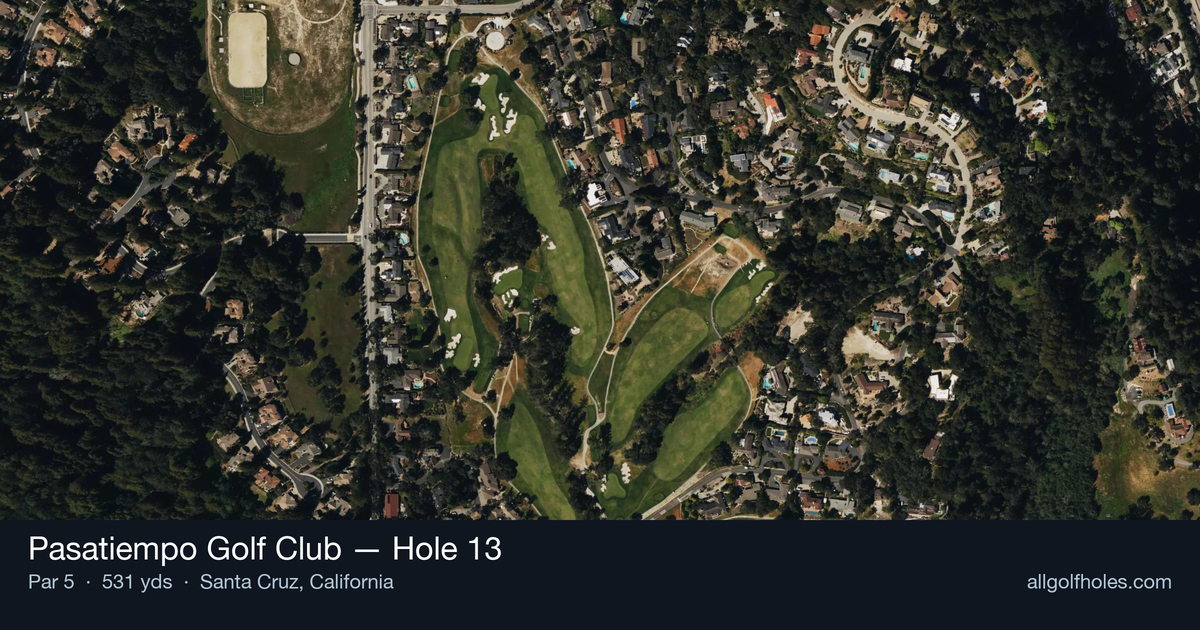
Aerial source not provided
Green size: 42 yds deep × 38 yds wide
Scorecard yardage is for Championship tees. The aerial shows its labeled reference position; distance rings measure to the green.
Championship tees · Par 5 · 531 yards
The plan for No. 13
The 13th hole at Pasatiempo Golf Club exemplifies Dr. Alister MacKenzie's strategic brilliance through deceptive simplicity. This 531-yard par 5 presents a straightforward layout that belies its true challenge, demanding precise execution from tee to green. The generous fairway invites aggressive play off the tee, but the hole's character emerges in the approach shots where MacKenzie's architectural genius becomes apparent. The small green complex requires surgical precision, particularly on the second shot where positioning becomes paramount for birdie opportunities. With no major hazards to intimidate, this hole tests course management and shot-making ability rather than fear-based strategy. The elevated tee provides stunning views of the Santa Cruz Mountains, making Pasatiempo Golf Club hole 13 a memorable experience that rewards thoughtful play over raw power in true MacKenzie fashion.
Off the tee
Your tee shot strategy should focus on finding the optimal position for your second shot rather than simply maximizing distance. Driver is the preferred club for most players, as the lack of fairway hazards allows you to swing freely and gain valuable yardage on this lengthy par 5. However, players who struggle with driver accuracy might consider a fairway wood to ensure they stay in the short grass. The target line should favor the center of the fairway, giving you the most options for your approach strategy. Pay attention to pin position when selecting your target - if the flag is tucked on one side of the small green, positioning your tee shot on the opposite side of the fairway can provide a better angle for your approach.
Approach & recovery
Your second shot presents the hole's most critical strategic decision. Longer hitters may have the opportunity to reach the green in two, but the small target requires exceptional accuracy. Consider the risk/reward carefully - a successful eagle attempt can yield significant scoring, but missing the small green can lead to difficult up-and-down situations. For most players, laying up to a comfortable wedge distance is the percentage play. Target an area that leaves you with your most confident yardage - typically between 80-120 yards for mid-to-high handicappers. This conservative approach maximizes your chances of hitting the small green and securing a birdie putt.
On the green
The small green at the 13th demands precise putting and careful green reading. With limited surface area, even slight misreads can result in lengthy comeback putts. Focus on getting your first putt close rather than being overly aggressive, as two-putting from anywhere on this green represents solid execution. Pay particular attention to the grain and slope, as MacKenzie's greens are known for subtle undulations that can significantly affect ball roll. Uphill putts should be struck firmly, while downhill putts require a delicate touch to avoid rolling well past the hole on the compact surface. ## RISK VS REWARD The 13th hole offers one of the round's best risk/reward scenarios. Players capable of reaching the green in two must weigh the eagle opportunity against the difficulty of hitting such a small target from long range. The absence of major hazards means a missed attempt typically results in a reasonable chip shot rather than penalty strokes. The conservative three-shot approach offers excellent birdie chances with minimal risk. By laying up to your preferred wedge distance, you can attack the pin with confidence, knowing that even a slight miss leaves a manageable putt. ## DIFFERENT SKILL LEVELS **High Handicappers:** Focus on three solid shots rather than attempting to reach in two. Use your most reliable clubs off the tee and for your layup, then commit to hitting the center of the green with your wedge approach. Par represents an excellent score, with birdie as a bonus. **Low Handicappers:** Evaluate going for the green based on your lie and confidence level with long irons or fairway woods. If you choose to lay up, be aggressive with your wedge approach, as your short game skills should handle any slight misses around the small green. **Scratch Players:** This hole should yield birdie or better with proper execution. Consider going for the green when conditions favor accuracy, but don't force the shot if your lie or wind conditions aren't optimal. Your ability to convert short iron approaches into the small green makes the conservative play highly effective. The key to success on Pasatiempo's 13th lies in playing within your capabilities while recognizing the genuine scoring opportunity this par 5 presents. Whether you choose the aggressive or conservative route, commit fully to your strategy and trust your club selection to navigate MacKenzie's strategic test.
Hole 13 Green Complex
Mapped green boundary
Green size: 5,699 sq ft
How did Hole 13 play?
How did this hole play today?
Frequently asked questions
Yardage reference: Championship tees · 531 yards.
Can this par 5 be reached in two?
↓
At 531 yards, A true three-shot hole for most players. Position your layup to leave a comfortable wedge distance.
How difficult is hole 13?
↓
This hole is a good scoring opportunity for most golfers. Key challenges include: heavily bunkered.
How big is the green on hole 13?
↓
The green is medium-sized with moderate targets. Pay attention to pin placement when selecting your approach club.
What's a good score on hole 13?
↓
This hole is a solid birdie opportunity with smart layup strategy. Most golfers can reach in three. Position your layup to leave a comfortable wedge.