Hole 2 at Grayhawk Golf Club (Raptor course)
- Par
- 4
- Yardage
- 395 yds
- Stroke index
- 16
- Hazards
- 5 bunkers
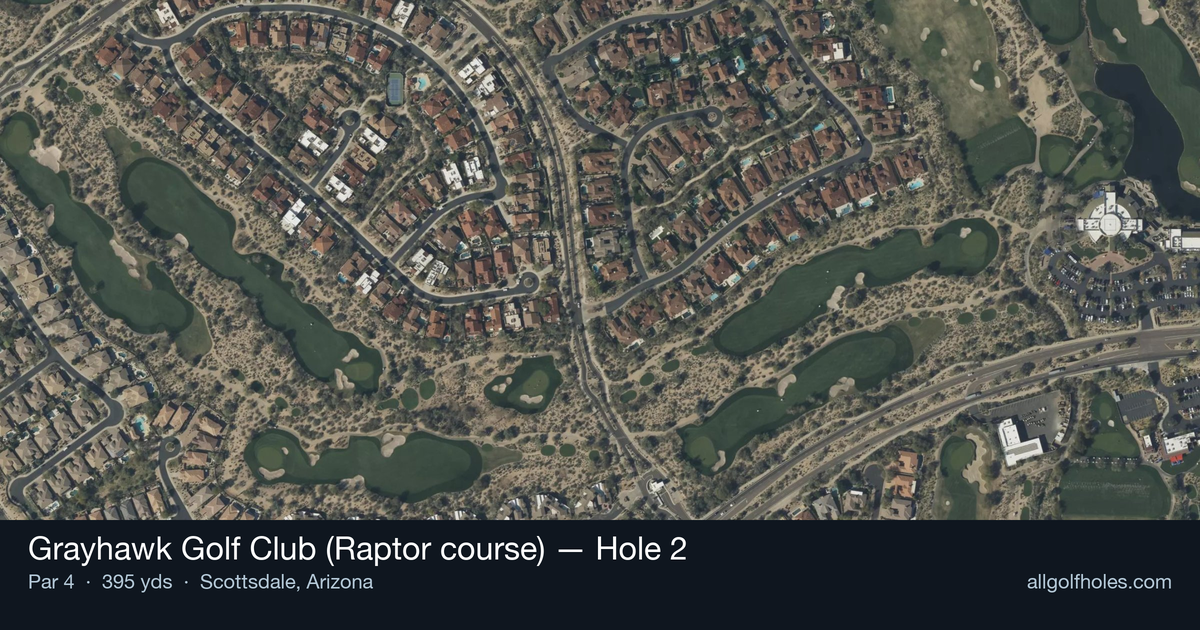
Aerial source not provided
Green size: 31 yds deep × 27 yds wide
Scorecard yardage is for Championship tees. The aerial shows its labeled reference position; distance rings measure to the green.
Championship tees · Par 4 · 395 yards
The plan for No. 2
The second hole at Grayhawk Golf Club's Raptor course presents Tom Fazio's signature risk-reward philosophy in a deceptively challenging 395-yard par 4. From the tee, players face an immediate strategic decision as a gaping fairway bunker guards the right side of the landing area. The conservative play calls for a long iron or fairway wood positioned safely short of this hazard, setting up a longer approach shot to the elevated green complex. The small green slopes dramatically from back to front and features a lower left tier protected by a deep bunker, demanding precise club selection and placement. This early test of course management exemplifies the Raptor's reputation for rewarding smart play while punishing aggressive mistakes.
Off the tee
The tee shot strategy centers around avoiding the prominent fairway bunker positioned on the right side of the landing zone. The conservative and often smartest play is a long iron or fairway wood aimed at the left-center of the fairway, playing just short of where the bunker comes into play. This approach sacrifices some distance but ensures a clean lie for the approach shot. Longer hitters who can confidently carry the bunker may choose driver, but this aggressive line requires precise execution. The target line should favor the left side of the fairway, as the desert landscape typical of Scottsdale courses leaves little room for error on missed shots. Wind conditions in the Arizona desert can significantly affect ball flight, making club selection even more critical.
Approach & recovery
The approach shot to this elevated green demands careful attention to pin position and green topography. The green slopes dramatically from back to front, with a lower tier on the left side that's protected by a deep bunker. This design creates distinct target zones depending on where the flag is positioned. For front pin positions, a controlled mid-iron shot that lands softly is essential to avoid rolling off the front edge. When the pin is on the elevated back portion, players can be more aggressive, using the slope to help stop the ball. The left tier requires precision, as the guarding bunker severely punishes approach shots that drift left of the target. Club selection should account for the elevated nature of the green, typically requiring one less club than the yardage suggests. The small green size demands accuracy over power on the approach.
On the green
Reading the green correctly is crucial for scoring success. The primary break runs from back to front, with putts from above the hole requiring delicate touch to avoid racing past. The lower left tier creates a separate putting surface with its own subtle breaks. Uphill putts from the front of the green can be struck more firmly, while downhill putts from the back require exceptional speed control. The transition between tiers can create tricky reads, particularly for putts that cross from one level to another. ## RISK VS REWARD The hole's primary risk-reward decision comes on the tee shot. Playing aggressively with driver over or around the fairway bunker shortens the approach but introduces significant penalty risk. The reward is a shorter iron into the green, potentially from a better angle. The conservative strategy of laying back with a fairway wood or long iron virtually guarantees a clean approach shot, though from a longer distance. Given the hole's relatively generous par 4 length and scoring potential, the conservative approach often yields better results. ## DIFFERENT SKILL LEVELS **High-Handicap Players:** Should prioritize the conservative tee shot strategy, using a club that comfortably stays short of the fairway bunker. Focus on hitting the center of the green rather than chasing pins, especially when they're positioned on the challenging left tier. Two-putting for par represents an excellent result. **Low-Handicap Players:** Can consider the aggressive driver line if they're confident in their accuracy and distance control. These players should attack pin positions more aggressively, using the green's slope to their advantage. The elevated green and back-to-front slope reward players who can control trajectory and spin. **Mid-Handicap Players:** Should generally favor the conservative tee shot but can be more aggressive on approach shots to accessible pin positions. Focus on leaving uphill putts when possible, as the severe front-to-back slope makes downhill putts treacherous. The key to success on this Tom Fazio design lies in respecting the strategic elements while recognizing the genuine birdie opportunity for well-executed shots. Smart course management and precise club selection will consistently yield better results than overly aggressive play.
Watch for
- Course conditioning and mapped hazards may affect line selection; confirm from the aerial.
Hole 2 Green Complex
Mapped green boundary
Green size: 4,691 sq ft
How did Hole 2 play?
How did this hole play today?
Frequently asked questions
Yardage reference: Championship tees · 395 yards.
What's the best strategy off the tee?
↓
For this 395-yard par 4, most players will hit driver to set up a comfortable approach.
How difficult is hole 2?
↓
This hole is a good scoring opportunity for most golfers. Key challenges include: heavily bunkered.
How big is the green on hole 2?
↓
The green is medium-sized with moderate targets. Pay attention to pin placement when selecting your approach club.
What's a good score on hole 2?
↓
This hole is a medium-length test where par is a solid result. A straightforward par 4 where course management pays off.