Hole 8 at Grayhawk Golf Club (Raptor course)
- Par
- 3
- Yardage
- 174 yds
- Stroke index
- 18
- Hazards
- 4 bunkers
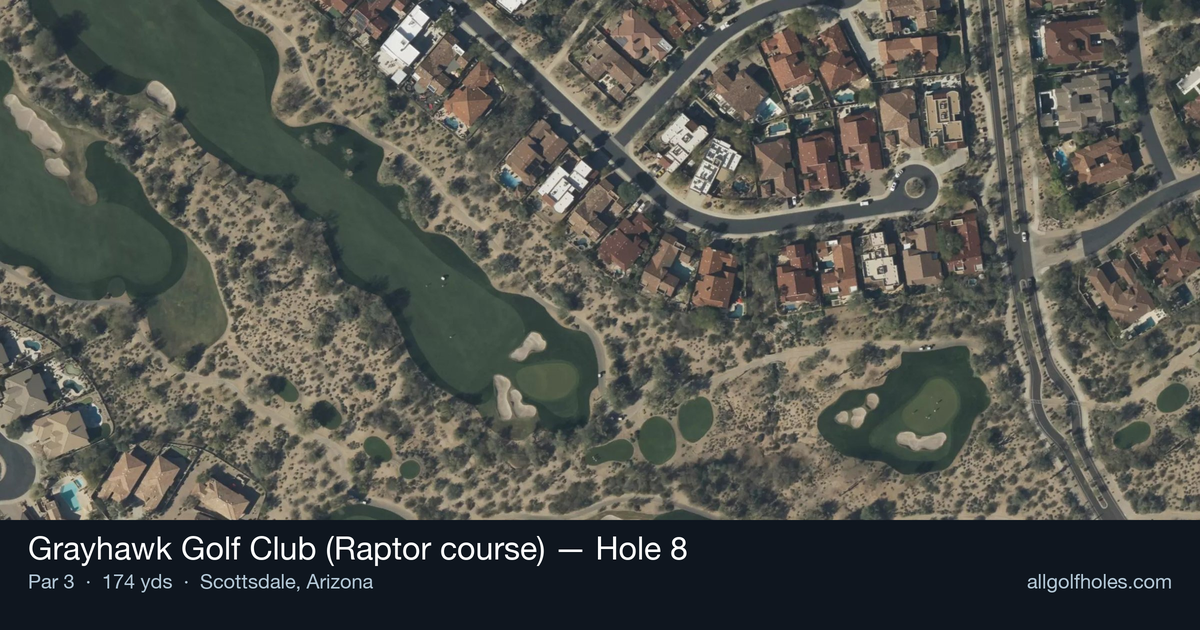
Aerial source not provided
Green size: 33 yds deep × 30 yds wide
Scorecard yardage is for Championship tees. The aerial shows its labeled reference position; distance rings measure to the green.
Championship tees · Par 3 · 174 yards
The plan for No. 8
The signature "Aces & Eights" at Grayhawk Golf Club (Raptor course) presents Tom Fazio's masterful risk-reward design in dramatic fashion. This 174-yard par 3 demands an all-carry tee shot to a large double-tiered green that's beautifully framed against the Sonoran Desert backdrop. Three imposing bunkers guard the front of the elevated putting surface, creating a formidable challenge that separates aggressive players from conservative ones. The green's back-to-front slope and lower left tier add complexity to club selection and pin positioning strategy. As the lowest handicap hole on the course, this scenic one-shotter epitomizes the Raptor's philosophy of high-stakes golf, where precision is rewarded and wayward shots face severe consequences in the deep, unforgiving bunkers that define this desert masterpiece.
Off the tee
From 174 yards, club selection becomes paramount on this all-carry hole. Most players will need a mid to long iron, though conditions and pin position heavily influence the choice. The target line should favor the center of the green initially, but adjust based on pin placement on the two-tiered surface. The three large bunkers fronting the green eliminate any chance of running the ball up, so commit fully to carrying them. Take one extra club if between selections - short is dead here, and the elevated green often plays longer than the yardage suggests.
Approach & recovery
Since this is a par 3, the tee shot IS the approach shot. The key is identifying which tier the pin sits on and adjusting accordingly. When the pin is on the lower left tier, aim for the left side but be aware of the deep bunker guarding that section. For pins on the upper tier, a more aggressive swing with a shorter club often works better than trying to finesse a longer iron. The elevated nature of the green means shots tend to land softer than expected, so don't be afraid to take dead aim at flag positions.
On the green
The double-tiered green slopes from back to front, creating significant putting challenges when the ball ends up on the wrong level. Putts from the upper tier to lower tier require careful speed control to avoid racing past the hole. Conversely, uphill putts from the lower tier demand firm striking. The small green size means most putts are makeable, but the tiers create subtle breaks that can fool even experienced players. Read the slope carefully and give yourself the best angle by playing to the correct tier from the tee. ## RISK VS REWARD This hole offers limited risk/reward options due to its all-or-nothing design. The primary decision involves club selection and target selection based on pin position. Aggressive players might attack pins close to the bunkers, while conservative golfers should aim for the fat part of the green regardless of pin position. The real reward comes from accepting par as a good score and avoiding the temptation to get too cute with pin-hunting when the flag is in a dangerous position. ## DIFFERENT SKILL LEVELS **High-handicap players** should focus entirely on reaching the green safely, aiming for the center regardless of pin position. Take an extra club to ensure clearing the front bunkers, and remember that any part of this small green gives you a reasonable birdie chance. Don't let the intimidating visual of the bunkers cause you to swing tentatively. **Low-handicap players** can be more aggressive with pin positions, but should still respect the severity of missing short. Consider the two-tier system when selecting clubs - sometimes taking less club and swinging aggressively to the lower tier is smarter than trying to finesse a longer club to an upper-tier pin. Course management and accepting par when the pin is in a tough position often leads to better overall scoring on this demanding hole.
Watch for
- Course conditioning and mapped hazards may affect line selection; confirm from the aerial.
Hole 8 Green Complex
Mapped green boundary
Green size: 5,133 sq ft
How did Hole 8 play?
How did this hole play today?
Frequently asked questions
Yardage reference: Championship tees · 174 yards.
What club should I use on this par 3?
↓
At 174 yards, most golfers will need a mid-iron (7-iron to 8-iron) to reach this green. Adjust for elevation, wind, and pin position.
How difficult is hole 8?
↓
This hole is a moderate challenge for most golfers. Key challenges include: heavily bunkered.
What hazards should I watch out for on hole 8?
↓
Key hazards include: 4 greenside bunkers. Plan your shots to avoid these trouble spots.
How big is the green on hole 8?
↓
The green is medium-sized with moderate targets. Pay attention to pin placement when selecting your approach club.
What's a good score on hole 8?
↓
This hole is a solid par with birdie chances for precise approach shots. Making par is a good result here. Focus on hitting the green and avoiding three-putts.