Hole 8 at Blackwolf Run Golf Course
- Par
- 3
- Yardage
- 240 yds
- Stroke index
- 13
- Hazards
- 1 bunker · Water
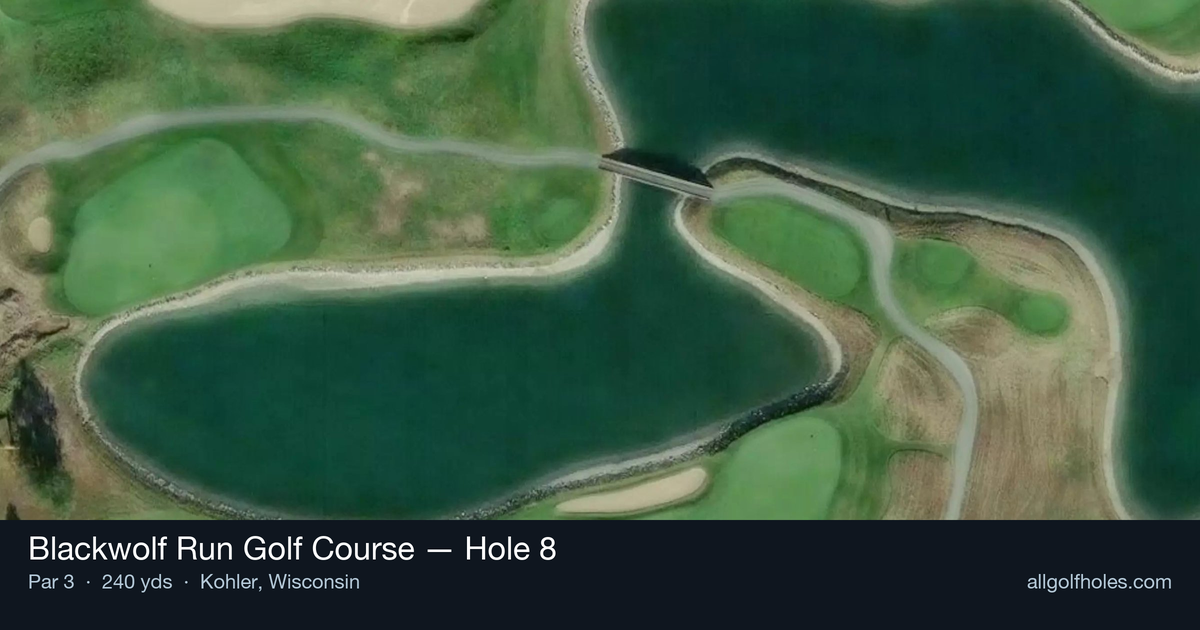
Aerial source not provided
Green size: 38 yds deep × 31 yds wide
Scorecard yardage is for Championship tees. The aerial shows its labeled reference position; distance rings measure to the green.
Championship tees · Par 3 · 240 yards
The plan for No. 8
The 8th hole at Blackwolf Run Golf Course showcases Pete Dye's architectural genius in a dramatic par 3 that plays 240 yards over water to a small, well-defended green. This beautiful one-shotter demands precision as water frames the right side with a distinctive rock wall separating the hazard from the putting surface. The hole's most striking feature is an extraordinarily long bunker that stretches the entire length down the left side, creating a narrow corridor for approach shots. With the clubhouse looming majestically in the background, this tee shot requires both power and accuracy to navigate between the water hazard and the seemingly endless sand trap. The combination of natural beauty carved by glacial runoff and Dye's signature design elements makes this hole a memorable test that epitomizes Blackwolf Run's reputation for hosting major championships while challenging golfers of all abilities.
Off the tee
Club selection is critical on this demanding one-shotter, typically requiring anything from a long iron to a hybrid or fairway wood depending on conditions and tee position. The target line should favor the center-left portion of the green to avoid the water hazard that dominates the right side. However, be mindful of the extensive bunker system that runs the entire length of the left side - what many consider one of the longest continuous bunkers in golf. Focus on a smooth, committed swing rather than trying to guide the ball. The elevated tee provides excellent visibility, but don't let the dramatic setting affect your pre-shot routine. Take extra time to assess wind conditions, as the river setting can create swirling breezes that dramatically affect ball flight.
Approach & recovery
Since this is a par 3, your tee shot IS your approach shot, making execution even more crucial. The small green demands precise distance control - coming up short often means finding water or bunkers, while going long typically leaves a difficult recovery shot. The rock wall separating the water from the green creates an intimidating visual, but trust your yardage and commit to your club selection. When the pin is positioned on the right side of the green, resist the temptation to fire directly at it. Instead, aim for the center of the green and rely on your putting to get close. Only attempt to attack right-side pins if you're feeling confident with your ball-striking and have favorable wind conditions.
On the green
The small putting surface at the 8th requires careful speed control and precise green reading. Pete Dye greens are known for subtle undulations that can be deceptive, so take time to study the slopes from multiple angles. Pay particular attention to how putts will break toward the water hazard - many putts will have a tendency to slide toward the right side of the green. Focus on getting your first putt close rather than being overly aggressive. The combination of elevation changes and the intimidating surroundings can make golfers tentative, leading to poor speed control. Trust your read and make a confident stroke. ## RISK VS REWARD This hole offers a classic Pete Dye risk-reward scenario. The reward for an accurate tee shot is a legitimate birdie opportunity on what many consider one of the most beautiful holes in American golf. However, the risks are severe - water right, bunkers left, and a small target that punishes anything less than precise execution. The smart play is often to aim for the center of the green regardless of pin position, accepting a longer putt in exchange for avoiding the major hazards. Only when conditions are perfect and confidence is high should you consider attacking tucked pins, particularly those on the right side near the water. ## DIFFERENT SKILL LEVELS **High Handicappers:** Focus on making solid contact and getting the ball airborne rather than trying to be too precise. Aim for the left-center of the green to give yourself the maximum margin for error. Don't be afraid to take one more club than you think you need - being long is generally better than being short on this hole. If you do find the bunkers or miss the green, focus on getting your next shot on the putting surface rather than trying to get it close. **Low Handicappers:** This hole rewards precision and course management skills. Study the wind conditions carefully and trust your yardages. When attacking right-side pins, ensure you have perfect contact and favorable conditions. Consider the risk of going for a back pin position versus settling for the center of the green. Your short game skills will be tested if you miss the green, so have a clear recovery strategy before you swing. The 8th hole at Blackwolf Run represents championship-level golf course design at its finest, where strategic thinking and precise execution combine to create one of the most memorable par 3s in the Midwest.
Watch for
- Course conditioning and mapped hazards may affect line selection; confirm from the aerial.
Hole 8 Green Complex
Mapped green boundary
Green size: 6,467 sq ft
How did Hole 8 play?
How did this hole play today?
Frequently asked questions
Yardage reference: Championship tees · 240 yards.
What club should I use on this par 3?
↓
At 240 yards, most golfers will need a fairway wood or hybrid to reach this green. Adjust for elevation, wind, and pin position.
How difficult is hole 8?
↓
This hole is one of the tougher holes on the course for most golfers. Key challenges include: long par 3, water in play.
What hazards should I watch out for on hole 8?
↓
Key hazards include: 1 greenside bunker; water at 48.2 yards. Plan your shots to avoid these trouble spots.
How big is the green on hole 8?
↓
The green is fairly large with multiple pin positions. The green is wider than it is deep, rewarding shots that find the correct tier. Lag putting becomes important on longer putts.
Where is the best miss on hole 8?
↓
If you're going to miss the green, favor the left side. The right (water) brings more trouble into play and makes recovery difficult.
What's a good score on hole 8?
↓
This hole is a challenging par where bogey is acceptable. This longer par 3 will test your long iron or hybrid game. Par is a good score.