Hole 17 at Blackwolf Run Golf Course
- Par
- 3
- Yardage
- 182 yds
- Stroke index
- 18
- Hazards
- 2 bunkers
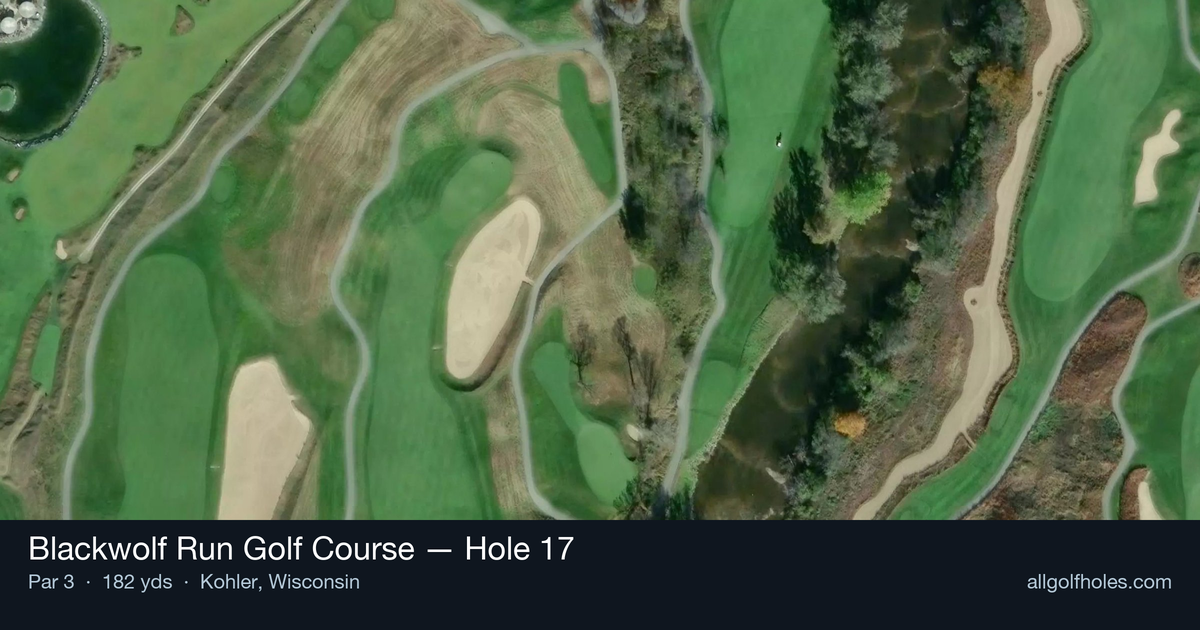
Aerial source not provided
Green size: 37 yds deep × 25 yds wide
Scorecard yardage is for Championship tees. The aerial shows its labeled reference position; distance rings measure to the green.
Championship tees · Par 3 · 182 yards
The plan for No. 17
The 17th hole at Blackwolf Run Golf Course showcases Pete Dye's architectural brilliance in a deceptively challenging 182-yard par 3. This straight shot demands precision to a small, elevated green that sits slightly right and downhill from the tee, offering golfers their first glimpse of the Sheboygan River flowing along the right side. The hole epitomizes Dye's "subtle and devilish" design philosophy, where the absence of obvious hazards masks the true challenge. The compact green complex features Dye's signature railroad ties framing the putting surface, creating an intimidating target that rewards accurate iron play while severely punishing wayward shots. As the easiest handicap hole on the course, it lulls players into false confidence before revealing its bite through precise distance control requirements and unforgiving green contours.
Off the tee
Club selection is paramount on this one-shot hole. The downhill nature of the shot means the ball will fly farther than the yardage suggests, so take at least one club less than the distance indicates. A smooth mid-iron to long-iron swing, depending on conditions, will serve you better than forcing a shorter club. Target the center-left portion of the green to give yourself the safest angle away from the river. The railroad ties around the green aren't just aesthetic - they're hazards that can create difficult recovery shots. Focus on a controlled, committed swing rather than trying to guide the ball, as tentative swings often lead to mishits toward the water.
Approach & recovery
Since this is a par 3, your tee shot is your approach. The key is accounting for the elevation change and potential wind off the river. The green slopes slightly from back to front, so landing past the pin isn't necessarily a bad outcome. Pay attention to pin position - when it's tucked right near the river, the smart play is to aim for the fat part of the green and take your two-putt par. The railroad ties create an intimidating visual, but they also provide a clear target reference. Use them as alignment aids, but remember that shots hitting the ties will likely bounce unpredictably.
On the green
Pete Dye's greens are known for subtle breaks that aren't immediately apparent. This small green features gentle slopes that feed toward the river, so putts will generally break right. The downhill nature of many putts means speed control is crucial - it's better to leave putts short than watch them roll off the green. When putting from above the hole, take an aggressive read toward the river side. Uphill putts can be more aggressive, but always respect the slope and the proximity to trouble. ## RISK VS REWARD This hole offers a classic risk/reward scenario. Aggressive players might try to attack pins tucked near the railroad ties, but the penalty for missing is severe. The conservative play - aiming for the center of the green regardless of pin position - typically yields better scoring over time. The real reward comes from simply making par on what can be a card-wrecker. With the handicap rating of 18, this hole is statistically the "easiest" on the course, but Pete Dye's design ensures that careless shots are severely punished. ## DIFFERENT SKILL LEVELS **High Handicappers:** Focus entirely on finding the green, preferably the left-center portion. Take an extra club to ensure you clear any front-edge trouble, and don't worry about pin hunting. A bogey here isn't a disaster - double bogey or worse is what you want to avoid. **Low Handicappers:** You can be more aggressive with pin positions, but still respect the water and railroad ties. Use the elevation change to your advantage with controlled ball flight. Consider the wind patterns off the river, which can be tricky to read from the tee. This is a hole where course management trumps ego - even scratch players should think twice about attacking dangerous pins. The 17th hole at Blackwolf Run rewards patience and precision while punishing overaggression. Embrace the scenic beauty, but never forget that Pete Dye's subtle design can quickly turn a scoring opportunity into a big number.
Watch for
- Course conditioning and mapped hazards may affect line selection; confirm from the aerial.
Hole 17 Green Complex
Mapped green boundary
Green size: 5,536 sq ft
How did Hole 17 play?
How did this hole play today?
Frequently asked questions
Yardage reference: Championship tees · 182 yards.
What club should I use on this par 3?
↓
At 182 yards, most golfers will need a long iron or hybrid (5-iron to 6-iron) to reach this green. Adjust for elevation, wind, and pin position.
How difficult is hole 17?
↓
This hole is a good scoring opportunity for most golfers.
How big is the green on hole 17?
↓
The green is medium-sized with moderate targets. Pay attention to pin placement when selecting your approach club.