Hole 7 at Blackwolf Run Golf Course
- Par
- 5
- Yardage
- 520 yds
- Stroke index
- 17
- Hazards
- 6 bunkers · Water
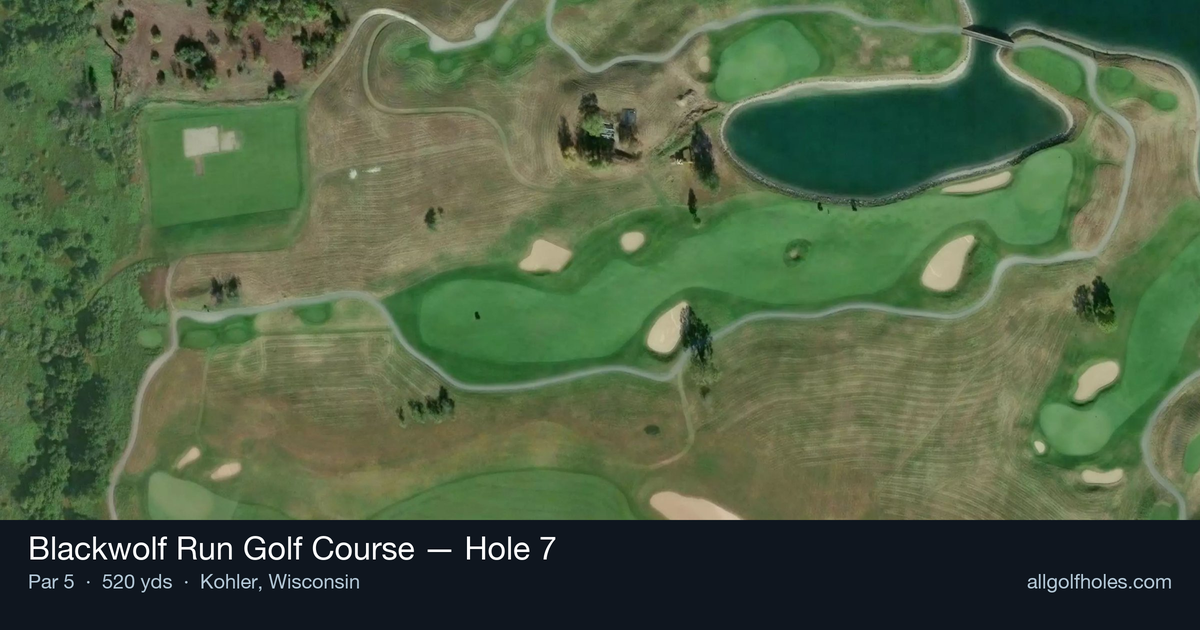
Aerial source not provided
Green size: 34 yds deep × 31 yds wide
Scorecard yardage is for Championship tees. The aerial shows its labeled reference position; distance rings measure to the green.
Championship tees · Par 5 · 520 yards
The plan for No. 7
The seventh hole at Blackwolf Run Golf Course represents Pete Dye's mastery of deceptive simplicity, offering a seemingly straightforward par 5 that reveals its subtle complexities upon closer inspection. At 520 yards, this straight hole flows through the rolling prairie landscape that defines the Meadow Valleys course, carved from Wisconsin's glacier-forged terrain. The generous fairway invites aggressive tee shots, but Dye's architectural genius lies in the positioning and approach angles that reward strategic thinking over pure distance. The small green complex demands precision on the approach, testing even accomplished players' short iron accuracy. While appearing benign compared to the course's more dramatic holes, this par 5 exemplifies Dye's philosophy of "subtle devilishness," where smart course management trumps brute force and sets up potential birdie opportunities for those who navigate its understated challenges with patience and precision.
Off the tee
Your tee shot strategy should focus on finding the optimal position for your second shot rather than maximum distance. Given the 520-yard length, most players will need two solid shots to reach this green in regulation. Aim for the center-left portion of the fairway to provide the best angle for your approach. Driver is typically the right choice here, but if you're struggling with accuracy, consider a 3-wood or hybrid to ensure you stay in the fairway. The key is avoiding any rough or uneven lies that could complicate your lengthy approach shot.
Approach & recovery
With the small green size being the primary defensive feature, your approach shot becomes critical to scoring success. From your likely position 200-250 yards out, you'll need a long iron or hybrid to reach the putting surface. Focus on the center of the green rather than attacking pin positions, as Pete Dye's small greens are notoriously difficult to hold with longer clubs. Pay attention to the wind conditions, which can significantly affect club selection on this exposed prairie layout. If you're not confident about reaching the green in two, consider laying up to your favorite wedge distance - sometimes the smart play yields better results than the aggressive one.
On the green
The small green demands respect with your putting approach. Expect subtle breaks and firm conditions typical of Pete Dye designs. Three-putting from long range is a real possibility, so focus on lag putting to ensure you don't turn a potential birdie into bogey. If you've successfully reached the green in regulation, take your time reading the putt - the relatively easy handicap rating suggests many players struggle here despite the apparent simplicity. ## RISK VS REWARD This hole presents a classic risk/reward scenario disguised as a straightforward par 5. The reward is significant - a legitimate birdie opportunity on a hole where many players expect to score well. The risk lies in the precision required, particularly on the approach shot to the small green. Going for the green in two offers the best scoring potential, but missing the target can lead to difficult up-and-down situations around Pete Dye's typically challenging green complexes. ## DIFFERENT SKILL LEVELS **Higher Handicap Players:** Play this as a three-shot hole. Focus on two solid shots to reach wedge distance, then attack the pin with your most reliable scoring club. Don't feel pressured to reach the green in two - a well-executed three-shot strategy often produces better scores than a failed aggressive approach. **Lower Handicap Players:** This is your birdie hole. With good course management and solid ball-striking, you should reach the green in regulation most rounds. However, respect the small green size and don't get greedy with pin hunting. Center of the green gives you the best chance for birdie while minimizing bogey risk. The 7th hole exemplifies why Blackwolf Run hosts major championships while remaining enjoyable for all skill levels - it rewards good strategy and execution while punishing careless play, regardless of your handicap.
Watch for
- Course conditioning and mapped hazards may affect line selection; confirm from the aerial.
Hole 7 Green Complex
Mapped green boundary
Green size: 6,295 sq ft
How did Hole 7 play?
How did this hole play today?
Frequently asked questions
Yardage reference: Championship tees · 520 yards.
Can this par 5 be reached in two?
↓
At 520 yards, A true three-shot hole for most players. Position your layup to leave a comfortable wedge distance.
How difficult is hole 7?
↓
This hole is a moderate challenge for most golfers. Key challenges include: water in play, heavily bunkered.
How big is the green on hole 7?
↓
The green is fairly large with multiple pin positions. Lag putting becomes important on longer putts.
What's a good score on hole 7?
↓
This hole is a solid birdie opportunity with smart layup strategy. Most golfers can reach in three. Position your layup to leave a comfortable wedge.