Hole 18 at Blackwolf Run Golf Course
- Par
- 4
- Yardage
- 458 yds
- Stroke index
- 4
- Hazards
- 1 bunker · Water
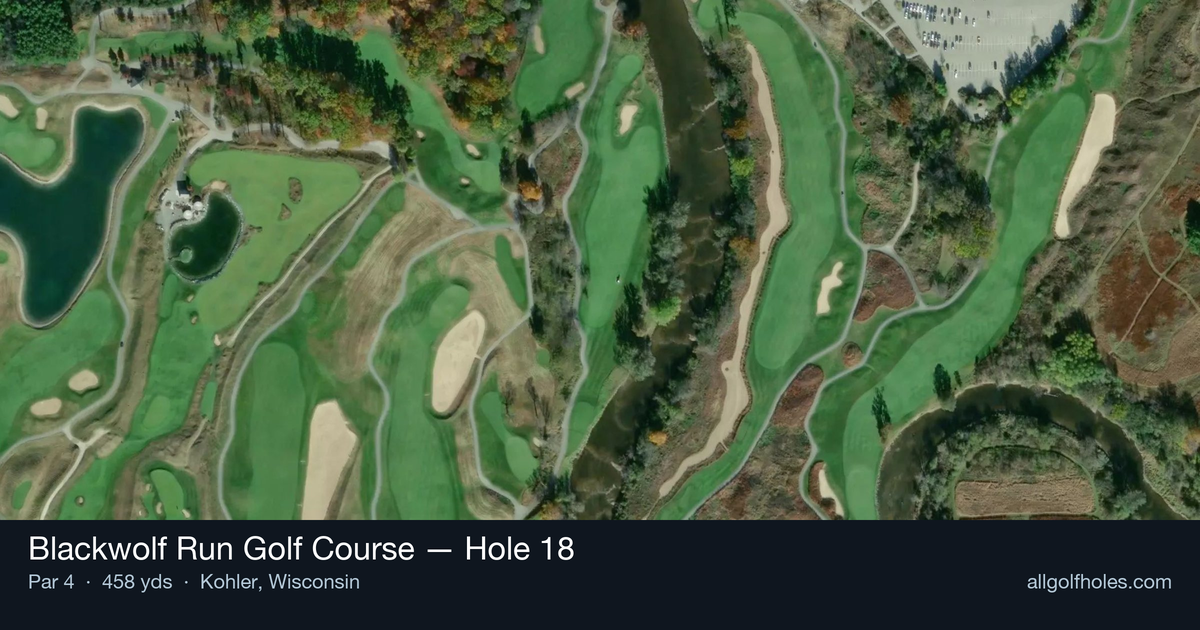
Aerial source not provided
Green size: 25 yds deep × 19 yds wide
Scorecard yardage is for Championship tees. The aerial shows its labeled reference position; distance rings measure to the green.
Championship tees · Par 4 · 458 yards
The plan for No. 18
The 18th hole at Blackwolf Run Golf Course, aptly named "Dyehard," serves as a formidable finale to Pete Dye's masterpiece along the Sheboygan River. This demanding par 4 stretches 458 yards and earned its reputation as a tough finishing hole during the 1998 US Open, where Se Ri Pak famously played barefoot from the flooded left fairway. The hole demands precision from tee to green, with the Sheboygan River potentially coming into play and creating strategic decisions throughout. The small green complex requires an accurate approach shot to secure par on this challenging closer. Blackwolf Run's signature finishing hole ensures that every round ends with a test worthy of championship golf, where a well-earned four represents a satisfying conclusion to one of Wisconsin's most celebrated layouts.
Off the tee
Your tee shot strategy should prioritize the center-right portion of the fairway to avoid the historically problematic left side that can become waterlogged in wet conditions. A driver or strong 3-wood aimed at the right-center of the landing zone will provide the best approach angle while keeping you away from trouble. The straight layout allows for an aggressive line, but remember that Se Ri Pak's famous barefoot shot from the flooded left side serves as a cautionary tale about straying too far left. Focus on a smooth, controlled swing rather than trying to overpower this hole. A well-struck drive of about 250-280 yards will leave you with a manageable mid-iron approach.
Approach & recovery
The approach shot into the small green requires precision club selection and target line discipline. With the green's compact size, accuracy trumps distance control. Aim for the center of the green initially, adjusting only when pin position and your lie dictate a more aggressive target. The small green means there's little margin for error, so take one extra club if you're between selections. Better to be long and putting back than short and chipping up to a difficult pin position.
On the green
The putting surface at "Dyehard" rewards careful green reading and speed control. With the green's small size, you'll often face longer putts than expected if you miss your approach target. Focus on lag putting to ensure you don't compound mistakes with three-putts on this challenging finishing hole. Pay attention to any subtle breaks and remember that the green's size makes distance control more critical than usual. ## RISK VS REWARD This hole offers limited risk/reward opportunities, instead demanding solid, conservative golf strategy. The primary risk comes from being too aggressive with club selection or target lines. The reward for playing smart and staying patient is avoiding the big numbers that can ruin your round on the final hole. The straight layout might tempt you to take risks, but the hole's length and small green make precision the better choice over power. ## DIFFERENT SKILL LEVELS **High-Handicap Players:** Focus on keeping the ball in play off the tee, even if it means hitting 3-wood or hybrid. Aim for the center of the fairway and don't worry about distance. On the approach, take plenty of club and aim for the middle of the green, accepting two-putt pars as excellent scores. **Low-Handicap Players:** You can be more aggressive with driver off the tee, but still respect the left side trouble. Your approach shot becomes crucial - use your distance control skills to attack pins when the lie and conditions allow, but always have a bailout plan to the center of the green. **Course Management Tip:** Remember this hole's reputation as a tough finisher. Don't let the pressure of the 18th hole force you into poor decisions. Play within your abilities and let good execution, not heroic shots, determine your score on "Dyehard."
Watch for
- Course conditioning and mapped hazards may affect line selection; confirm from the aerial.
Hole 18 Green Complex
Mapped green boundary
Green size: 2,676 sq ft
How did Hole 18 play?
How did this hole play today?
Frequently asked questions
Yardage reference: Championship tees · 458 yards.
What's the best strategy off the tee?
↓
For this 458-yard par 4, most players will hit driver to set up a comfortable approach.
How difficult is hole 18?
↓
This hole is one of the tougher holes on the course for most golfers. Key challenges include: long par 4, water in play, small green.
What hazards should I watch out for on hole 18?
↓
Key hazards include: 1 greenside bunker; water at 164.0 yards. Plan your shots to avoid these trouble spots.
How big is the green on hole 18?
↓
The green is small and requires precision. Expect challenging pin positions with limited room for error.
What's a good score on hole 18?
↓
This hole is one of the tougher holes where par feels like birdie. A challenging par 4. Accept that bogey happens and avoid big numbers.