Hole 6 at Blackwolf Run Golf Course
- Par
- 4
- Yardage
- 475 yds
- Stroke index
- 1
- Hazards
- 6 bunkers
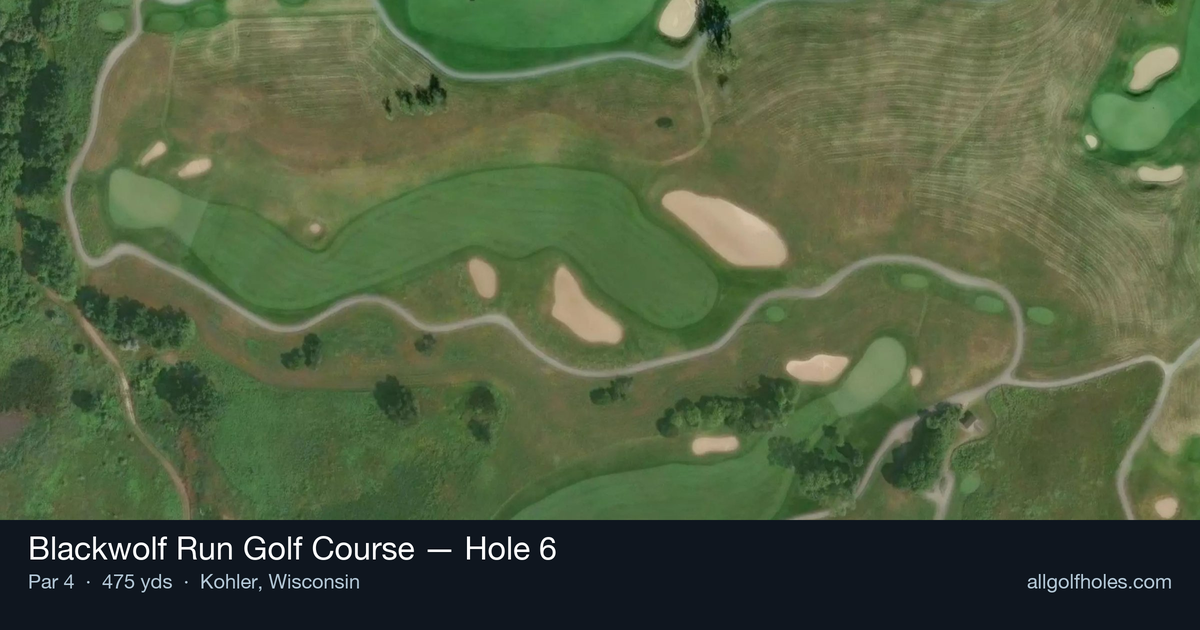
Aerial source not provided
Green size: 36 yds deep × 23 yds wide
Scorecard yardage is for Championship tees. The aerial shows its labeled reference position; distance rings measure to the green.
Championship tees · Par 4 · 475 yards
The plan for No. 6
The number one handicap hole at Blackwolf Run Golf Course, this 475-yard par 4 embodies Pete Dye's "subtly devilish" design philosophy in its purest form. Carved through Wisconsin's glacial landscape, the sixth hole presents a deceptively straightforward challenge that demands both power and precision from the championship tees. The generous fairway invites aggressive tee shots, but Dye's trademark strategic elements lurk beneath the surface, rewarding thoughtful course management over raw distance. The approach shot to a small, well-defended green complex separates contenders from pretenders, requiring pinpoint accuracy to access favorable pin positions. This hole perfectly captures the essence of Blackwolf Run's championship pedigree while remaining accessible to golfers of all abilities.
Off the tee
The tee shot strategy centers on finding the optimal position in the fairway for your approach angle. With no major hazards to avoid, focus on hitting your most reliable tee shot rather than forcing extra distance. A well-struck driver or strong 3-wood should find the fairway, but accuracy trumps distance here. Aim for the center-right portion of the fairway to open up the best angle to the small green. The natural rolling terrain can create uneven lies, so commit fully to your swing and trust your target line.
Approach & recovery
The approach shot to this small green is where the hole shows its teeth. From the landing area, you'll likely face a mid-iron to long-iron depending on conditions and tee shot success. The compact green size demands pinpoint accuracy - this isn't a hole where you can bail out to the fat part of the green. Study the pin position carefully and aim for the center of the green unless you're feeling particularly confident. The glacially-carved terrain around the green can create challenging recovery shots, making the middle of the green your safest target.
On the green
Pete Dye's putting surfaces are renowned for their subtle breaks and challenging reads. This small green likely features multiple tiers or gentle slopes that can fool the eye. Take extra time to read your putt from multiple angles, paying attention to the natural drainage patterns in the glacial landscape. Lag putting becomes crucial here - two-putting from anywhere on this green should be considered a victory, especially with challenging pin positions. ## RISK VS REWARD The risk/reward calculation on this hole is more nuanced than obvious. While there are no water hazards or bunkers to navigate, the combination of length, small green, and #1 handicap rating creates its own set of challenges. The reward comes from playing within yourself - a solid par here is equivalent to a birdie on easier holes. Aggressive play rarely pays off; instead, focus on two quality shots that find their targets. ## DIFFERENT SKILL LEVELS **High Handicappers:** Play this hole conservatively from start to finish. Consider a fairway wood or hybrid off the tee if your driver tends to be erratic. Focus on finding the fairway first, then hitting the largest part of the green with your approach. Don't be afraid to take one more club than you think you need - short-siding yourself on this small green can lead to big numbers. **Low Handicappers:** This is a scoring opportunity if you execute properly. Use your distance advantage to hit a controlled tee shot, leaving yourself a comfortable approach distance. Attack pins only when they're accessible, and remember that even tour professionals respect Pete Dye's design philosophy. Course management and patience will serve you better than aggressive play. The 6th hole at Blackwolf Run embodies everything that makes Pete Dye's designs legendary - it rewards strategic thinking, precise execution, and respect for the natural landscape while punishing overconfidence and poor club selection.
Watch for
- Course conditioning and mapped hazards may affect line selection; confirm from the aerial.
Hole 6 Green Complex
Mapped green boundary
Green size: 5,180 sq ft
How did Hole 6 play?
How did this hole play today?
Frequently asked questions
Yardage reference: Championship tees · 475 yards.
What's the best strategy off the tee?
↓
For this 475-yard par 4, most players will hit driver to set up a comfortable approach.
How difficult is hole 6?
↓
This hole is a moderate challenge for most golfers. Key challenges include: long par 4, heavily bunkered.
How big is the green on hole 6?
↓
The green is medium-sized with moderate targets. The green is wider than it is deep, rewarding shots that find the correct tier. Pay attention to pin placement when selecting your approach club.
What's a good score on hole 6?
↓
This hole is one of the tougher holes where par feels like birdie. A challenging par 4. Accept that bogey happens and avoid big numbers.