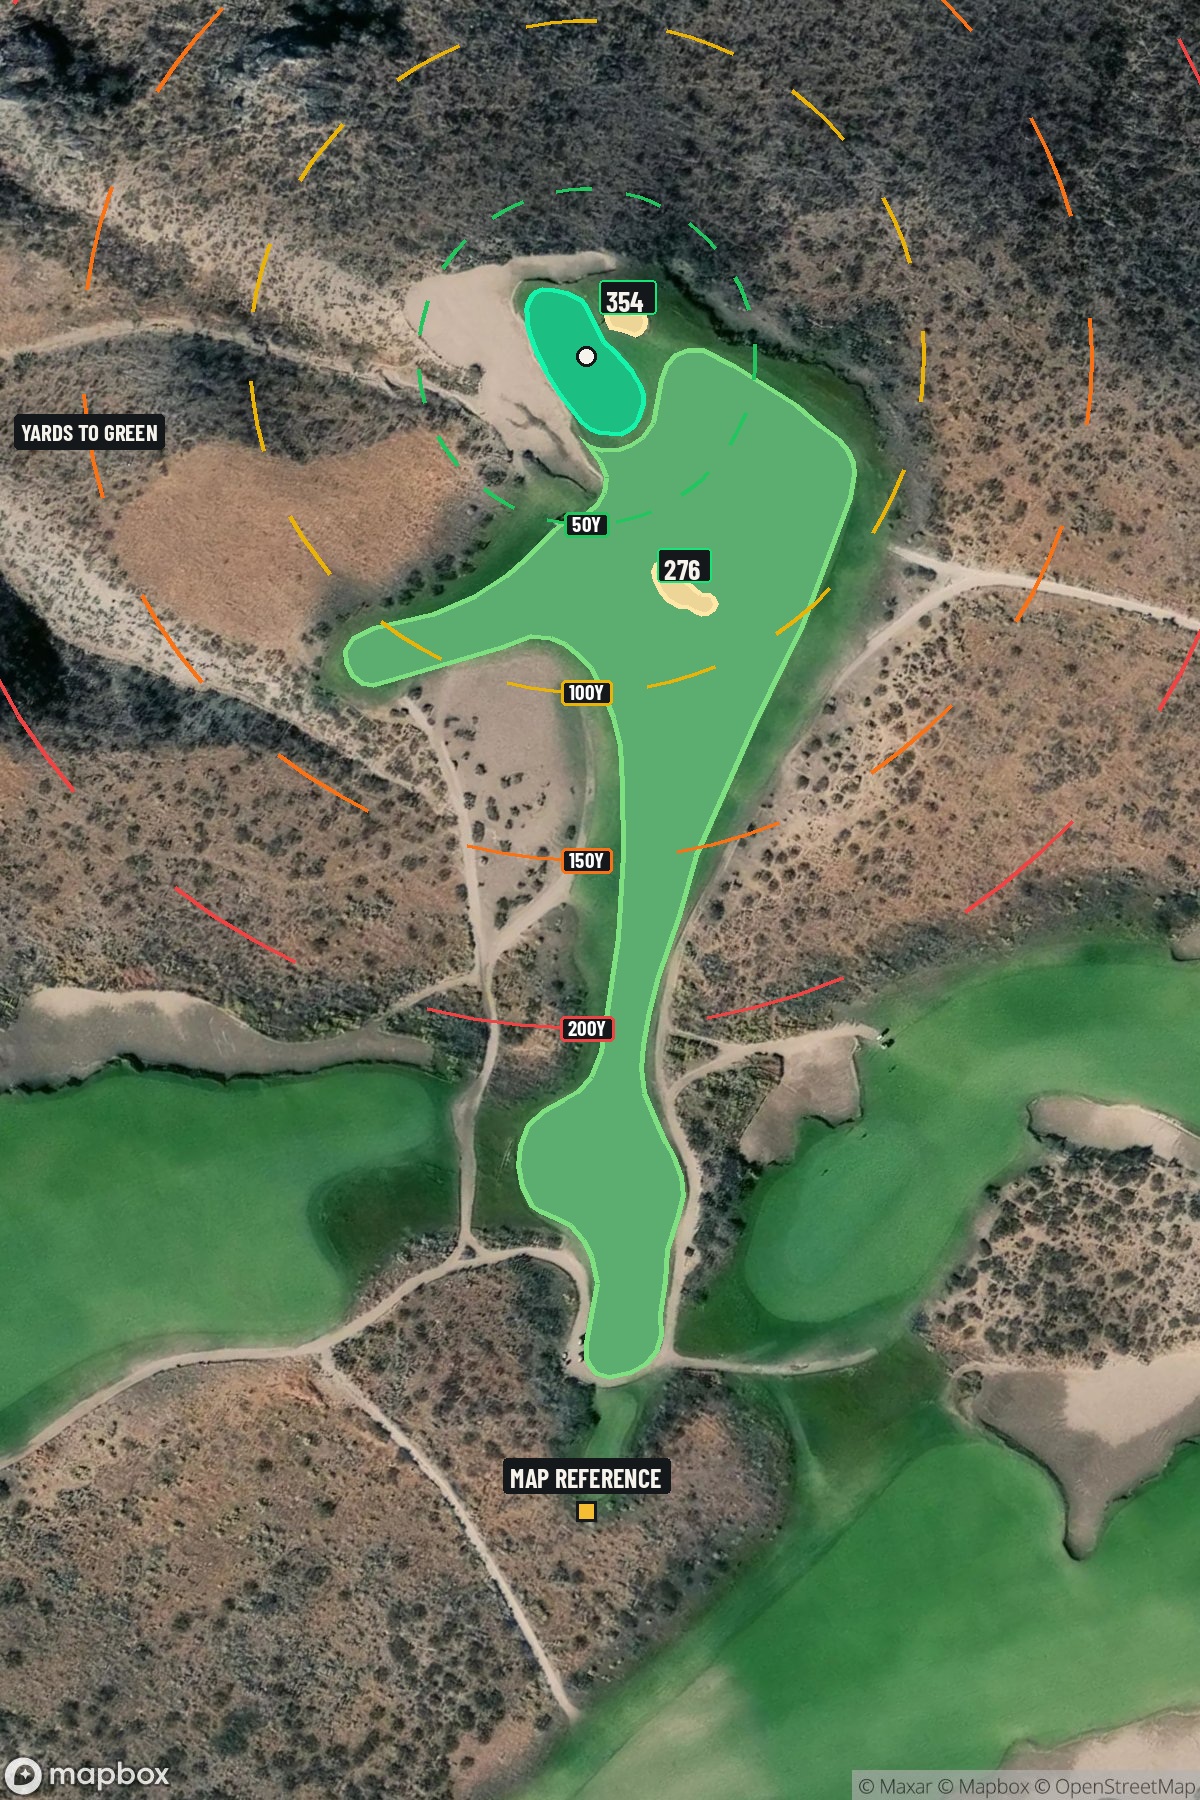
Hole 2 of 18 · Brewster, Washington

Hole 2 at Gamble Sands Golf and Inn

Par
4
Yards
340
Handicap
13
Bunkers
2
Hole 2 aerial at Gamble Sands Golf and Inn
Map distances from Map reference tee

The map's printed distances are measured from the Map reference tee to the green; they do not move when you change tees. Your Championship yardage is in the tiles above.

Green size: 44 yds deep × 36 yds wide

Mapbox Satellite composite · capture date not provided. Green at the top.

Where this map comes from

Satellite photo
Date not published
Mapbox satellite
Report a map problem
100%
Hole 2 aerial at Gamble Sands Golf and Inn

The plan for No. 2

These notes were written before the current map. Where their distances differ, trust the map.

The play: The signature second hole at Gamble Sands Golf and Inn showcases David McLay Kidd's masterful design philosophy, offering golfers a breathtaking panoramic view of the Columbia River valley below. This short par 4 at 340 yards presents a deceptively strategic challenge despite its modest length and absence of traditional hazards. The generous fairway invites aggressive tee shots, but the elevated position and dramatic terrain create visual intimidation that can affect club selection. The small green demands precision on the approach shot, rewarding accurate iron play over distance. With the stunning valley backdrop framing every shot, this hole exemplifies why Gamble Sands earned Golf Digest's Best New Public recognition, combining strategic golf with spectacular scenery that makes it one of Washington's most memorable holes.

Shot by shot

  1. Off the tee

    Your tee shot strategy should prioritize position over power. With the hole measuring 340 yards, most golfers will want to lay back with a fairway wood or long iron, leaving themselves a comfortable wedge distance to the small green. The wide fairway provides ample room for error, making this an ideal hole to find your rhythm early in the round. For longer hitters, driver remains an option, but the risk-reward calculation changes significantly. Getting too close to the green can leave you with an awkward partial wedge shot to a small target, making distance control more challenging than a full swing from the ideal approach distance.

  2. Approach & recovery

    The approach shot is where this hole's true challenge reveals itself. The small green demands precise club selection and committed swings. From the optimal approach distance, you'll typically be hitting a full wedge or short iron, which provides better spin control and distance consistency than a delicate partial shot. Focus on the center of the green regardless of pin position - the compact target leaves little margin for error. The straight layout means you won't have to worry about awkward lies or uneven stances, allowing you to commit fully to your approach shot. Pay attention to wind conditions, as they can significantly affect shorter irons on this elevated setting.

  3. On the green

    While the green shape is unknown from the data, small greens typically feature subtle breaks that can be deceiving. Take time to read the slopes carefully, as what appears to be a straight putt may have more break than expected. The elevated position overlooking the Columbia River valley can create optical illusions, so trust your read over what your eyes might suggest. Three-putting should be avoided at all costs on a hole this short. Conservative putting strategy - aiming for the center of the hole and focusing on solid contact - will serve you better than aggressive lines on this compact surface. ## RISK VS REWARD The primary risk-reward decision comes on the tee shot. Playing aggressively with driver can set up potential eagle opportunities but increases the difficulty of the approach shot. The more conservative play of laying back to your preferred approach distance offers a higher percentage birdie chance while virtually eliminating big numbers. Given the hole's handicap rating of 13, this represents a genuine scoring opportunity that shouldn't be squandered with overly aggressive play. The smart money is on taking your birdie chance while protecting against bogey. ## DIFFERENT SKILL LEVELS **High-handicap players** should embrace the conservative approach: fairway wood or hybrid off the tee to a comfortable approach distance, then aim for the center of the green with whatever club gives you confidence. Don't be tempted by the short yardage - par is an excellent score that keeps momentum building. **Low-handicap players** can be more aggressive with their approach shots, attacking pins when conditions allow. However, even skilled players should respect the small green size and avoid getting too cute with partial wedge shots. The key is finding the right balance between aggression and precision. **Mid-handicap players** will find this hole perfectly suited to their games when they resist the temptation to overpower it. Focus on solid fundamentals: good tee shot position, committed approach shot, and confident putting on the small green. This signature hole at Gamble Sands offers the perfect early-round scoring opportunity for golfers who combine smart course management with precise execution around the green.

  4. Watch for

    • Course conditioning and mapped hazards may affect line selection; confirm from the aerial.

The green on No. 2

Mapped boundary
Wide × deepyards
36×44
Areasq ft
8,551

Gear for Hole 2

We may earn a commission when you buy through these links.

Golfer feedback

How did Hole 2 play?

⚡ Quick Golfer Pulse

How did this hole play today?

1-tap anonymous vote

Frequently asked questions

Yardage reference: Championship tees · 340 yards.

What's the best strategy off the tee?

↓

For this 340-yard par 4, most players will hit 3-wood or driver to set up a comfortable approach.

How difficult is hole 2?

↓

This hole is a good scoring opportunity for most golfers. Key challenges include: large green requiring good lag putting.

How big is the green on hole 2?

↓

The green is large and can play quite long. The green is wider than it is deep, rewarding shots that find the correct tier. Three-putt territory if you don't manage your approach distance well.

What's a good score on hole 2?

↓

This hole is a birdie opportunity if you find the fairway. This shorter par 4 rewards accuracy off the tee with a short iron approach.