Hole 9 of 18 · Brewster, Washington

Hole 9 at Gamble Sands Golf and Inn

Par
4
Yards
421
Handicap
5
Bunkers
2
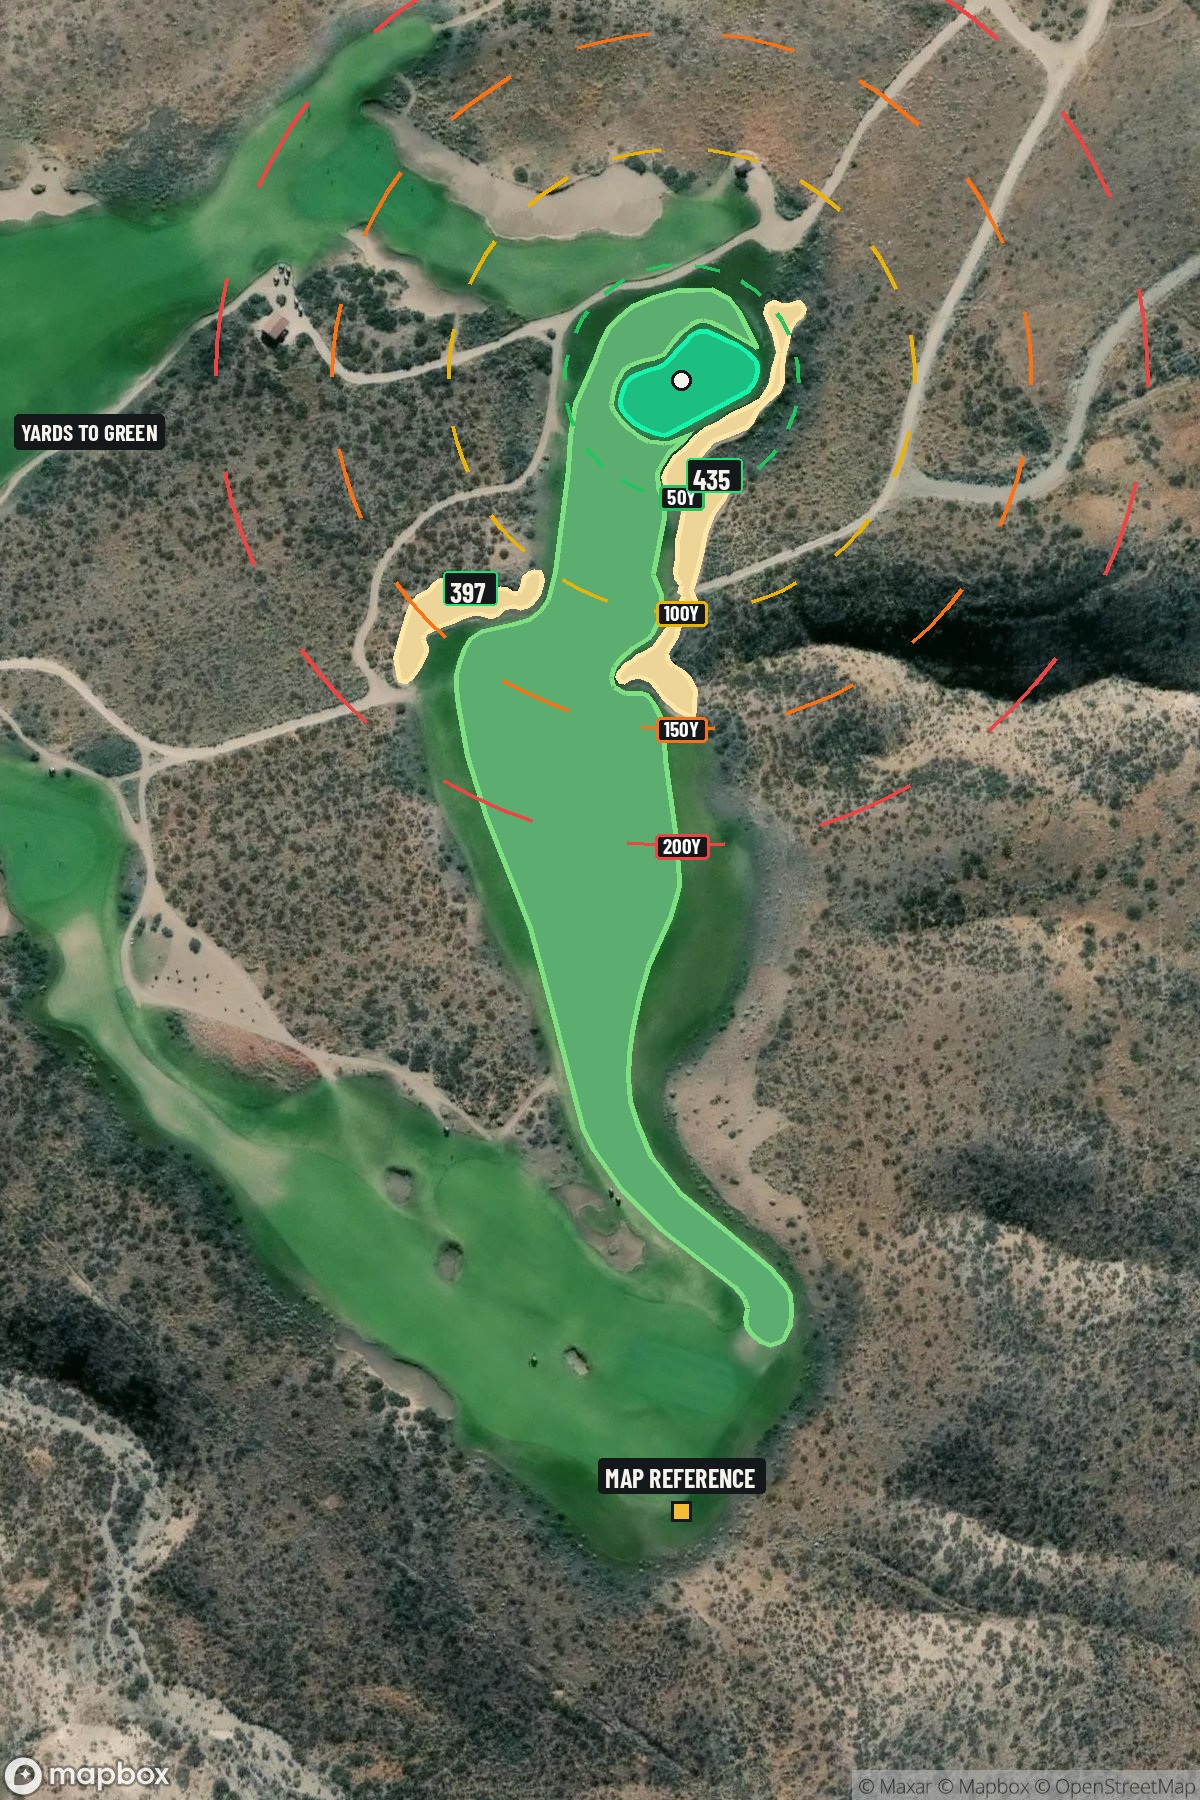
Hole 9 aerial at Gamble Sands Golf and Inn
Map distances from Map reference tee

The map's printed distances are measured from the Map reference tee to the green; they do not move when you change tees. Your Championship yardage is in the tiles above.

Green size: 47 yds deep × 61 yds wide

Mapbox Satellite composite · capture date not provided. Green at the top.

Where this map comes from

Satellite photo
Date not published
Mapbox satellite
Report a map problem
100%
Hole 9 aerial at Gamble Sands Golf and Inn

The plan for No. 9

These notes were written before the current map. Where their distances differ, trust the map.

The play: The finishing hole of the front nine at Gamble Sands Golf and Inn hole 9 presents a demanding 421-yard par 4 that tests every aspect of your game. This straight-forward layout demands precision from tee to green, with the fifth handicap rating reflecting its challenge level. The tee shot requires careful positioning on a fairway that rewards accuracy over distance, setting up a crucial approach shot to a small, unforgiving green complex. With minimal hazards to distract, this hole becomes a pure test of golf fundamentals - driving accuracy and iron play precision. The compact green demands pinpoint approach shots, making par a satisfying achievement as you turn toward the back nine in the spectacular Columbia River valley setting.

Shot by shot

  1. Off the tee

    Your tee shot strategy should prioritize finding the fairway center, setting up the optimal approach angle. With no significant hazards to navigate, focus on a controlled swing with your most reliable fairway club. For most players, this means a driver or 3-wood aimed at the fairway's heart, leaving a comfortable mid-iron approach. The target line should favor the center of the landing zone, avoiding any urge to cut corners or gain extra distance at the expense of accuracy.

  2. Approach & recovery

    The approach shot is where this hole's true challenge reveals itself. The small green demands pinpoint accuracy, making club selection critical for sticking your shot close to the pin. Depending on your tee shot position, expect to hit anything from a 6-iron to 9-iron for your approach. Aim for the center of the green unless the pin position clearly favors one side, and always err on the side of caution with a small target. Consider taking one extra club to ensure you clear any front-edge trouble and give yourself the best chance at a makeable birdie putt.

  3. On the green

    With a small green, putting becomes a premium skill on this hole. Focus on speed control above all else, as the compact surface leaves little room for error on longer putts. Read the green carefully from multiple angles, paying special attention to any subtle breaks that might be magnified by the green's size. Lag putting to a two-foot circle becomes crucial, as three-putts can quickly turn a scoring opportunity into a bogey. ## RISK VS REWARD This hole offers excellent risk/reward dynamics for confident players. The straight layout and lack of major hazards make aggressive play tempting, but the small green serves as the great equalizer. The reward for hitting the green in regulation is substantial - birdie opportunities abound. However, missing the small target often results in challenging up-and-down situations that can lead to bogey or worse. ## DIFFERENT SKILL LEVELS **High Handicappers:** Focus on fairway accuracy with your most reliable tee club, even if it means laying back with a 3-wood or hybrid. Aim for the center of the green on your approach, accepting a 20-foot putt over a risky pin-hunting shot. Two-putt pars should be your primary goal. **Low Handicappers:** This hole presents a genuine birdie opportunity with proper execution. Consider driver if you're confident in your accuracy, setting up a shorter iron approach. Be more aggressive with pin-hunting on your approach shot, but respect the small green's margins. This is a hole where good players should expect to make birdie with solid execution. The 9th hole at Gamble Sands rewards smart golf strategy over heroic shots, making it an ideal confidence-builder before tackling the back nine challenges ahead.

  4. Watch for

    • Course conditioning and mapped hazards may affect line selection; confirm from the aerial.

The green on No. 9

Mapped boundary
Wide × deepyards
61×47
Areasq ft
15,552

Gear for Hole 9

We may earn a commission when you buy through these links.

Golfer feedback

How did Hole 9 play?

⚡ Quick Golfer Pulse

How did this hole play today?

1-tap anonymous vote

Frequently asked questions

Yardage reference: Championship tees · 421 yards.

What's the best strategy off the tee?

↓

For this 421-yard par 4, most players will hit driver to set up a comfortable approach.

How difficult is hole 9?

↓

This hole is a good scoring opportunity for most golfers. Key challenges include: large green requiring good lag putting.

How big is the green on hole 9?

↓

The green is large and can play quite long. Three-putt territory if you don't manage your approach distance well.