Hole 13 at Cog Hill Golf & CC (Dubsdread)
- Par
- 4
- Yardage
- 480 yds
- Stroke index
- 6
- Hazards
- 5 bunkers
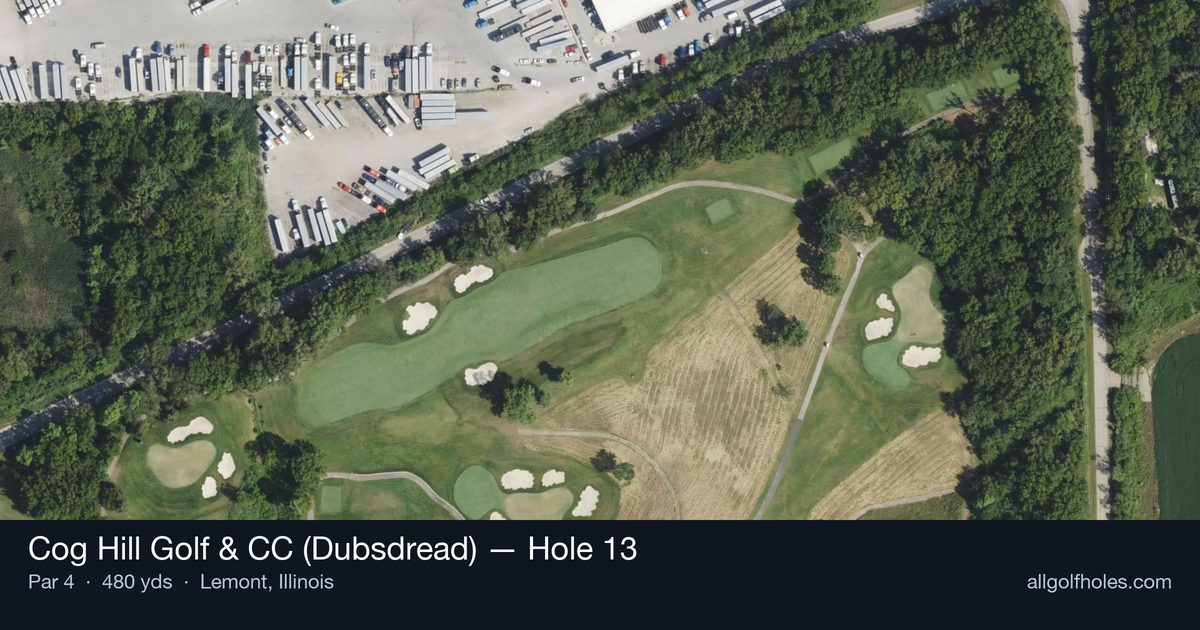
Aerial source not provided
Green size: 35 yds deep × 29 yds wide
Scorecard yardage is for Championship tees. The aerial shows its labeled reference position; distance rings measure to the green.
Championship tees · Par 4 · 480 yards
The plan for No. 13
The 13th hole at Cog Hill Golf & CC (Dubsdread) epitomizes the championship pedigree that has made this course a former PGA Tour venue. This demanding par 4 stretches 480 yards through the rolling terrain of the Des Plaines River Valley, presenting a stern test of accuracy and distance control. The straight layout may appear straightforward, but the hole's true challenge lies in its unforgiving nature - a characteristic that earned Dubsdread its fearsome nickname. A precise tee shot sets up a lengthy approach to a small, well-guarded green that punishes anything less than pinpoint accuracy. With its position as the 6th handicap hole, this par 4 demands respect from golfers of all skill levels, embodying the relentless difficulty that has frustrated countless players on this storied Chicago-area layout.
Off the tee
Your tee shot strategy centers on finding the optimal position for your approach while maximizing distance. With 480 yards to navigate, most players will need every yard they can safely achieve off the tee. Target the center-left portion of the fairway to provide the best angle for your approach shot. Driver is typically the right choice here for players who can control it, but those struggling with accuracy should consider a fairway wood or long iron to ensure they stay in play. The key is avoiding any trouble that could leave you with an impossible recovery shot on this demanding hole.
Approach & recovery
The approach shot to this small green requires careful club selection and precise execution. From the fairway, you'll likely be facing a mid to long iron depending on your tee shot distance. The small green size demands accuracy over aggression - aim for the center of the green regardless of pin position. Take one extra club to ensure you clear any front trouble and focus on a smooth, controlled swing. The margin for error is minimal with this green size, so course management trumps going for pins here.
On the green
The small green at the 13th creates challenging putting scenarios where lag putting becomes crucial. Focus on getting your first putt close rather than being aggressive with longer attempts. Pay attention to the overall slope and grain direction, as subtle breaks can be magnified on a smaller putting surface. Two-putting from anywhere on this green should be considered a victory, especially if you're outside of 20 feet. ## RISK VS REWARD This hole offers limited risk/reward opportunities due to its straightforward design and demanding length. The primary decision point comes with tee shot club selection - the reward of extra distance with driver versus the safety of a more controlled club. Given the small green target, the real reward comes from simply finding the putting surface in regulation, making this more about solid execution than gambling for birdies. ## DIFFERENT SKILL LEVELS **Low Handicappers (0-10):** Attack this hole with driver off the tee and aim for the center of the green with your approach. Focus on two-putting for par and consider any birdie opportunity a bonus. Your length advantage allows you to play more aggressively while still maintaining control. **Mid Handicappers (11-18):** Consider a 3-wood or hybrid off the tee if driver accuracy is inconsistent. Accept that this may be a three-shot hole and play for bogey or better. Lay up to your favorite wedge distance if needed, rather than forcing a long iron approach to the small green. **High Handicappers (19+):** This hole exemplifies why Dubsdread is recommended for players with lower handicaps. Play conservatively with fairway wood or hybrid off the tee, and don't hesitate to lay up to a comfortable distance for your third shot. The small green makes getting up and down difficult, so prioritize avoiding big numbers over chasing par. The 13th hole at Cog Hill's Dubsdread serves as a perfect example of championship golf design - rewarding solid strategy and execution while punishing poor decisions. Embrace the challenge and focus on smart course management to navigate this demanding test successfully.
Watch for
- 5 mapped bunkers guard landing zones and/or the green.
- Tree-lined areas (5 mapped woodland zones) punish offline tee shots.
Hole 13 Green Complex
Mapped green boundary
Green size: 5,729 sq ft
How did Hole 13 play?
How did this hole play today?
Frequently asked questions
Yardage reference: Championship tees · 480 yards.
What's the best strategy off the tee?
↓
For this 480-yard par 4, most players will hit driver to set up a comfortable approach.
How difficult is hole 13?
↓
This hole is a moderate challenge for most golfers. Key challenges include: long par 4, heavily bunkered.
How big is the green on hole 13?
↓
The green is medium-sized with moderate targets. The green is wider than it is deep, rewarding shots that find the correct tier. Pay attention to pin placement when selecting your approach club.
What's a good score on hole 13?
↓
This hole is one of the tougher holes where par feels like birdie. A challenging par 4. Accept that bogey happens and avoid big numbers.