Hole 11 at Pasatiempo Golf Club
- Par
- 4
- Yardage
- 392 yds
- Stroke index
- 3
- Hazards
- 4 bunkers
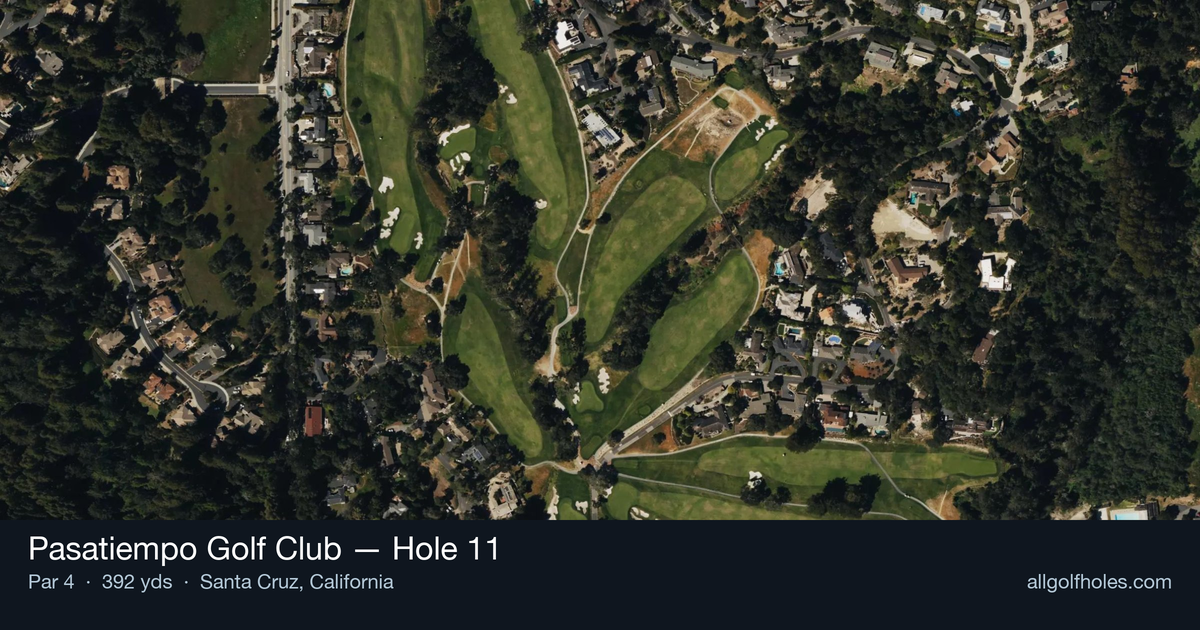
Aerial source not provided
Green size: 37 yds deep × 22 yds wide
Scorecard yardage is for Championship tees. The aerial shows its labeled reference position; distance rings measure to the green.
Championship tees · Par 4 · 392 yards
The plan for No. 11
Pasatiempo Golf Club hole 11 presents a deceptively challenging par 4 that showcases Alister MacKenzie's strategic brilliance. At 392 yards, this straight hole demands precision over power, with the tee shot setting up everything that follows. The fairway offers multiple playing angles, but choosing the correct line proves crucial for the approach. A gulley guards the green complex, creating an intimidating second shot that requires both distance control and nerve. The small green rewards those who can navigate the natural terrain contours, particularly players who understand how to use the ground game effectively. This hole epitomizes MacKenzie's philosophy of strategic options with clear consequences, making it a memorable test that separates thoughtful course management from aggressive play.
Off the tee
The tee shot presents a fascinating strategic choice that epitomizes MacKenzie's design philosophy. Players who favor the left side of the fairway will find a more favorable approach angle over the gulley to the green, but this line requires carrying more challenging terrain and accepting greater risk. The safer play down the right center of the fairway provides a more secure landing area but creates a more demanding approach shot across the gulley at an awkward angle. For most players, a driver or strong 3-wood is necessary to reach an optimal position. The target line should favor the left-center of the fairway if you're confident in your driving accuracy, as this provides the best approach angle. Conservative players should aim right-center, accepting the more difficult second shot in exchange for finding the short grass.
Approach & recovery
The approach shot is where this hole's true character emerges. From the preferred left side position, players face a more direct line to the green, though the gulley still demands respect. The approach from the right side of the fairway requires navigating the gulley at a more severe angle, making distance control and accuracy even more critical. Club selection typically ranges from mid-iron to long-iron depending on your tee shot position and pin location. The key is committing fully to carrying the gulley rather than trying to lay up short. The small green demands precision, so take enough club to ensure you clear any trouble and give yourself the best chance at the putting surface.
On the green
The small green at the 11th requires careful attention to pin position and approach angle. The putting surface features subtle contours that can be used to your advantage when approaching from the right side, where the natural slopes can help feed the ball toward certain hole locations. Reading the green carefully is essential, as the compact size means even slight misjudgments in speed or line can result in challenging recovery shots. Focus on getting your approach shot below the hole when possible, as uphill putts on this green tend to be more manageable than downhill attempts. ## RISK VS REWARD This hole perfectly embodies MacKenzie's risk/reward philosophy. The aggressive tee shot down the left side offers a significantly better approach angle but demands precise execution and carries more inherent danger. Players who successfully execute this strategy often find themselves with scoring opportunities, while those who miss left face potential trouble. The conservative approach down the right side virtually guarantees finding the fairway but creates a more challenging approach shot that requires carrying the gulley at an awkward angle. This strategy prioritizes avoiding big numbers over creating birdie opportunities. ## DIFFERENT SKILL LEVELS **High-handicap players** should prioritize course management over aggressive play. Aim for the right-center of the fairway with your most reliable club off the tee, even if it's a 3-wood or hybrid. Focus on finding the fairway first, then take enough club on the approach to comfortably clear the gulley. Don't be afraid to aim for the center of the green regardless of pin position. **Low-handicap players** can consider the more aggressive left-side tee shot if their driving accuracy supports it. The reward of an easier approach angle to the small green can create genuine birdie opportunities. These players should also consider how pin position affects their strategy, potentially adjusting their tee shot target line based on where the flag is positioned. The 11th hole at Pasatiempo rewards thoughtful strategy and precise execution while punishing indecision and poor course management. Understanding the terrain and committing to your chosen strategy is essential for navigating this MacKenzie masterpiece successfully.
Hole 11 Green Complex
Mapped green boundary
Green size: 3,746 sq ft
How did Hole 11 play?
How did this hole play today?
Frequently asked questions
Yardage reference: Championship tees · 392 yards.
What's the best strategy off the tee?
↓
For this 392-yard par 4, most players will hit driver to set up a comfortable approach.
How difficult is hole 11?
↓
This hole is a moderate challenge for most golfers. Key challenges include: heavily bunkered, small green.
What hazards should I watch out for on hole 11?
↓
Key hazards include: 4 greenside bunkers. Plan your shots to avoid these trouble spots.
How big is the green on hole 11?
↓
The green is small and requires precision. Expect challenging pin positions with limited room for error.
What's a good score on hole 11?
↓
This hole is a medium-length test where par is a solid result. A straightforward par 4 where course management pays off.