Hole 6 at Pinehurst Resort #7
- Par
- 4
- Yardage
- 479 yds
- Stroke index
- 3
- Hazards
- 4 bunkers
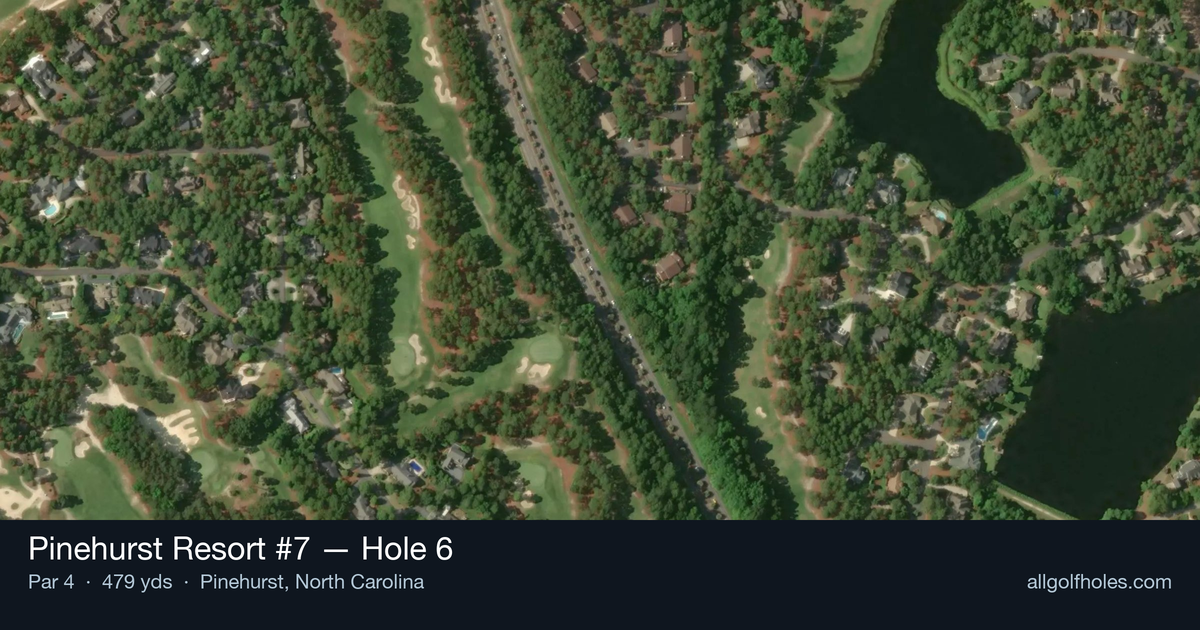
Aerial source not provided
Green size: 26 yds deep × 21 yds wide
Scorecard yardage is for Championship tees. The aerial shows its labeled reference position; distance rings measure to the green.
Championship tees · Par 4 · 479 yards
The plan for No. 6
The sixth hole at Pinehurst Resort #7 presents a demanding par 4 that epitomizes the course's reputation as Pinehurst's boldest design. Stretching 479 yards through the dramatic Carolina Sandhills terrain, this straight hole challenges golfers with its length and strategic complexity. The tee shot must navigate the undulating fairway that characterizes this layout's departure from traditional Pinehurst design, requiring precise distance control to find the optimal position. The approach shot plays to a small green complex that demands accuracy and proper club selection. With its handicap rating of 3, this hole embodies the course's philosophy where both birdie and bogey remain tantalizingly possible, making it a true test of golf strategy and execution in the scenic Sandhills setting.
Off the tee
Your tee shot strategy should focus on finding the optimal position for your approach rather than maximum distance. A well-struck driver or strong 3-wood to the center of the fairway sets up the best angle to attack the small green. The straight layout allows for an aggressive line, but accuracy is paramount—even slight misses can leave you in the native Carolina Sandhills vegetation that frames this dramatic terrain. Consider club selection based on your comfort level and the day's conditions. If driver feels risky, a 3-wood or hybrid that keeps you in play while still providing sufficient distance for a manageable approach shot is the smarter play. The target line should favor the center of the fairway, avoiding the temptation to cut corners that don't exist on this straightforward hole.
Approach & recovery
The approach shot to the small green is where this hole truly shows its teeth. Distance control becomes critical, as the compact putting surface offers little margin for error. A mid-iron to long-iron, depending on your tee shot position and pin location, requires precise execution. Focus on the center of the green regardless of pin position—the small target makes going directly at tucked pins a high-risk proposition. The green's unknown shape characteristics mean you'll need to rely on visual cues and course knowledge to read the contours properly. Take one extra club if you're between distances, as short approaches often find trouble in the surrounding areas.
On the green
The small green demands respect with your putter selection and read. Approach putts conservatively, focusing on lag putting to avoid three-putts that can derail your score on this already challenging hole. The putting surface likely features subtle breaks that can be deceiving, so take extra time to read the green from multiple angles. When facing longer putts, prioritize getting your first putt close rather than being aggressive toward the hole. The small green means even modest misreads can send balls well off the putting surface. ## RISK VS REWARD This hole offers limited risk/reward opportunities, which is precisely what makes it so challenging. The strategic decision-making comes in club selection and target selection rather than dramatic shortcuts or aggressive lines. The reward for conservative, well-executed shots is a legitimate scoring opportunity, while aggressive play that misses the mark can quickly lead to bogey or worse. The primary risk/reward decision comes on the approach shot—do you fire directly at a tucked pin or play to the center of the green? Given the small target, the center of the green strategy typically offers the better risk/reward ratio. ## DIFFERENT SKILL LEVELS **High-Handicap Players:** Focus on keeping the ball in play off the tee with your most reliable club, even if it means a longer approach shot. Aim for the center of the green on your approach and don't be afraid to take an extra club. Two-putt pars are victories on this hole. **Low-Handicap Players:** You can be more aggressive with driver off the tee, but maintain discipline on the approach shot. The small green rewards precision over power, so trust your yardages and commit to center-green targets unless the pin position and your confidence level justify attacking it directly. **Mid-Handicap Players:** Strike a balance between aggression and conservation. A well-struck 3-wood or hybrid off the tee followed by a committed approach to the center of the green gives you the best chance for par while minimizing big numbers. The key to mastering this hole lies in understanding that it's a test of precision and course management rather than raw power—qualities that define the strategic nature of Pinehurst No. 7's dramatic, hilly terrain.
Watch for
- Course conditioning and mapped hazards may affect line selection; confirm from the aerial.
Hole 6 Green Complex
Mapped green boundary
Green size: 3,018 sq ft
How did Hole 6 play?
How did this hole play today?
Frequently asked questions
Yardage reference: Championship tees · 479 yards.
What's the best strategy off the tee?
↓
For this 479-yard par 4, most players will hit driver to set up a comfortable approach.
How difficult is hole 6?
↓
This hole is one of the tougher holes on the course for most golfers. Key challenges include: long par 4, heavily bunkered, small green.
How big is the green on hole 6?
↓
The green is small and requires precision. The green is deeper than wide, so club selection is crucial. Expect challenging pin positions with limited room for error.
What's a good score on hole 6?
↓
This hole is one of the tougher holes where par feels like birdie. A challenging par 4. Accept that bogey happens and avoid big numbers.