Hole 6 at Hazeltine National Golf Club
- Par
- 4
- Yardage
- 405 yds
- Stroke index
- 0
- Hazards
- 3 bunkers · Water
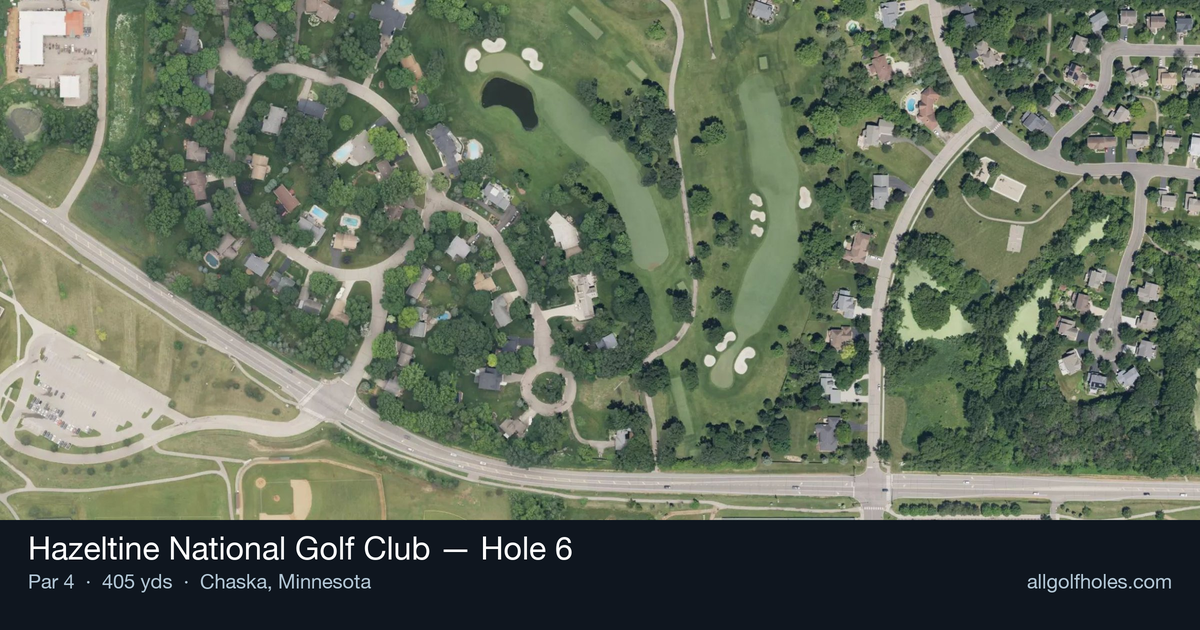
Aerial source not provided
Green size: 34 yds deep × 37 yds wide
Scorecard yardage is for Championship tees. The aerial shows its labeled reference position; distance rings measure to the green.
Championship tees · Par 4 · 405 yards
The plan for No. 6
The 6th hole at Hazeltine National Golf Club showcases the natural beauty that made this venue a destination for premier championship golf. This strategic par 4 exemplifies the thoughtful design that has hosted major championships, demanding both precision and course management from players of all skill levels.
Off the tee
The tee shot strategy centers on finding the optimal position in the landing zone while avoiding any trouble areas that may lurk beyond the fairway's edges. With 405 yards to work with, most golfers will want to position their drive in the 230-260 yard range, leaving a manageable approach shot to the small green. For longer hitters, resist the temptation to blast driver if it brings unnecessary risk into play. A well-struck 3-wood or hybrid that finds the fairway center provides the ideal angle and distance for the approach. The key is leaving yourself with a comfortable club selection rather than an awkward in-between distance to the green. Focus your target line down the middle of the fairway, as the straight layout rewards accuracy over distance. Any deviation from the short grass will make the already challenging approach shot even more difficult.
Approach & recovery
The approach shot represents the hole's primary scoring challenge, with the small green demanding pinpoint accuracy. Club selection becomes critical here – take one more club than you think you need and focus on hitting the center of the green rather than chasing pins. From the typical approach distance, you'll likely be hitting anything from a mid-iron to long-iron depending on conditions and tee shot placement. The small green size means there's little margin for error, so prioritize solid contact and proper distance control over aggressive pin-hunting. Pay attention to wind conditions, as they can significantly affect club selection on this exposed hole. When in doubt, favor the center of the green and rely on your putting to make birdie rather than risking a missed green for a closer approach.
On the green
The small green at the 6th demands respect with your putter in hand. While specific break patterns aren't detailed, the compact putting surface means most putts will be relatively straight, but precision becomes paramount given the limited real estate. Focus on lag putting when facing longer putts, as three-putting from this small surface can be particularly frustrating. The key is getting your first putt close enough to ensure a comfortable two-putt, especially if you've successfully found the green in regulation. When pin positions are tucked near edges, be conservative with your approach and putt to the fat part of the green rather than chasing difficult pins that could lead to costly mistakes.
Watch for
- Water along the hole
- Greenside bunker (greenside)
Hole 6 Green Complex
Mapped green boundary
Green size: 5,947 sq ft
How did Hole 6 play?
How did this hole play today?
Frequently asked questions
Yardage reference: Championship tees · 405 yards.
What's the best strategy off the tee?
↓
For this 405-yard par 4, most players will hit driver to set up a comfortable approach.
How difficult is hole 6?
↓
This hole is a moderate challenge for most golfers. Key challenges include: water in play.
What hazards should I watch out for on hole 6?
↓
Key hazards include: 3 greenside bunkers; water at 355.6 yards. Plan your shots to avoid these trouble spots.
How big is the green on hole 6?
↓
The green is medium-sized with moderate targets. The green is wider than it is deep, rewarding shots that find the correct tier. Pay attention to pin placement when selecting your approach club.