Hole 11 at Hazeltine National Golf Club
- Par
- 5
- Yardage
- 606 yds
- Stroke index
- 0
- Hazards
- 8 bunkers
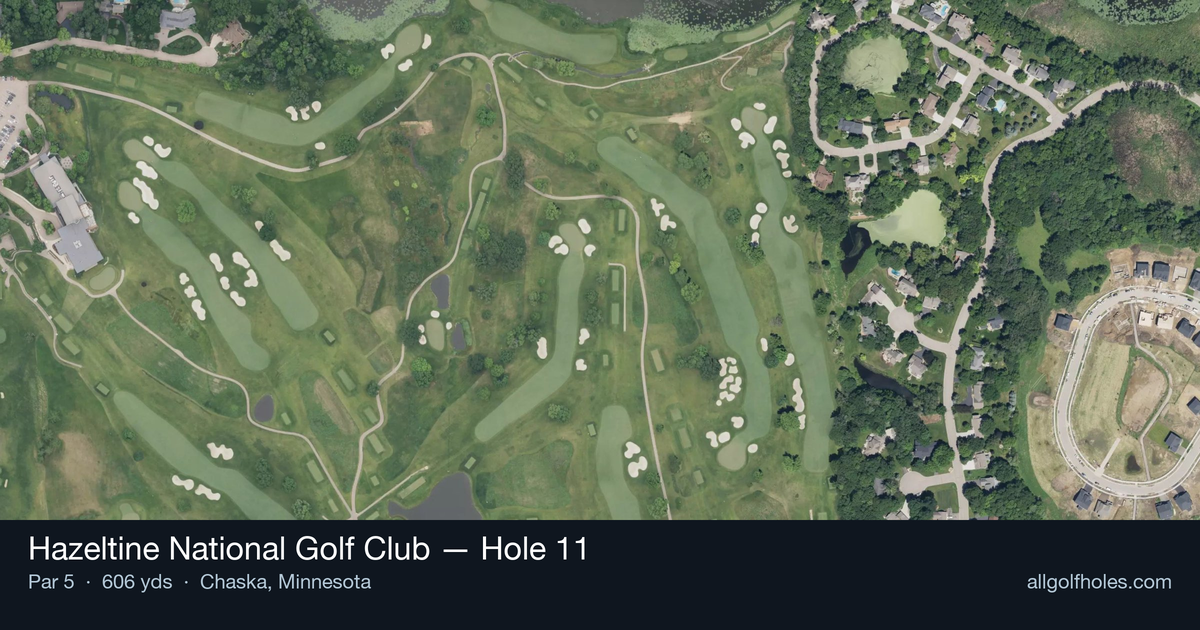
Aerial source not provided
Green size: 35 yds deep × 37 yds wide
Scorecard yardage is for Championship tees. The aerial shows its labeled reference position; distance rings measure to the green.
Championship tees · Par 5 · 606 yards
The plan for No. 11
The par-5 11th hole at Hazeltine National showcases the classic Robert Trent Jones design philosophy with its signature "runway" tee and strategic bunkering. Playing slightly downhill, this challenging hole demands precision through multiple fairway hazards before approaching a well-guarded green complex. The hole exemplifies Hazeltine's championship pedigree with its risk-reward opportunities and demanding approach shots.
Off the tee
Your tee shot strategy should focus on positioning rather than maximum distance. The fairway bunkers are strategically placed to challenge aggressive drives, so club selection becomes crucial. Consider using a 3-wood or hybrid off the tee to ensure you find the fairway and avoid the bunkers that guard the landing zone. The Robert Trent Jones "runway" tees provide an excellent launching platform, but accuracy trumps distance here. Target the center-left portion of the fairway to give yourself the best angle for your second shot while avoiding the fairway bunkers.
Approach & recovery
With the hole's length, most players will face a layup decision on their second shot. Position your layup to avoid the remaining fairway bunkers while setting up an optimal angle to the small green. The key is leaving yourself a comfortable wedge distance for your third shot. Avoid getting too aggressive with your second shot - the three greenside bunkers punish wayward approaches severely. Focus on finding the correct side of the fairway based on pin position for your final approach.
On the green
The small green features a pronounced slope from back right to front left, making club selection and approach angle critical. The narrow opening in the front left creates scoring opportunities when the pin is positioned there, but also demands precision. Read putts carefully as the slope can be deceptive, particularly on longer putts. Uphill putts will be slower than they appear, while downhill putts can get away from you quickly.
Watch for
- Fairway bunker crossing the landing zone
- Greenside bunker (greenside)
Hole 11 Green Complex
Mapped green boundary
Green size: 8,154 sq ft
How did Hole 11 play?
How did this hole play today?
Frequently asked questions
Yardage reference: Championship tees · 606 yards.
Can this par 5 be reached in two?
↓
At 606 yards, A true three-shot hole for most players. Position your layup to leave a comfortable wedge distance.
How difficult is hole 11?
↓
This hole is a moderate challenge for most golfers. Key challenges include: long par 5, heavily bunkered, large green requiring good lag putting.
How big is the green on hole 11?
↓
The green is large and can play quite long. Three-putt territory if you don't manage your approach distance well.
What's a good score on hole 11?
↓
This hole is a true three-shot hole where birdie requires execution. This longer par 5 demands patience. Two good shots set up the scoring opportunity.