Hole 5 at Hazeltine National Golf Club
- Par
- 4
- Yardage
- 448 yds
- Stroke index
- 0
- Hazards
- 7 bunkers
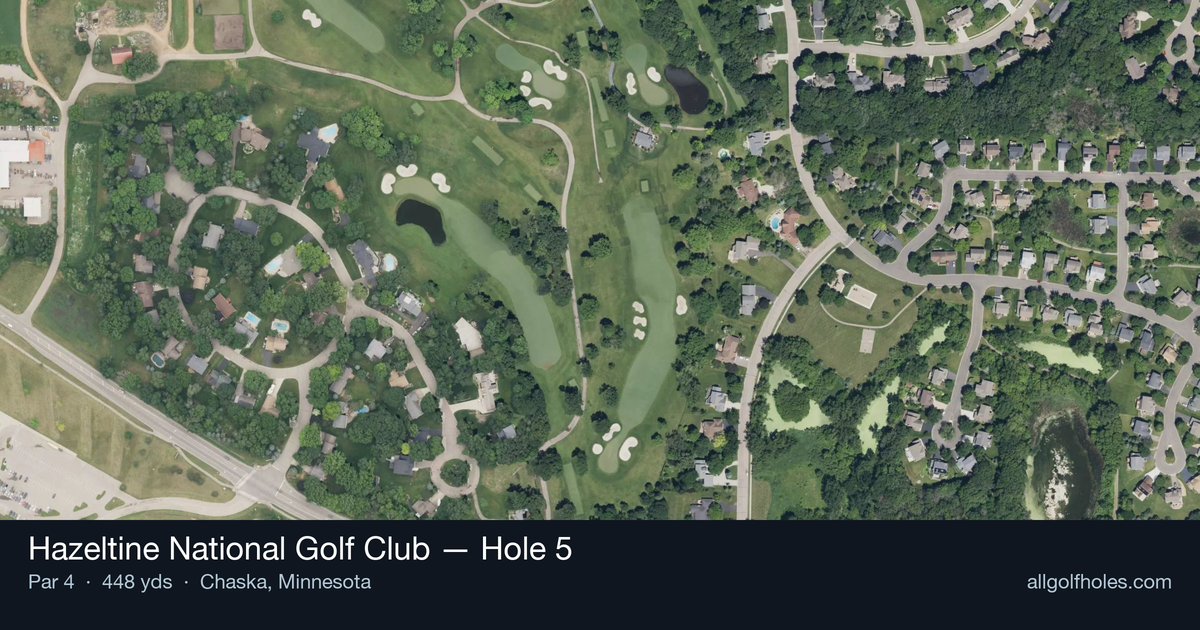
Aerial source not provided
Green size: 37 yds deep × 27 yds wide
Scorecard yardage is for Championship tees. The aerial shows its labeled reference position; distance rings measure to the green.
Championship tees · Par 4 · 448 yards
The plan for No. 5
Hole 5 at Hazeltine National stands as one of the course's most iconic challenges, featuring the famous Payne Stewart Bridge that adds both beauty and strategic complexity. This classic Robert Trent Jones design epitomizes championship golf with water creating constant tension from tee to green.
Off the tee
Your tee shot strategy should focus on finding the optimal position for your approach shot while maximizing distance. With the hole playing straight and measuring 448 yards, most golfers will need to use driver to have a reasonable approach distance remaining. Aim for the center of the fairway, as the small green ahead will require a precise approach shot from the best possible angle. The key is committing to your target line and making solid contact. Any significant miss off the tee will leave you with a longer, more difficult approach to an already challenging green. Focus on tempo and balance rather than trying to overpower the hole.
Approach & recovery
The approach shot is where this hole reveals its true character. With a small green as your target, club selection and distance control become paramount. Depending on your tee shot success, you'll likely face a mid-iron to long-iron approach shot. Take extra time to factor in wind conditions and pin position, as the small green offers little margin for error. Aim for the center of the green regardless of pin position - this conservative strategy will help you avoid short-siding yourself and give you the best chance for a two-putt par.
On the green
The small green demands respect with your putter. Focus on lag putting to ensure you get your first putt close to the hole, as three-putts can quickly turn a good hole into a frustrating bogey. Read the green carefully and trust your initial read - overthinking on smaller greens often leads to poor execution. Pay attention to the overall slope and grain of the green, and remember that speed control is more important than perfect line on longer putts.
Watch for
- Fairway bunker crossing the landing zone
- Greenside bunker (greenside)
Hole 5 Green Complex
Mapped green boundary
Green size: 5,356 sq ft
How did Hole 5 play?
How did this hole play today?
Frequently asked questions
Yardage reference: Championship tees · 448 yards.
What's the best strategy off the tee?
↓
For this 448-yard par 4, most players will hit driver to set up a comfortable approach.
How difficult is hole 5?
↓
This hole is a moderate challenge for most golfers. Key challenges include: heavily bunkered.
How big is the green on hole 5?
↓
The green is medium-sized with moderate targets. Pay attention to pin placement when selecting your approach club.
What's a good score on hole 5?
↓
This hole is a demanding hole where bogey is not unusual. This longer par 4 will test most golfers. Focus on position over distance.