Hole 9 at Forest Dunes Golf Club
- Par
- 3
- Yardage
- 166 yds
- Stroke index
- 17
- Hazards
- 8 bunkers
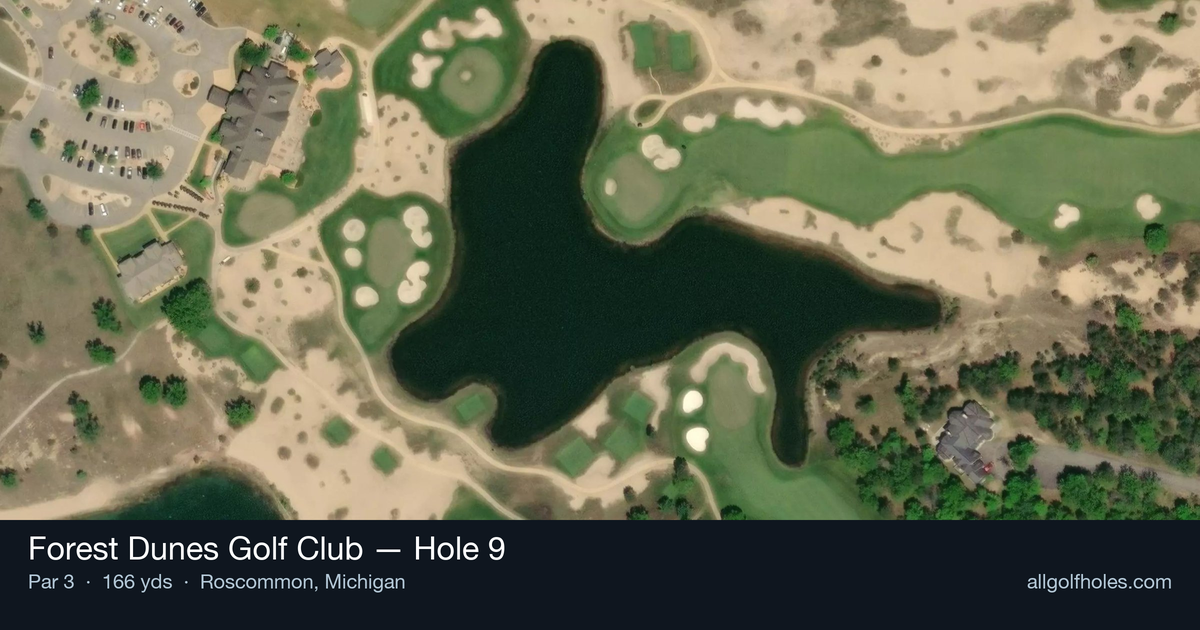
Aerial source not provided
Green size: 33 yds deep × 38 yds wide
Scorecard yardage is for Championship tees. The aerial shows its labeled reference position; distance rings measure to the green.
Championship tees · Par 3 · 166 yards
The plan for No. 9
The signature 9th hole at Forest Dunes Golf Club serves as a stunning finale to Tom Weiskopf's front nine, earning recognition as the course's most picturesque par 3. This 166-yard one-shotter demands a precise tee shot over water to reach the small, elevated green nestled within the heavily wooded Huron National Forest. The pristine water hazard creates both visual drama and strategic tension, requiring golfers to commit fully to their club selection and swing. With trees framing the target and water guarding the approach, there's little room for error on this deceptively challenging hole. The green's compact size rewards accuracy over distance, making it a true test of iron play. This memorable hole perfectly captures the natural beauty and strategic design that defines Forest Dunes' championship layout.
Off the tee
Your tee shot strategy centers on committing fully to clearing the water while targeting the center of the green. Club selection should prioritize carrying the water hazard with confidence - better to be long than short here. Consider taking one extra club to ensure you clear the hazard, especially in headwind conditions. The target line should favor the middle of the green rather than attacking pin positions, as the small green size makes precision paramount. Pay close attention to wind direction and strength, as it significantly impacts club selection over water.
Approach & recovery
Since this is a par 3, your tee shot serves as your approach. Focus on a smooth, controlled swing rather than forcing distance. The small green demands accuracy, so avoid the temptation to attack difficult pin positions. When the pin is tucked behind hazards or on edges, aim for the fat part of the green and rely on your putting. Consider the green's surroundings when missing - determine which side offers the best recovery options should you miss the putting surface.
On the green
The small green at the 9th creates challenging putting scenarios with limited space for long putts. Focus on speed control, as the compact surface means most putts will have some break. Pay attention to the green's subtle slopes and how they might affect your ball's roll. Pin positions on this small green can create dramatic differences in putting difficulty, so adjust your approach accordingly. Practice lag putting to ensure you avoid three-putts on this scoring opportunity. ## RISK VS REWARD The primary risk/reward decision involves club selection and target selection. The conservative play targets the center of the green with a club that comfortably clears the water, virtually guaranteeing a par opportunity. The aggressive play attacks pin positions for birdie chances but increases the risk of finding water or missing the small green entirely. Weather conditions heavily influence this decision - calm conditions favor more aggressive play, while wind demands conservative course management. ## DIFFERENT SKILL LEVELS **High-handicap players** should prioritize clearing the water hazard above all else. Take an extra club, aim for the center of the green, and accept any result on the putting surface as a victory. Focus on smooth tempo and avoid the temptation to guide the ball - trust your swing and commit to the shot. **Low-handicap players** can be more aggressive with pin hunting, especially in favorable conditions. Consider attacking pins when they're accessible, but respect the water hazard and small green. Use your distance control skills to dial in yardages precisely, and don't be afraid to take dead aim when you have the right club and conditions align. The 9th hole at Forest Dunes rewards smart course management and confident execution, making it a memorable finish to your front nine round.
Watch for
- Course conditioning and mapped hazards may affect line selection; confirm from the aerial.
Hole 9 Green Complex
Mapped green boundary
Green size: 4,558 sq ft
How did Hole 9 play?
How did this hole play today?
Frequently asked questions
Yardage reference: Championship tees · 166 yards.
What club should I use on this par 3?
↓
At 166 yards, most golfers will need a mid-iron (7-iron to 8-iron) to reach this green. Adjust for elevation, wind, and pin position.
How difficult is hole 9?
↓
This hole is a good scoring opportunity for most golfers. Key challenges include: heavily bunkered.
What hazards should I watch out for on hole 9?
↓
Key hazards include: fairway bunkers at 2319694.6-2319942.9 yards. Plan your shots to avoid these trouble spots.
How big is the green on hole 9?
↓
The green is medium-sized with moderate targets. Pay attention to pin placement when selecting your approach club.
Where is the best miss on hole 9?
↓
If you're going to miss the green, favor the right side. The left brings more trouble into play and makes recovery difficult.
What's a good score on hole 9?
↓
This hole is a solid par with birdie chances for precise approach shots. Making par is a good result here. Focus on hitting the green and avoiding three-putts.