Hole 6 at Forest Dunes Golf Club
- Par
- 4
- Yardage
- 375 yds
- Stroke index
- 11
- Hazards
- 6 bunkers · Water
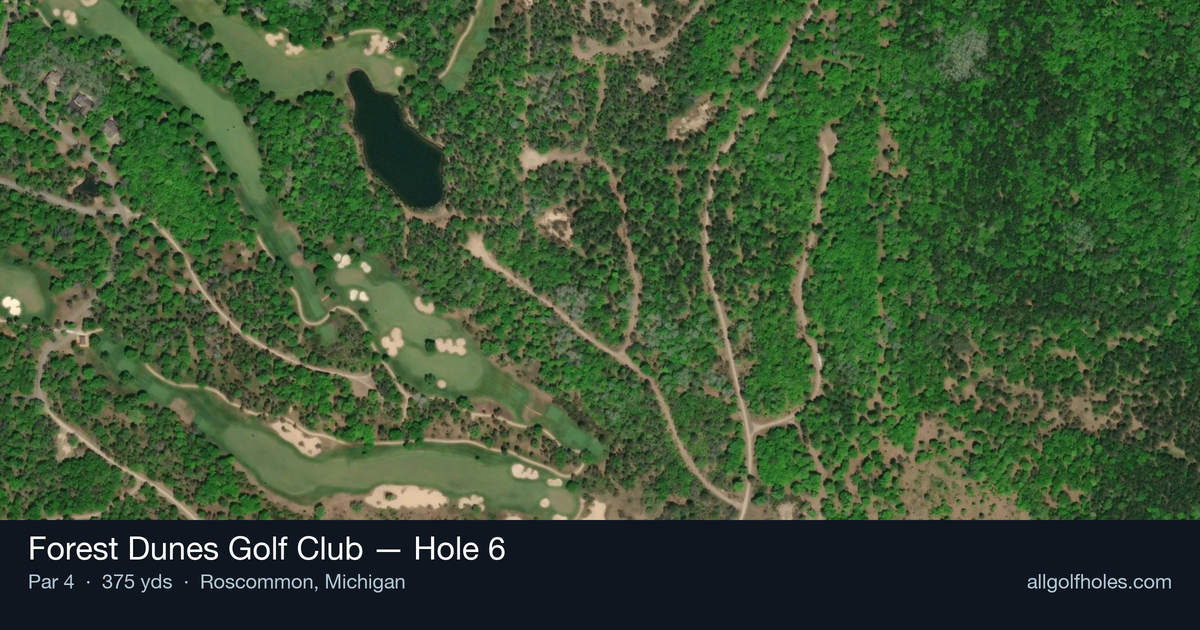
Aerial source not provided
Green size: 40 yds deep × 36 yds wide
Scorecard yardage is for Championship tees. The aerial shows its labeled reference position; distance rings measure to the green.
Championship tees · Par 4 · 375 yards
The plan for No. 6
The sixth hole at Forest Dunes Golf Club showcases Tom Doak's brilliant reversible design philosophy in a deceptively straightforward 375-yard par 4. This straight layout appears benign from the tee, but the elevated small green demands precision on the approach shot. The hole's genius lies in its dual personality - when played as part of the Red routing in reverse, it transforms into an entirely different strategic challenge with a left dogleg to the raised putting surface. The clean, minimalist design emphasizes shot-making over hazard navigation, requiring golfers to focus on distance control and green-reading skills. What makes this hole memorable is how it embodies The Loop's revolutionary concept, proving that great golf architecture doesn't always need bunkers or water to create compelling strategic decisions.
Off the tee
Your tee shot strategy should prioritize finding the fairway center, giving yourself the best angle and lie for your approach. With no major hazards to navigate, focus on a controlled swing with your driver or 3-wood, depending on your comfort level and the day's conditions. The straight layout means you can be aggressive with your target line down the middle of the fairway. Consider the wind conditions and pin position when selecting your tee shot club - leaving yourself a comfortable approach distance is more valuable than maximum distance on this hole.
Approach & recovery
The approach shot is where this hole shows its teeth. The small green demands exceptional accuracy, making club selection and commitment crucial. Aim for the center of the green regardless of pin position, as the compact putting surface leaves little margin for error. A controlled mid-iron to long-iron approach (depending on your tee shot distance) should be your go-to play. Focus on a smooth tempo and solid contact rather than trying to attack specific pin positions. The lack of significant hazards around the green means your miss should favor the safe side, allowing for easier up-and-down opportunities.
On the green
With a small green, putting becomes a premium skill on this hole. Expect subtle breaks and potentially faster speeds due to the reduced surface area. Focus on lag putting to avoid three-putts, as the compact green can make distance control challenging. Pay attention to the grain and any elevation changes within the putting surface. Pin positions will play a significant role in your approach strategy - when the flag is tucked, play to the fat part of the green and rely on your putting to get close. ## RISK VS REWARD This hole offers a classic example of strategic restraint over aggressive play. The reward for finding the small green in regulation is significant - likely a birdie opportunity. However, the risk of missing the green and facing a difficult recovery shot makes conservative play the smart choice. The straight layout with minimal hazards means the primary risk comes from approach shot execution rather than tee shot placement. ## DIFFERENT SKILL LEVELS **High Handicappers:** Focus on course management and fairway accuracy. Consider using a fairway wood or hybrid off the tee to ensure you find the short grass. On your approach, aim for the center of the green and accept par as a good score. Don't get aggressive with pin hunting - the small green rewards patience. **Low Handicappers:** This hole offers a legitimate birdie opportunity with precise execution. You can be more aggressive off the tee with driver, but maintain discipline on the approach shot. Consider pin position and wind conditions when selecting your approach club, but remember that even skilled players should respect the small green size. Your short game skills will be tested if you miss the putting surface. The 6th hole at The Loop exemplifies Tom Doak's strategic design philosophy - appearing simple while demanding thoughtful execution. Whether playing the Red or Black routing, this hole rewards golfers who prioritize precision and course management over raw power.
Watch for
- Course conditioning and mapped hazards may affect line selection; confirm from the aerial.
Hole 6 Green Complex
Mapped green boundary
Green size: 3,611 sq ft
How did Hole 6 play?
How did this hole play today?
Frequently asked questions
Yardage reference: Championship tees · 375 yards.
What's the best strategy off the tee?
↓
For this 375-yard par 4, most players will hit 3-wood or driver to set up a comfortable approach.
How difficult is hole 6?
↓
This hole is one of the tougher holes on the course for most golfers. Key challenges include: water in play, heavily bunkered, small green.
What hazards should I watch out for on hole 6?
↓
Key hazards include: fairway bunkers at 1867158.5-1867299.1 yards; water at 1867287.7 yards. Plan your shots to avoid these trouble spots.
How big is the green on hole 6?
↓
The green is small and requires precision. The green is deeper than wide, so club selection is crucial. Expect challenging pin positions with limited room for error.
Which side of the fairway is safer on hole 6?
↓
Aim for the right side of the fairway when possible. Missing left (water) brings more trouble into play.
What's a good score on hole 6?
↓
This hole is a medium-length test where par is a solid result. A straightforward par 4 where course management pays off.