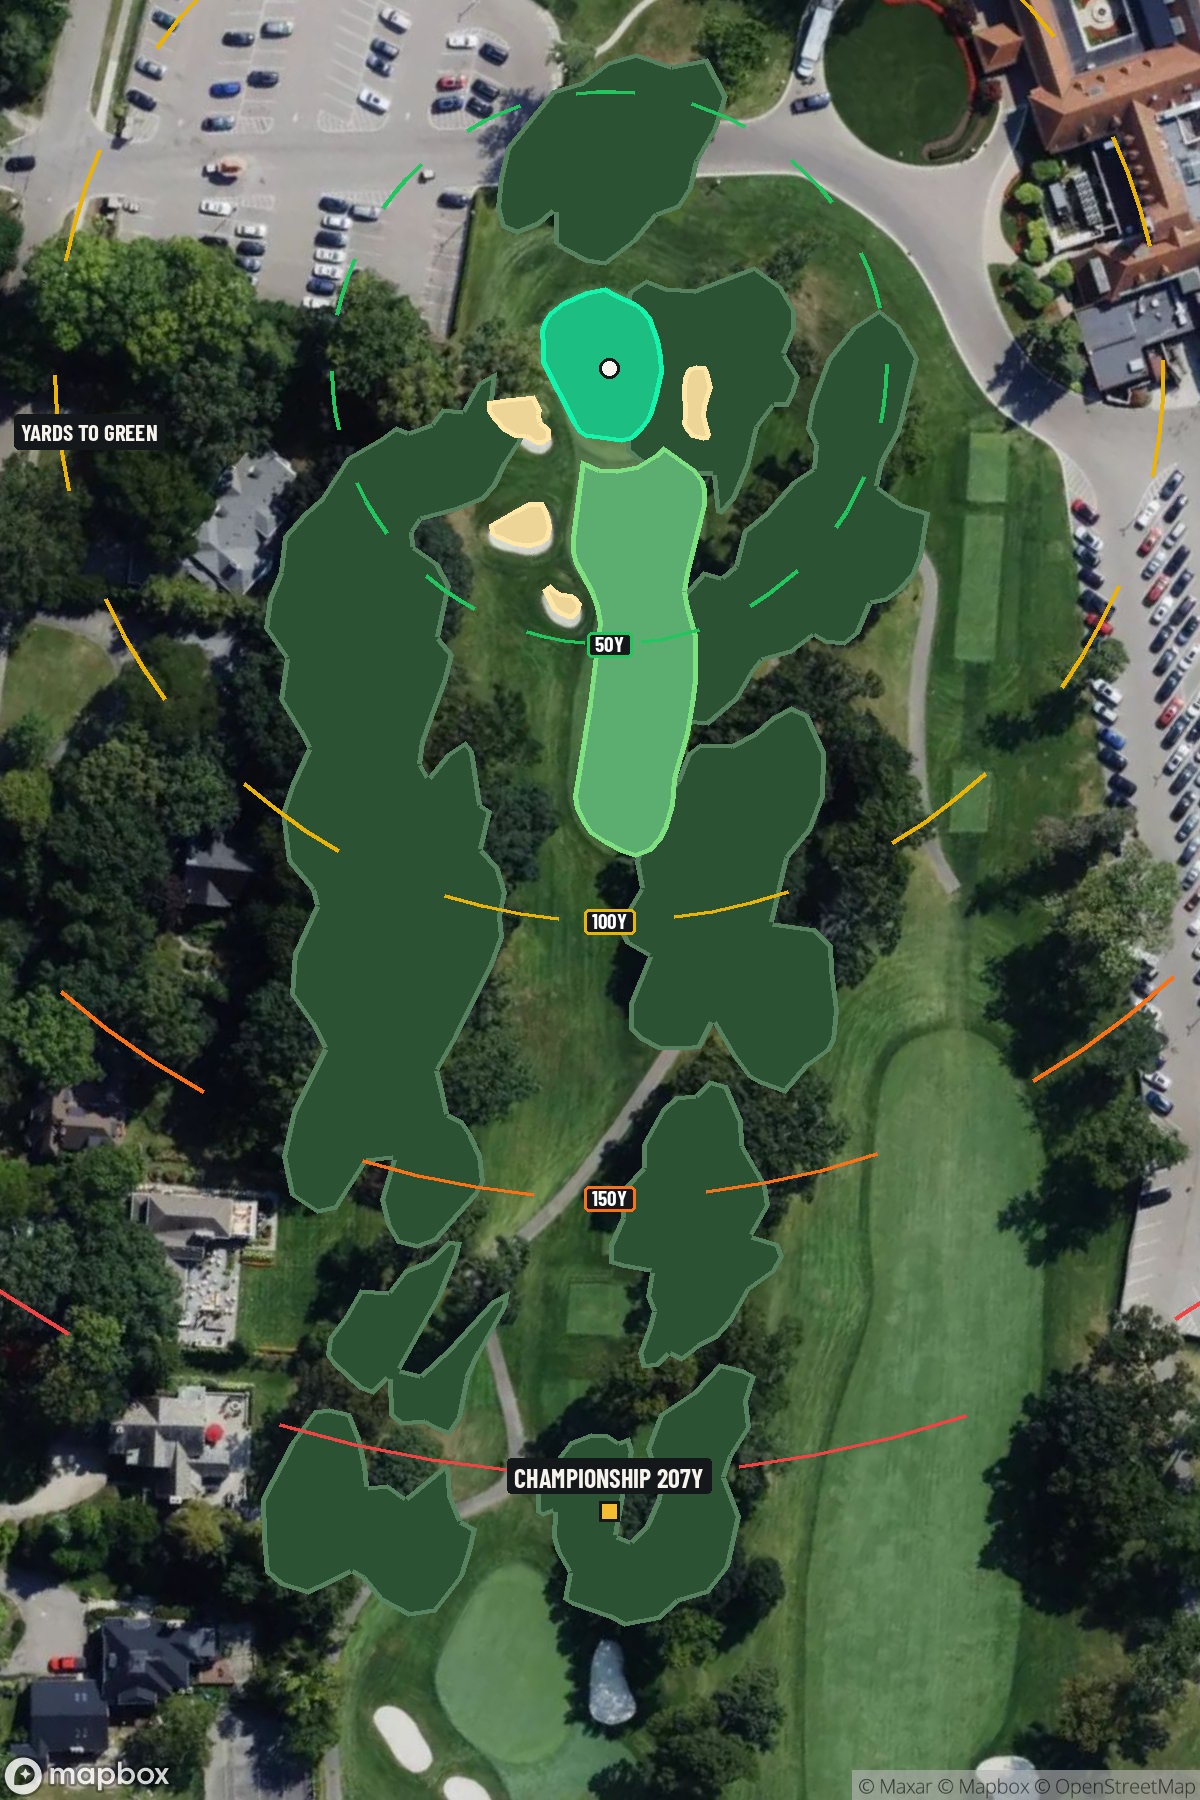
Hole 7 of 18 · Highland Park, Michigan

Hole 7 at Detroit Golf Club (North)

Par
3
Yards
207
Handicap
15
Bunkers
4
Hole 7 aerial at Detroit Golf Club (North)
Map distances from Championship tee · 207 yds

The map's printed distances are measured from the Championship tee to the green; they do not move when you change tees.

Green size: 28 yds deep × 22 yds wide

Mapbox Satellite composite · capture date not provided. Green at the top.

Where this map comes from

Satellite photo
Date not published
Mapbox satellite
Green contours
2017 survey
USGS lidar survey
Report a map problem
100%
Hole 7 aerial at Detroit Golf Club (North)

The plan for No. 7

The play: Detroit Golf Club (North) hole 7 presents a deceptively challenging par 3 that plays 207 yards to a compact, well-protected green. This hole sits near the historic marker tree that Native Americans once bent as a trail guide along what is now Woodward Avenue, adding cultural significance to the golfing experience. The tee shot demands precision over distance, as the small green complex requires accurate club selection and committed execution. Wind conditions often factor into play, making this mid-length par 3 more demanding than its handicap rating suggests. The straightforward layout belies the challenge of finding and holding this tight target, where anything short of center pin typically leaves a difficult recovery shot.

Shot by shot

  1. Off the tee

    Club selection is paramount on this tee shot, with most players needing anything from a mid-iron to hybrid depending on conditions and pin position. The key is committing fully to your chosen club rather than trying to finesse a shot between clubs. Aim for the center of the green unless you're confident in your distance control, as the small target leaves little margin for error. Take note of wind conditions, as even a modest breeze can significantly affect ball flight over this distance. The straight layout means your target line is clear - focus on tempo and solid contact rather than trying to shape the shot.

  2. Approach & recovery

    Since this is a par 3, your tee shot is your approach. The small green demands precision, so err on the side of taking enough club to reach the back portion rather than coming up short. Study the pin position carefully during your pre-round preparation or warm-up, as different sections of this compact green will play quite differently. Without significant hazards protecting the green, your main concern is distance control and avoiding three-putts on what could be a challenging putting surface.

  3. On the green

    The small green size means every putt matters significantly on your scorecard. Spend time reading the green from multiple angles, as subtle breaks can be magnified on a smaller putting surface. Focus on getting your first putt close to the hole rather than being overly aggressive, since two-putting from anywhere on this green should be your primary goal. Pay attention to grain direction and any slope, as these factors become more pronounced on smaller greens where you have less room to work with. ## RISK VS REWARD This hole offers a clear risk/reward scenario: the reward of a potential birdie with an accurate shot versus the risk of a difficult recovery if you miss the green entirely. The absence of major hazards means aggressive play won't lead to disaster, but the small green size punishes imprecise shots with challenging up-and-downs. Conservative players should aim for the center of the green regardless of pin position, while confident ball-strikers can attack pins when they're feeling sharp with their irons. ## DIFFERENT SKILL LEVELS **High-handicap players** should focus on making solid contact and getting the ball somewhere on the green. Club up if you're between clubs, as being long is generally better than short on this hole. Don't worry about pin hunting - aim for the fat part of the green and focus on a smooth, controlled swing. **Low-handicap players** can be more aggressive with pin positions, especially when the flag is in the center of the green. Use your course management skills to identify when to attack versus when to play conservatively based on your current round momentum. Consider how this hole fits into your overall scoring strategy, as it represents a legitimate birdie opportunity when played with confidence and precision. The 7th hole rewards golfers who understand that sometimes the most strategic play is the most straightforward one - pick your club, trust your swing, and execute with commitment.

  4. Watch for

    • Course conditioning and mapped hazards may affect line selection; confirm from the aerial.

The green on No. 7

Mapped boundary
Wide × deepyards
22×28
Areasq ft
3,884
Golfer feedback

How did Hole 7 play?

⚡ Quick Golfer Pulse

How did this hole play today?

1-tap anonymous vote

Frequently asked questions

Yardage reference: Championship tees · 207 yards.

What club should I use on this par 3?

↓

At 207 yards, most golfers will need a long iron or hybrid (5-iron to 6-iron) to reach this green. Adjust for elevation, wind, and pin position.

What hazards should I watch out for on hole 7?

↓

Key hazards include: 4 greenside bunkers. Plan your shots to avoid these trouble spots.

How big is the green on hole 7?

↓

The green is small and requires precision. Expect challenging pin positions with limited room for error.