Hole 12 at Sage Valley Golf Club
- Par
- 3
- Yardage
- 180 yds
- Hazards
- 1 bunker
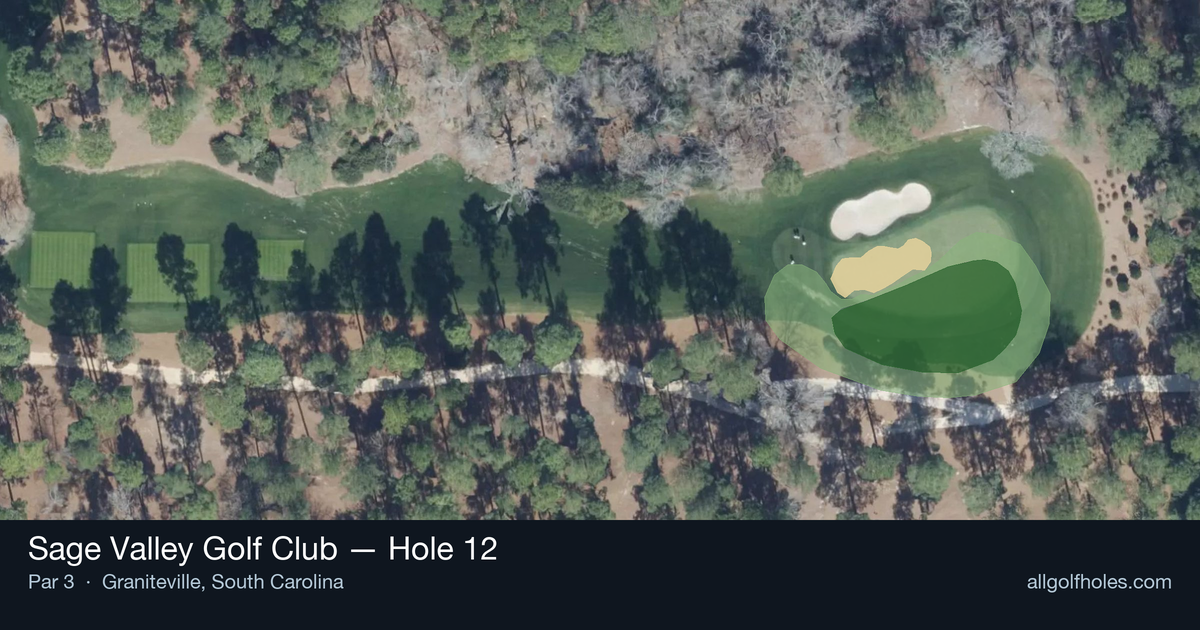
Aerial source not provided
Green size: 44 yds deep × 26 yds wide
Scorecard yardage is for Pro tees. The aerial shows its labeled reference position; distance rings measure to the green.
Pro tees · Par 3 · 180 yards
The plan for No. 12
At 180 yards, Sage Valley Golf Club hole 12 presents a deceptively straightforward par 3 that demands precision over power. This elegant one-shotter features a small, subtly contoured green that rewards accurate iron play while punishing wayward shots with challenging recovery situations. The absence of major hazards might suggest an easy birdie opportunity, but the compact putting surface creates its own defense, requiring golfers to commit to their yardage and trust their swing. The straight line from tee to green offers no hiding spots for miscalculated shots, making club selection and tempo critical. What appears simple on the scorecard becomes a true test of accuracy and nerve execution.
Off the tee
Club selection is everything on this hole. Most golfers will be looking at anything from a 6-iron to a 4-iron depending on wind conditions and pin position. The key is committing fully to your yardage and swinging with confidence. Aim for the center of the green regardless of pin position - with no hazards to penalize a miss, the worst outcome is typically a manageable chip shot. Take one extra club if there's any doubt about distance, as coming up short on a par-3 often leads to more difficult recovery shots than going long.
Approach & recovery
Since this is a par-3, your tee shot IS your approach shot. Focus on making a smooth, balanced swing rather than trying to force extra distance. The straight layout means you can play aggressively to most pin positions, but the small green demands respect. When the pin is tucked to one side, still favor the center of the green - the difference between a 15-foot putt and a difficult chip shot isn't worth the risk for most golfers.
On the green
With a small putting surface, you'll often face putts in the 10-25 foot range even with good approach shots. Read the green carefully, as subtle breaks can be deceiving on smaller greens. Focus on speed control above all else - leaving yourself tap-in range for par is always preferable to charging putts and risking three-putts. The green's compact size means most putts will have relatively straight lines, so trust your read and make a confident stroke. ## RISK VS REWARD This hole offers a pure risk/reward scenario: aggressive pin-hunting versus conservative center-green strategy. With no penalty areas, the risk of being aggressive is typically just a longer putt or chip shot. However, the small green means the margin for error is minimal. The reward for precise shot-making is a legitimate birdie opportunity, while the penalty for poor execution is usually just a routine up-and-down for par. ## DIFFERENT SKILL LEVELS **High-Handicap Players:** Play conservatively to the center of the green every time, regardless of pin position. Focus on making solid contact and getting the ball airborne. Take an extra club to ensure you reach the green, as short-sided chips are more challenging than long putts. Don't get fancy - par is an excellent score here. **Low-Handicap Players:** You can be more aggressive with pin positions, especially when the pin is accessible. Still respect the small green size, but don't hesitate to attack when you have a good yardage and favorable conditions. This is a legitimate birdie hole for skilled players who can control their distance effectively. Consider the wind carefully and trust your yardages - precision beats power every time on this hole. The 12th hole at Sage Valley rewards thoughtful course management and solid execution. While it may appear straightforward, the combination of distance and small green size creates a deceptively challenging test that separates careful strategists from overly aggressive players.
Watch for
- Course conditioning and mapped hazards may affect line selection; confirm from the aerial.
Hole 12 Green Complex
Mapped green boundary
Green size: 5,746 sq ft
Course coverage
Tournament and creator videos about Sage Valley Golf Club — shared course coverage, not hole-specific clips.
Featured by these creators
Creator videos about this course
YouTube creators who filmed or featured Sage Valley Golf Club. · Stats as of Oct 12, 2026 · 6d ago
The First Ever YouTube Match at Sage Valley
How did Hole 12 play?
How did this hole play today?
Frequently asked questions
Yardage reference: Pro tees · 180 yards.
What club should I use on this par 3?
↓
At 180 yards, most golfers will need a long iron or hybrid (5-iron to 6-iron) to reach this green. Adjust for elevation, wind, and pin position.
How difficult is hole 12?
↓
This hole is a good scoring opportunity for most golfers.
What hazards should I watch out for on hole 12?
↓
Key hazards include: 1 greenside bunker. Plan your shots to avoid these trouble spots.
How big is the green on hole 12?
↓
The green is medium-sized with moderate targets. The green is wider than it is deep, rewarding shots that find the correct tier. Pay attention to pin placement when selecting your approach club.