Hole 4 at Sage Valley Golf Club
- Par
- 5
- Yardage
- 570 yds
- Hazards
- 5 bunkers
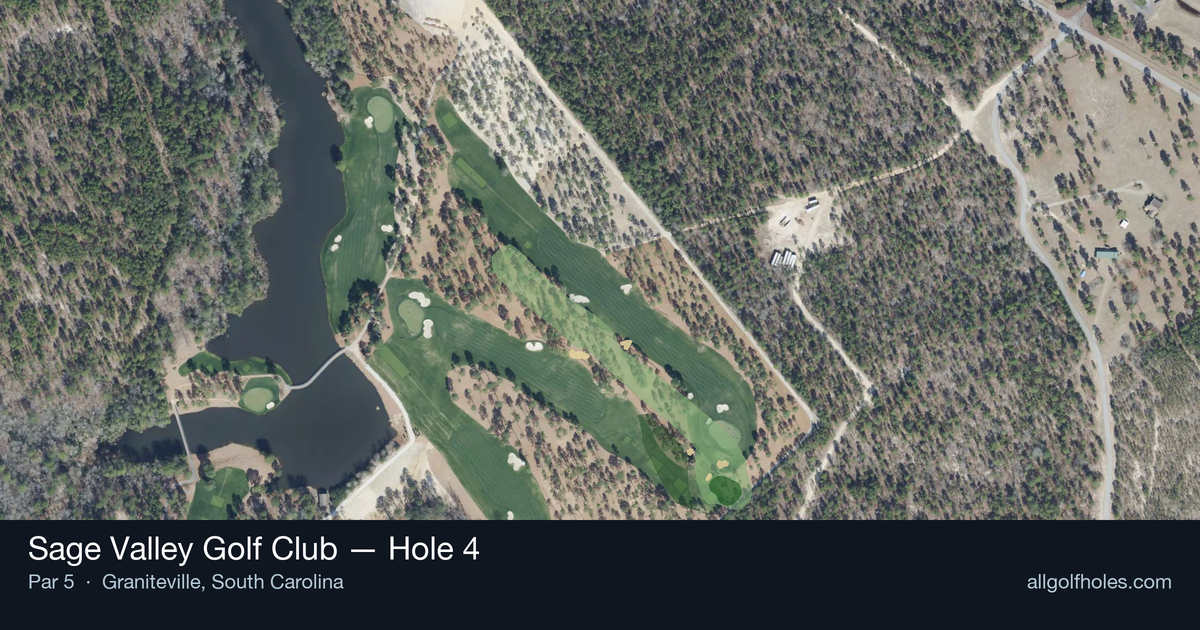
Aerial source not provided
Green size: 40 yds deep × 32 yds wide
Scorecard yardage is for Pro tees. The aerial shows its labeled reference position; distance rings measure to the green.
Pro tees · Par 5 · 570 yards
The plan for No. 4
The fourth hole at Sage Valley Golf Club presents a strategic par 5 stretching 570 yards through pristine South Carolina terrain. This straight-away layout challenges golfers to navigate a narrow corridor lined with towering pines, demanding precision from tee to green. The absence of traditional water hazards or bunkers shifts the focus to course management and accuracy, as the tree-lined fairway punishes wayward shots severely. The small green complex rewards those who can reach in two with a precise long iron or hybrid approach, while shorter hitters must plot a careful three-shot strategy. Wind direction becomes crucial on this exposed hole, often influencing club selection for the critical approach shot. Sage Valley Golf Club hole 4 epitomizes the course's philosophy of strategic golf through natural beauty and thoughtful design.
Off the tee
The tee shot strategy centers on finding the fairway with your most reliable club rather than chasing maximum distance. A well-struck driver down the center gives you the best foundation for the hole, but players struggling with accuracy should consider a 3-wood or hybrid to ensure position. Aim for the center-left portion of the fairway to open up the best angle for your layup shot. The straight layout means there's no dogleg to cut, so focus on distance control and staying in play rather than trying to gain an advantage through aggressive lines.
Approach & recovery
Given the hole's length, most players will face a layup decision on their second shot. Position this shot to leave yourself a comfortable full wedge or short iron into the green - typically laying up to around 100-120 yards out. Target the center of the fairway to give yourself the best angle and lie for your third shot. Longer hitters who can reach in two should carefully consider the small green size; a slightly mishit long iron or fairway wood can easily bound over this target. The risk of a difficult up-and-down from behind the green often outweighs the reward of going for it in two.
On the green
The small green requires precise distance control on your approach shot. Focus on hitting the center of the green and taking your par or birdie from there, as short-siding yourself on either side can make getting up and down challenging. Without specific knowledge of the green's contours, play conservatively to the middle and rely on solid putting rather than trying to attack tucked pins. The putting surface likely rewards aggressive putts given its smaller size, as longer lag putts are less common. ## RISK VS REWARD The primary risk/reward decision comes on the second shot for longer players. Going for the green in two offers birdie or eagle potential but requires perfect execution to hold the small putting surface. The conservative layup strategy virtually guarantees a birdie opportunity with a short iron in hand, making it the percentage play for most golfers. Weather conditions should heavily influence this decision - firm conditions favor laying up, while softer greens might make the aggressive play more viable. ## DIFFERENT SKILL LEVELS **High Handicappers:** Focus on keeping the ball in play with every shot. Use your most reliable clubs off the tee and for the layup, even if it means hitting 5-iron, 6-iron, wedge rather than trying to reach in two. The lack of hazards means bogey should be your worst score with smart course management. **Low Handicappers:** This hole offers legitimate eagle potential with precise execution. Consider the pin position, wind conditions, and your recent ball-striking when deciding whether to go for it in two. When laying up, be more aggressive with your target areas to create specific yardages for your preferred scoring clubs. The small green rewards confident, committed swings on approach shots.
Watch for
- Course conditioning and mapped hazards may affect line selection; confirm from the aerial.
Hole 4 Green Complex
Mapped green boundary
Green size: 7,120 sq ft
Course coverage
Tournament and creator videos about Sage Valley Golf Club — shared course coverage, not hole-specific clips.
Featured by these creators
Creator videos about this course
YouTube creators who filmed or featured Sage Valley Golf Club. · Stats as of Oct 12, 2026 · 6d ago
The First Ever YouTube Match at Sage Valley
How did Hole 4 play?
How did this hole play today?
Frequently asked questions
Yardage reference: Pro tees · 570 yards.
Can this par 5 be reached in two?
↓
At 570 yards, A true three-shot hole for most players. Position your layup to leave a comfortable wedge distance.
How difficult is hole 4?
↓
This hole is a moderate challenge for most golfers. Key challenges include: long par 5, heavily bunkered, large green requiring good lag putting.
How big is the green on hole 4?
↓
The green is fairly large with multiple pin positions. Lag putting becomes important on longer putts.
What's a good score on hole 4?
↓
This hole is a true three-shot hole where birdie requires execution. This longer par 5 demands patience. Two good shots set up the scoring opportunity.