Hole 5 at Sage Valley Golf Club
- Par
- 4
- Yardage
- 430 yds
- Hazards
- 3 bunkers
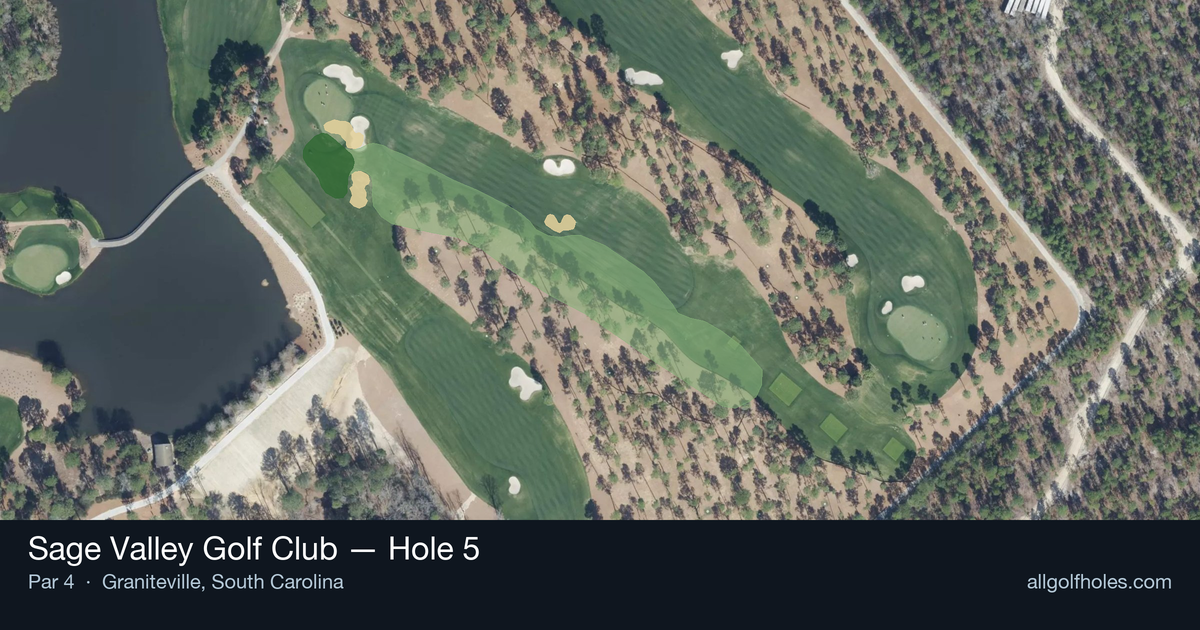
Aerial source not provided
Green size: 38 yds deep × 33 yds wide
Scorecard yardage is for Pro tees. The aerial shows its labeled reference position; distance rings measure to the green.
Pro tees · Par 4 · 430 yards
The plan for No. 5
Sage Valley Golf Club's fifth hole presents a deceptively challenging par 4 that demands precision over power. This 430-yard straight-away hole appears straightforward from the tee, but its small green complex requires surgical accuracy on the approach shot. The generous fairway welcomes most tee shots, allowing golfers to focus on positioning for the critical second shot. Without significant hazards to distract, the real test lies in the approach to the compact putting surface, where pin placement becomes paramount. The hole's understated elegance exemplifies Sage Valley's reputation for rewarding thoughtful course management, making it a memorable test of iron play accuracy in this prestigious South Carolina layout.
Off the tee
The tee shot strategy centers on finding the optimal position in the fairway for your approach angle. With no significant hazards to navigate, focus on hitting to your most comfortable yardage for the approach shot. Most players should favor a controlled drive with a 3-wood or hybrid, prioritizing accuracy over maximum distance. The target line should be center-fairway, allowing for your natural shot shape. Avoid the temptation to grip it and rip it – course management trumps raw distance on this hole.
Approach & recovery
The small green is the hole's primary defense, demanding precise club selection and committed swings. From the fairway, assess pin position carefully and aim for the center of the green unless you're feeling particularly confident. A mid-iron to long-iron approach (depending on your tee shot distance) should be the norm, with emphasis on hitting the green rather than attacking pins. The compact target means even slight misses can leave challenging up-and-downs, so err on the side of caution with your target selection.
On the green
With a small putting surface, lag putting becomes crucial for avoiding three-putts. Focus on getting your first putt within tap-in range rather than being overly aggressive with birdie attempts. The green's size means most putts will have subtle breaks, so take time to read the grain and slope carefully. Pin positions on small greens can dramatically affect difficulty, so adjust your approach strategy accordingly when the flag is tucked in corners. ## RISK VS REWARD The risk-reward calculation here is subtle but important. The reward for aggressive play is modest – perhaps a slightly easier approach angle or a few yards closer to the pin. The risk, however, is missing the small green entirely and facing a difficult recovery shot. The smart play is conservative: fairway off the tee, green with the approach, and two-putt for par. Birdie opportunities will come from excellent execution rather than aggressive strategy. ## DIFFERENT SKILL LEVELS **High-Handicap Players:** Focus entirely on finding the fairway with your most reliable club off the tee, even if it's a hybrid or long iron. From there, take enough club to comfortably reach the green and aim for the center regardless of pin position. Accept that par is an excellent score and don't let the lack of obvious hazards fool you into overaggressive play. **Low-Handicap Players:** You can be more aggressive with driver off the tee if you're confident in your accuracy. Consider pin position more heavily in your approach strategy, but still respect the small target. This hole rewards precision and course management skills that better players possess, making it a potential scoring opportunity with disciplined execution. The key to mastering Hole #5 lies in recognizing that sometimes the most dangerous holes are those that appear harmless – respect the small green and play within your capabilities for consistent scoring.
Watch for
- Course conditioning and mapped hazards may affect line selection; confirm from the aerial.
Hole 5 Green Complex
Mapped green boundary
Green size: 6,378 sq ft
Course coverage
Tournament and creator videos about Sage Valley Golf Club — shared course coverage, not hole-specific clips.
Featured by these creators
Creator videos about this course
YouTube creators who filmed or featured Sage Valley Golf Club. · Stats as of Oct 12, 2026 · 6d ago
The First Ever YouTube Match at Sage Valley
How did Hole 5 play?
How did this hole play today?
Frequently asked questions
Yardage reference: Pro tees · 430 yards.
What's the best strategy off the tee?
↓
For this 430-yard par 4, most players will hit driver to set up a comfortable approach.
How difficult is hole 5?
↓
This hole is a good scoring opportunity for most golfers.
How big is the green on hole 5?
↓
The green is fairly large with multiple pin positions. Lag putting becomes important on longer putts.
What's a good score on hole 5?
↓
This hole is a demanding hole where bogey is not unusual. This longer par 4 will test most golfers. Focus on position over distance.