Hole 13 at Sage Valley Golf Club
- Par
- 4
- Yardage
- 390 yds
- Hazards
- 6 bunkers
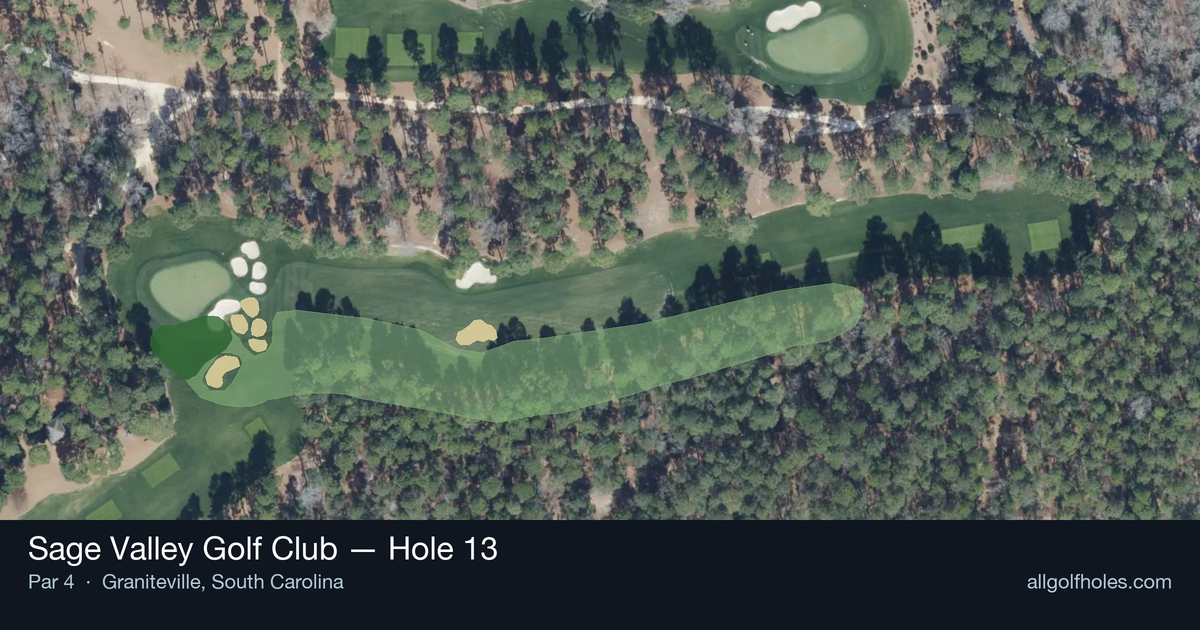
Aerial source not provided
Green size: 35 yds deep × 26 yds wide
Scorecard yardage is for Pro tees. The aerial shows its labeled reference position; distance rings measure to the green.
Pro tees · Par 4 · 390 yards
The plan for No. 13
Sage Valley Golf Club hole 13 presents a deceptively straightforward par 4 that demands precision over power. This 390-yard test features a straight layout that invites aggressive play, but the small green complex requires surgical accuracy on the approach shot. The absence of major hazards allows golfers to focus purely on execution and course management. From the tee, players face a generous fairway that encourages confident swings, but the real challenge emerges as you near the putting surface. The compact green punishes wayward approach shots, demanding proper club selection and committed swings. This hole epitomizes Sage Valley's philosophy of rewarding thoughtful strategy and precise execution over brute force.
Off the tee
The tee shot strategy centers on finding the ideal approach distance while staying in the fairway's center. Most golfers should consider hitting less than driver to position themselves in the prime approach zone around 100-130 yards from the pin. A 3-wood or hybrid off the tee often provides the perfect combination of distance and accuracy, leaving a comfortable wedge or short iron to the green. For longer hitters, driver can be used if course conditions are firm, but the focus should be on finding the fairway rather than maximizing distance. The straight layout makes target line selection straightforward - aim for the center of the fairway and commit to your swing.
Approach & recovery
With the green being notably small, the approach shot becomes the critical scoring element. From the ideal tee shot position, you'll typically face a wedge or short iron, which should allow for aggressive pin-hunting. Focus on hitting the ball first, then turf, with a controlled swing that prioritizes accuracy over distance. The small green size means there's little room for error, so when the pin is tucked, consider aiming for the center of the green rather than chasing difficult pin positions. A 20-foot putt from the center is always preferable to a difficult up-and-down from the fringe or rough.
On the green
The small green at #13 means most putts will be relatively short, but don't underestimate the importance of reading the subtle breaks correctly. Pay attention to the overall slope of the green and any grain patterns in the grass. With Sage Valley's typically fast greens, speed control becomes crucial on shorter putts. Focus on getting your first putt close rather than trying to hole everything. The small surface area means even slight misreads can result in putts sliding off the green, turning a potential birdie into a bogey. ## RISK VS REWARD This hole offers excellent risk/reward opportunities for golfers willing to be aggressive. The primary reward comes from attacking the pin with your approach shot when you've positioned yourself well off the tee. Players who successfully execute both the positioning tee shot and precise approach can expect regular birdie chances. The main risk lies in being overly aggressive with approach shots to tucked pins. The small green penalizes misses more severely than larger targets, making course management crucial even on this seemingly straightforward hole. ## DIFFERENT SKILL LEVELS **Low Handicap Players:** Should view this as a birdie hole and play aggressively. Consider driver if you're confident in your accuracy, and don't hesitate to attack pins when you have a wedge in your hands. Your superior short game skills allow for more aggressive approach play. **High Handicap Players:** Focus on two solid shots rather than trying to make something special happen. Hit your most reliable fairway club off the tee, then prioritize hitting the green with your approach rather than getting close to the pin. Pars here are excellent scores that keep momentum building for the closing holes. The key for all skill levels is recognizing this as a scoring opportunity while respecting the precision required by the small green. Smart course management and confident execution typically result in one of the better scores of the round on this hole.
Watch for
- Course conditioning and mapped hazards may affect line selection; confirm from the aerial.
Hole 13 Green Complex
Mapped green boundary
Green size: 4,408 sq ft
Course coverage
Tournament and creator videos about Sage Valley Golf Club — shared course coverage, not hole-specific clips.
Featured by these creators
Creator videos about this course
YouTube creators who filmed or featured Sage Valley Golf Club. · Stats as of Oct 12, 2026 · 6d ago
The First Ever YouTube Match at Sage Valley
How did Hole 13 play?
How did this hole play today?
Frequently asked questions
Yardage reference: Pro tees · 390 yards.
What's the best strategy off the tee?
↓
For this 390-yard par 4, most players will hit driver to set up a comfortable approach.
How difficult is hole 13?
↓
This hole is a moderate challenge for most golfers. Key challenges include: heavily bunkered, small green.
How big is the green on hole 13?
↓
The green is small and requires precision. Expect challenging pin positions with limited room for error.
What's a good score on hole 13?
↓
This hole is a medium-length test where par is a solid result. A straightforward par 4 where course management pays off.