Hole 2 at Sage Valley Golf Club
- Par
- 3
- Yardage
- 200 yds
- Hazards
- 1 bunker · Water
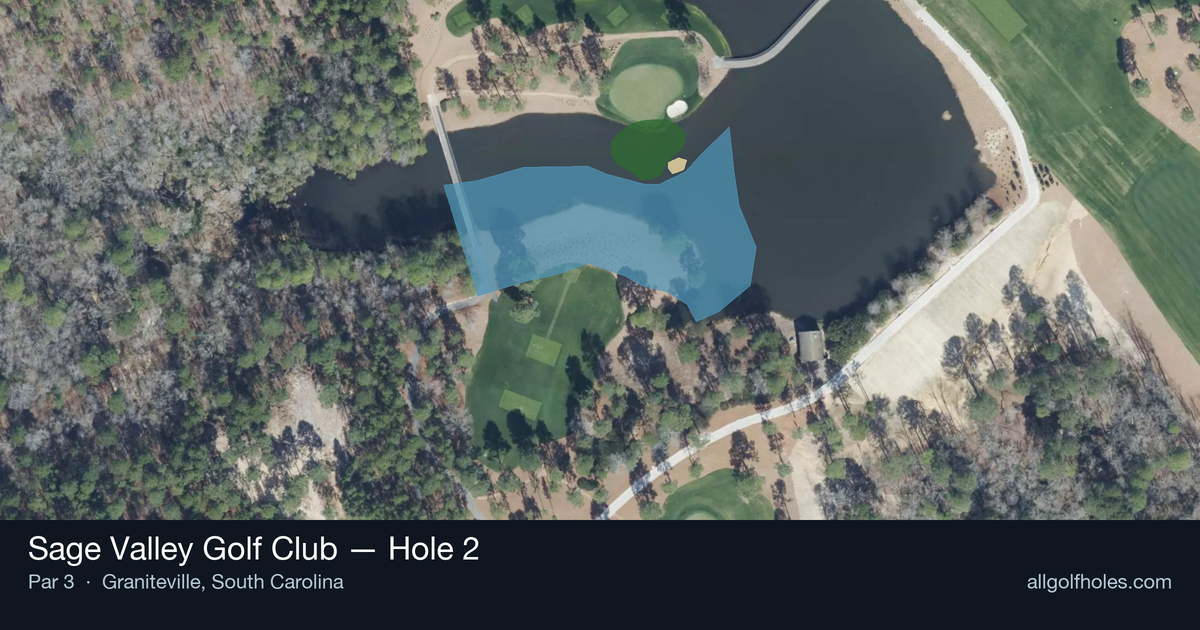
Aerial source not provided
Green size: 31 yds deep × 33 yds wide
Scorecard yardage is for Pro tees. The aerial shows its labeled reference position; distance rings measure to the green.
Pro tees · Par 3 · 200 yards
The plan for No. 2
The second hole at Sage Valley Golf Club presents a deceptively straightforward par 3 that demands precision over power. At 200 yards, this one-shot hole requires golfers to commit fully to their club selection and trust their swing, as the small green offers little margin for error. Without significant hazards to complicate the visual, players can focus entirely on distance control and pin placement, making this a true test of iron play accuracy. The compact green rewards those who can dial in their yardages, while approach shots that drift offline will find recovery challenging. This hole epitomizes the strategic design philosophy that makes Sage Valley Golf Club a respected South Carolina layout, where clean execution matters more than raw distance.
Off the tee
**Club Selection Strategy:** The 200-yard distance typically calls for anything from a 6-iron to a 4-iron, depending on conditions and your personal yardages. Factor in wind direction, pin position, and green firmness when making your selection. In calm conditions, most golfers should take one extra club and swing smoothly rather than forcing a shot. **Target Line:** Aim for the center of the green regardless of pin position. With a small target, playing to the fat of the green maximizes your margin for error. Only attack pins when they're centrally located and conditions are ideal. **Execution Keys:** Focus on tempo and balance. The tendency on longer par-3s is to swing harder, which often leads to poor contact. Trust your club selection and commit to a smooth, controlled swing.
Approach & recovery
Since this is a par-3, your tee shot IS your approach. The key considerations involve reading the conditions properly: **Wind Assessment:** Take extra time to read wind direction and strength. A 200-yard shot gives wind more time to affect ball flight. Toss grass or use the flag as your guide. **Green Conditions:** On firm greens, consider landing short and bouncing on. On soft conditions, you can be more aggressive with your target line.
On the green
**Reading the Terrain:** Small greens typically feature subtle breaks that can be deceptive. Take time to read putts from multiple angles, especially on longer attempts. **Pin Position Strategy:** When the pin is tucked near an edge, focus on lag putting to the safe side of the hole. Two-putting from 30 feet is always better than three-putting from 8 feet after an aggressive attempt. **Speed Control:** Small greens punish poor speed control more severely. Practice strokes should focus on distance rather than line for longer putts. ## RISK VS REWARD This hole offers limited risk/reward opportunities due to its straightforward design. The main decision point involves pin hunting versus playing safe: **Conservative Play:** Always aim for the center of the green. This approach virtually guarantees avoiding big numbers while still providing birdie opportunities. **Aggressive Play:** Only consider attacking tucked pins when you're confident in your distance control and the conditions favor precision. ## DIFFERENT SKILL LEVELS **High Handicappers:** Take the conservative approach every time. Use a club that gets you to the back edge of the green with a comfortable swing. Don't worry about pin positions – just find the putting surface and two-putt for par. **Low Handicappers:** You can be more aggressive with pin positions, but still respect the small target. Consider the scoring opportunity this hole presents, but don't force shots that aren't there. Your short game skills give you more latitude to attack pins. **Course Management Tip:** Regardless of skill level, this hole rewards patience and smart decision-making over heroics. Make par your worst score, and let birdies come naturally from solid execution rather than risky target selection.
Watch for
- Course conditioning and mapped hazards may affect line selection; confirm from the aerial.
Hole 2 Green Complex
Mapped green boundary
Green size: 5,369 sq ft
Course coverage
Tournament and creator videos about Sage Valley Golf Club — shared course coverage, not hole-specific clips.
Featured by these creators
Creator videos about this course
YouTube creators who filmed or featured Sage Valley Golf Club. · Stats as of Oct 12, 2026 · 6d ago
The First Ever YouTube Match at Sage Valley
How did Hole 2 play?
How did this hole play today?
Frequently asked questions
Yardage reference: Pro tees · 200 yards.
What club should I use on this par 3?
↓
At 200 yards, most golfers will need a long iron or hybrid (5-iron to 6-iron) to reach this green. Adjust for elevation, wind, and pin position.
How difficult is hole 2?
↓
This hole is a moderate challenge for most golfers. Key challenges include: water in play.
What hazards should I watch out for on hole 2?
↓
Key hazards include: 1 greenside bunker; water at 152.6 yards. Plan your shots to avoid these trouble spots.
How big is the green on hole 2?
↓
The green is medium-sized with moderate targets. Pay attention to pin placement when selecting your approach club.