Hole 14 at Oakmont Country Club
- Par
- 4
- Yardage
- 358 yds
- Stroke index
- 18
- Hazards
- 14 bunkers
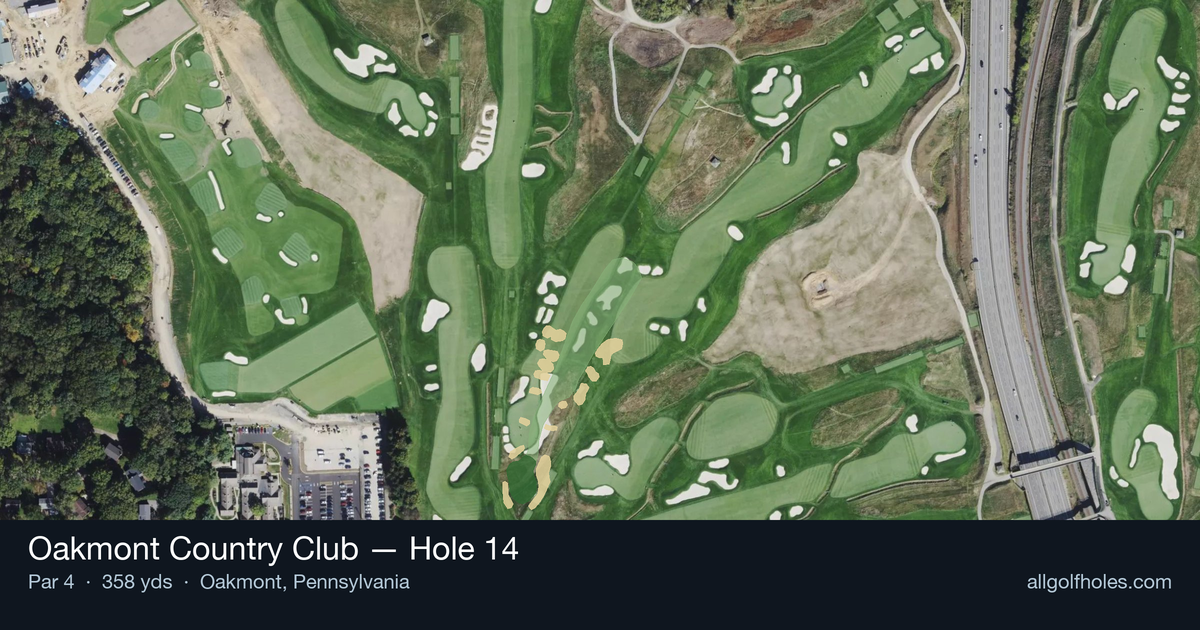
Aerial source not provided
Green size: 45 yds deep × 36 yds wide
Scorecard yardage is for Championship tees. The aerial shows its labeled reference position; distance rings measure to the green.
Championship tees · Par 4 · 358 yards
The plan for No. 14
The shortest par 4 at Oakmont Country Club, hole 14 may appear deceptively simple at 358 yards, but this straight layout embodies the course's philosophy that precision trumps power. As the highest handicap hole, it offers strategic respite while demanding accuracy from tee to green. The generous fairway welcomes aggressive drivers, yet the small green complex requires a deft touch on the approach shot. Without bunkers or water to intimidate, this hole relies on Oakmont's legendary green speeds and subtle undulations to test even seasoned players. Smart course management and confident putting separate good scores from great ones on this understated gem that perfectly balances risk and reward.
Off the tee
The tee shot strategy centers on positioning for the optimal approach distance rather than maximizing length. Most players should consider a controlled driver or strong 3-wood to leave a comfortable wedge or short iron into the green. The target line should favor the center of the fairway, as Oakmont's firm conditions will provide additional roll. Avoid the temptation to overswing - rhythm and balance are crucial for setting up the approach shot. Tour professionals often use less than driver here to ensure they have their preferred approach yardage.
Approach & recovery
The approach shot is the scoring moment on this hole. The small green demands pinpoint accuracy, and Oakmont's firm surfaces mean shots must land softly with proper spin. Favor the center of the green unless the pin position clearly favors one side. Club selection should prioritize landing the ball on the putting surface rather than attacking pins. A full wedge or short iron with proper trajectory will hold better than a hard-hit longer club. Study the pin position carefully - on this small green, being on the wrong level can create extremely difficult two-putts.
On the green
Oakmont's greens are legendary for their speed and subtle breaks that become magnified at tournament pace. On this small putting surface, lag putting becomes critical - getting close to any pin position is more important than being aggressive. Pay attention to the overall slope of the green and how it relates to the surrounding terrain. Putts that look straight often have subtle breaks due to Oakmont's sophisticated green contouring. Leave approach shots below the hole whenever possible, as uphill putts are much more manageable on these lightning-fast surfaces. ## RISK VS REWARD The primary risk/reward decision involves approach shot aggression. While the hole's length suggests a birdie opportunity, the small green punishes misses severely. The reward of attacking tight pin positions must be weighed against the difficulty of getting up and down from Oakmont's challenging surrounds. Conservative play to the green's center often yields better results than aggressive pin-hunting, especially in tournament conditions. ## DIFFERENT SKILL LEVELS **High-Handicap Players:** Focus on finding the fairway with a comfortable club off the tee, even if it means a longer approach shot. Aim for the center of the green regardless of pin position - making par here is an excellent result. Prioritize keeping the ball in play and avoiding big numbers. **Low-Handicap Players:** Can be more aggressive with driver to set up shorter approach shots, but must respect the small green size. These players can consider attacking certain pin positions, particularly when the pin is in the center or front portion of the green. However, even skilled players should think twice about back pins on this small target. The key to success on Oakmont's 14th is recognizing it as a precision hole disguised as a short par 4 - respect the venue's reputation and play smart golf strategy rather than overpowering the hole.
Watch for
- Crossing center
Hole 14 Green Complex
Mapped green boundary
Green size: 8,088 sq ft
Course coverage
Tournament and creator videos about Oakmont Country Club — shared course coverage, not hole-specific clips.
Featured by these creators
Creator videos about this course
YouTube creators who filmed or featured Oakmont Country Club. · Stats as of Oct 12, 2026 · 6d ago
The World's Hardest Golf Course: Oakmont Country Club
Deep Dive: Oakmont Country Club | Designing Golf
The Architecture of Oakmont Country Club | 2025 U.S. Open Preview
How did Hole 14 play?
How did this hole play today?
Frequently asked questions
Yardage reference: Championship tees · 358 yards.
What's the best strategy off the tee?
↓
For this 358-yard par 4, most players will hit 3-wood or driver to set up a comfortable approach.
How difficult is hole 14?
↓
This hole is a good scoring opportunity for most golfers. Key challenges include: large green requiring good lag putting.
How big is the green on hole 14?
↓
The green is large and can play quite long. The green is deeper than wide, so club selection is crucial. Three-putt territory if you don't manage your approach distance well.
What's a good score on hole 14?
↓
This hole is a medium-length test where par is a solid result. A straightforward par 4 where course management pays off.