Hole 17 at Oakmont Country Club
- Par
- 4
- Yardage
- 313 yds
- Stroke index
- 14
- Hazards
- 12 bunkers
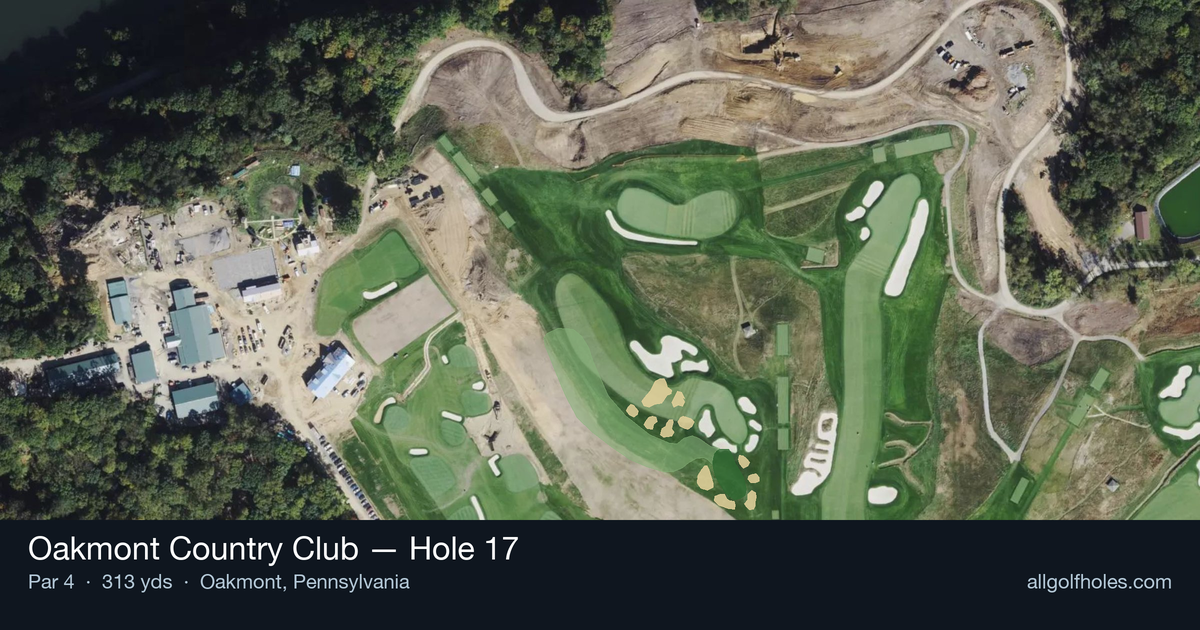
Aerial source not provided
Green size: 39 yds deep × 26 yds wide
Scorecard yardage is for Championship tees. The aerial shows its labeled reference position; distance rings measure to the green.
Championship tees · Par 4 · 313 yards
The plan for No. 17
The 17th hole at Oakmont Country Club presents a deceptively challenging short par 4 that demands precision over power. At 313 yards, this straight hole might appear straightforward, but Oakmont's legendary conditioning and strategic design ensure no shot is given freely. The tee shot requires careful consideration - longer hitters may be tempted to drive aggressively, but the small green complex punishes wayward approaches with Oakmont's notoriously firm and fast conditions. The compact putting surface demands pinpoint accuracy on the approach shot, where club selection and trajectory become critical. This hole epitomizes Oakmont's philosophy that every stroke matters, turning what looks like a birdie opportunity into a stern test of course management and execution.
Off the tee
The optimal strategy off the tee is conservative aggression - taking enough club to reach a comfortable approach distance while maintaining accuracy. Most players should consider a long iron or hybrid, aiming for the center of the fairway and leaving themselves 100-130 yards to the pin. The target line is straightforward down the middle, but precision becomes paramount given the small green ahead. Avoid the temptation to grip down on a driver or force a 3-wood, as the added distance provides minimal benefit while increasing dispersion risk.
Approach & recovery
The approach shot is where this hole is won or lost. With a small green as your target, club selection and commitment to your yardage are crucial. Focus on taking one more club than you think you need and making a smooth, controlled swing. The preferred angle is straight on, as the hole's design doesn't favor one side over the other. Pay careful attention to pin position - when the flag is tucked, aim for the center of the green and take your two-putt par. Wind conditions can significantly impact club selection on this shorter approach, so factor in any breeze before committing to your shot.
On the green
Oakmont's greens are notoriously fast and subtle, and the 17th is no exception despite its small size. Focus on getting your first putt close rather than being overly aggressive with birdie attempts. Common breaks will depend on the green's internal contours, but expect subtle movements that can catch unwary putters off guard. When facing challenging pin positions, prioritize leaving yourself an uphill putt for your second attempt. The small surface means three-putts can happen quickly if you're not careful with speed control. ## RISK VS REWARD The primary risk/reward decision comes with tee shot club selection. While driver might leave you with just a wedge into the green, the increased accuracy demands of hitting such a small target with a short club can backfire. The reward of potential eagle or easy birdie must be weighed against the risk of missing the green entirely and facing a difficult up-and-down. Most situations favor the conservative approach of laying back to a full iron distance. ## DIFFERENT SKILL LEVELS **High-Handicap Players:** Focus entirely on hitting the fairway with your most reliable club, even if it means a longer approach shot. Aim for the center of the green regardless of pin position and prioritize avoiding big numbers. A bogey here isn't devastating, but a double or worse can derail your round. **Low-Handicap Players:** This hole demands birdie consideration given its short length and lack of hazards. Consider being more aggressive with pin hunting, especially when the flag is accessible. Your superior distance control should allow you to attack pins that others must avoid, but maintain discipline when conditions or pin positions call for patience. The 17th hole at Oakmont rewards smart course management and precise execution while punishing overaggression and poor club selection. Treat it as the scoring opportunity it is, but respect the challenge that Oakmont's demanding greens always present.
Watch for
- Crossing center
Hole 17 Green Complex
Mapped green boundary
Green size: 5,038 sq ft
Course coverage
Tournament and creator videos about Oakmont Country Club — shared course coverage, not hole-specific clips.
Featured by these creators
Creator videos about this course
YouTube creators who filmed or featured Oakmont Country Club. · Stats as of Oct 12, 2026 · 6d ago
The World's Hardest Golf Course: Oakmont Country Club
Deep Dive: Oakmont Country Club | Designing Golf
The Architecture of Oakmont Country Club | 2025 U.S. Open Preview
How did Hole 17 play?
How did this hole play today?
Frequently asked questions
Yardage reference: Championship tees · 313 yards.
What's the best strategy off the tee?
↓
For this 313-yard par 4, most players will hit 3-wood or driver to set up a comfortable approach.
How difficult is hole 17?
↓
This hole is a good scoring opportunity for most golfers.
How big is the green on hole 17?
↓
The green is medium-sized with moderate targets. The green is deeper than wide, so club selection is crucial. Pay attention to pin placement when selecting your approach club.
What's a good score on hole 17?
↓
This hole is a birdie opportunity if you find the fairway. This shorter par 4 rewards accuracy off the tee with a short iron approach.