Hole 13 at Oakmont Country Club
- Par
- 3
- Yardage
- 183 yds
- Stroke index
- 16
- Hazards
- 5 bunkers
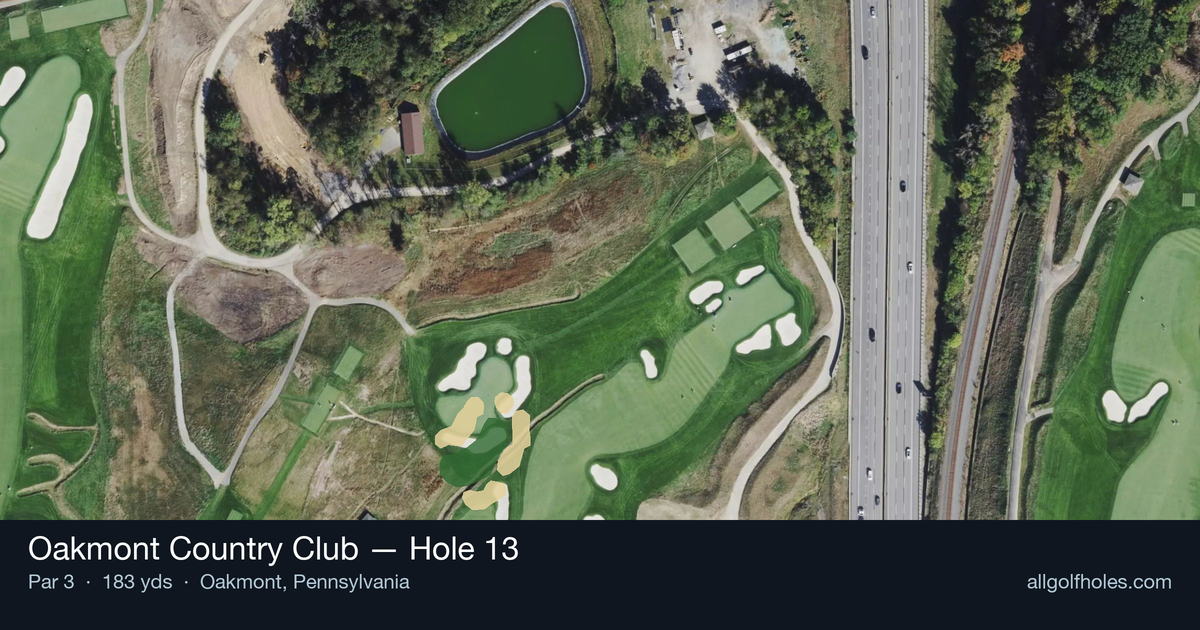
Aerial source not provided
Green size: 42 yds deep × 24 yds wide
Scorecard yardage is for Championship tees. The aerial shows its labeled reference position; distance rings measure to the green.
Championship tees · Par 3 · 183 yards
The plan for No. 13
The 13th hole at Oakmont Country Club presents a deceptively challenging par 3 that embodies the course's reputation for precision and mental fortitude. At 183 yards, this straight shot demands unwavering accuracy to a small, well-guarded green that punishes even slight miscalculations. The hole's placement as the 16th handicap might suggest accessibility, but Oakmont's notorious difficulty reveals itself in the unforgiving green complex and subtle slopes that can turn good shots into difficult recovery situations. With minimal hazards visible, the primary challenge lies in club selection and commitment to the target line. This hole exemplifies Oakmont's philosophy that par is always earned, never given, making it a true test of iron play precision.
Off the tee
Club selection is everything on this hole. The 183-yard distance typically calls for a mid-iron to long-iron depending on conditions, but prioritize accuracy over distance. Aim for the center of the green regardless of pin position - the small target leaves little room for error when chasing flags. Take one extra club if there's any doubt, as coming up short on Oakmont's firm greens often means a difficult up-and-down. Factor in wind conditions carefully, as even a slight breeze can significantly impact ball flight over this distance. Trust your yardage and commit fully to your club selection.
Approach & recovery
Since this is a par 3, your tee shot IS your approach shot. Focus on creating a high, soft landing that will stick on the small green surface. The key is generating enough spin to hold the green without flying it entirely. Aim for a controlled draw or fade rather than trying to hit it pin-high - the margin for error is simply too small. If the pin is tucked near an edge, resist the temptation to fire directly at it. Playing to the fat part of the green, even if it means a longer putt, is the percentage play that keeps big numbers off your scorecard.
On the green
Oakmont's greens are legendary for their speed and subtle breaks, and the 13th is no exception. Even on this smaller surface, you'll encounter slopes that aren't immediately apparent to the eye. Take extra time reading your putt from multiple angles, paying special attention to the overall slope of the green. Lag putting becomes crucial - getting your first putt close is more important than being aggressive toward the hole. The green's compact size means most putts will have some break, so trust your read and maintain smooth tempo throughout your stroke. ## RISK VS REWARD This hole offers limited risk/reward scenarios due to the absence of major hazards, but the reward comes in the form of a genuine birdie opportunity. The risk lies in being overly aggressive with pin hunting or club selection. Playing conservatively to the center of the green offers the best chance for a stress-free par with birdie potential. The only significant risk is short-siding yourself by missing the green entirely, which at Oakmont can lead to challenging recovery shots from firm, closely-mown areas. ## DIFFERENT SKILL LEVELS **High-Handicap Players:** Take the safe route every time. Club up if in doubt and aim for the absolute center of the green. Focus on making solid contact rather than perfect distance control. A two-putt par from anywhere on this green is a victory, so don't get greedy chasing pins. **Low-Handicap Players:** This is your scoring opportunity. You can be more aggressive with pin positions, especially when they're in the middle third of the green. Trust your distance control and don't be afraid to attack accessible pins. However, respect the difficulty of Oakmont's green surfaces and prioritize leaving yourself uphill putts when possible. Consider the pin position in relation to your natural ball flight - a draw player might favor right pins, while fade players can attack left pins more confidently.
Watch for
- Crossing center
Hole 13 Green Complex
Mapped green boundary
Green size: 5,325 sq ft
Course coverage
Tournament and creator videos about Oakmont Country Club — shared course coverage, not hole-specific clips.
Featured by these creators
Creator videos about this course
YouTube creators who filmed or featured Oakmont Country Club. · Stats as of Oct 12, 2026 · 5d ago
The World's Hardest Golf Course: Oakmont Country Club
Deep Dive: Oakmont Country Club | Designing Golf
The Architecture of Oakmont Country Club | 2025 U.S. Open Preview
How did Hole 13 play?
How did this hole play today?
Frequently asked questions
Yardage reference: Championship tees · 183 yards.
What club should I use on this par 3?
↓
At 183 yards, most golfers will need a long iron or hybrid (5-iron to 6-iron) to reach this green. Adjust for elevation, wind, and pin position.
How difficult is hole 13?
↓
This hole is a good scoring opportunity for most golfers.
How big is the green on hole 13?
↓
The green is medium-sized with moderate targets. Pay attention to pin placement when selecting your approach club.