Hole 3 at Oakmont Country Club
- Par
- 4
- Yardage
- 428 yds
- Stroke index
- 1
- Hazards
- 10 bunkers
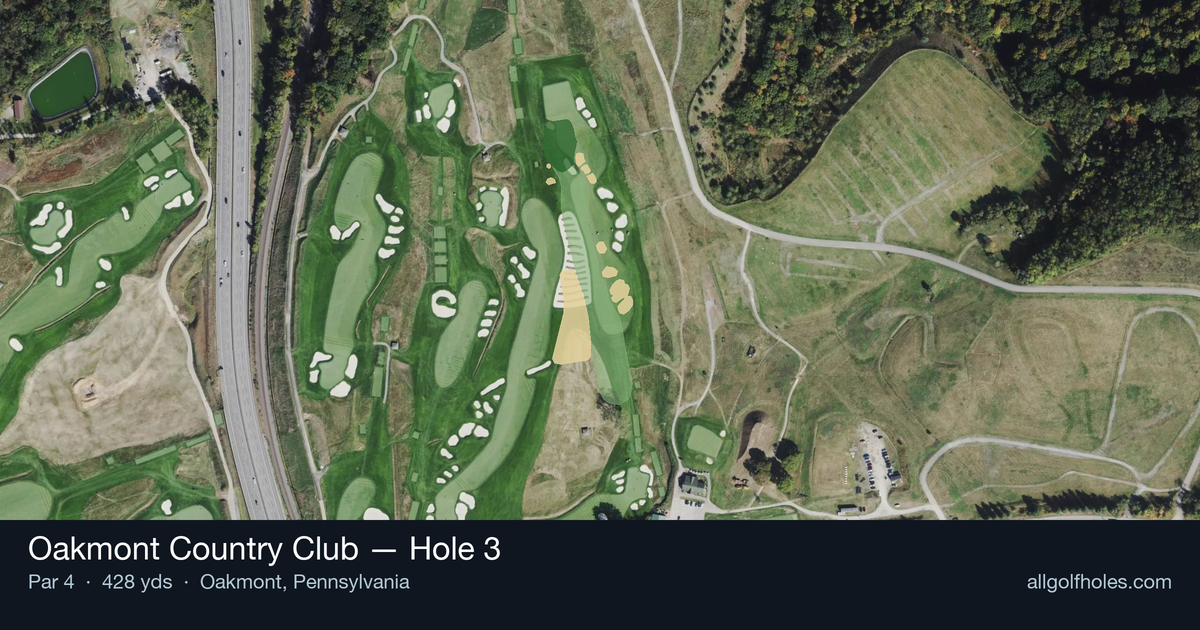
Aerial source not provided
Green size: 58 yds deep × 39 yds wide
Scorecard yardage is for Championship tees. The aerial shows its labeled reference position; distance rings measure to the green.
Championship tees · Par 4 · 428 yards
The plan for No. 3
The #1 handicap hole at Oakmont Country Club demands precision from the first swing, earning its reputation as one of the most challenging par 4s in championship golf. This 428-yard straight test of skill presents a deceptively simple layout that has humbled the world's best players during multiple U.S. Opens. The tee shot requires careful placement on a fairway that offers little margin for error, while the approach shot must navigate to a small, subtly contoured green that punishes anything less than perfect execution. Without traditional hazards to distract, this hole strips golf down to its purest elements—accuracy, distance control, and mental fortitude. At Oakmont Country Club hole 3, par feels like a victory against one of golf's most demanding venues.
Off the tee
Your tee shot strategy centers on finding the optimal position for your approach angle. With the fairway's characteristic Oakmont firmness, focus on a controlled drive that finds the center-left portion of the landing area. A 3-wood or hybrid might be the smarter play here, sacrificing distance for accuracy and leaving yourself a comfortable approach distance. The key is avoiding any trouble that could leave you with an awkward angle or longer approach than necessary.
Approach & recovery
The approach to Oakmont's small, firm greens requires surgical precision. Plan to hit one club more than the yardage suggests, as the green will reject anything less than a perfectly struck shot. Target the center of the green regardless of pin position - the small target leaves little room for error. Focus on a controlled trajectory that will hold the putting surface, as anything short or long will leave extremely difficult recovery shots.
On the green
Oakmont's greens are legendary for their speed and subtle breaks that become pronounced under pressure. Read putts conservatively and focus on lag putting to avoid the dreaded three-putt. The small green means most putts will have manageable length, but the lightning-fast surface requires a delicate touch. Pay special attention to grain direction and any subtle slopes that might not be immediately apparent. ## RISK VS REWARD This hole offers little in terms of risk/reward opportunities - it's about minimizing mistakes rather than creating birdie chances. The reward comes from making par and moving on, while the risks are numerous and severe. Any aggressive play should be carefully calculated based on your current round situation and comfort level with the conditions. ## DIFFERENT SKILL LEVELS **Low Handicap Players:** Focus on precise execution and trust your yardages. Consider course conditions heavily in club selection and don't be afraid to aim for the fat part of the green regardless of pin position. Your short game skills give you more margin for error on approaches. **High Handicap Players:** Play conservatively from tee to green. Consider hitting 3-wood or hybrid off the tee for better accuracy, then focus on finding the green with your approach rather than attacking pins. A bogey here isn't a disaster - double bogey or worse can derail your round. The third hole at Oakmont exemplifies championship golf strategy: respect the hole's difficulty, execute within your capabilities, and understand that par is always a good score on one of golf's most demanding tests.
Watch for
- Crossing center
Hole 3 Green Complex
Mapped green boundary
Green size: 14,054 sq ft
Course coverage
Tournament and creator videos about Oakmont Country Club — shared course coverage, not hole-specific clips.
Featured by these creators
Creator videos about this course
YouTube creators who filmed or featured Oakmont Country Club. · Stats as of Oct 12, 2026 · 6d ago
The World's Hardest Golf Course: Oakmont Country Club
Deep Dive: Oakmont Country Club | Designing Golf
The Architecture of Oakmont Country Club | 2025 U.S. Open Preview
How did Hole 3 play?
How did this hole play today?
Frequently asked questions
Yardage reference: Championship tees · 428 yards.
What's the best strategy off the tee?
↓
For this 428-yard par 4, most players will hit driver to set up a comfortable approach.
How difficult is hole 3?
↓
This hole is a good scoring opportunity for most golfers. Key challenges include: large green requiring good lag putting.
How big is the green on hole 3?
↓
The green is large and can play quite long. The green is deeper than wide, so club selection is crucial. Three-putt territory if you don't manage your approach distance well.