Hole 16 at Oakmont Country Club
- Par
- 3
- Yardage
- 231 yds
- Stroke index
- 12
- Hazards
- 5 bunkers
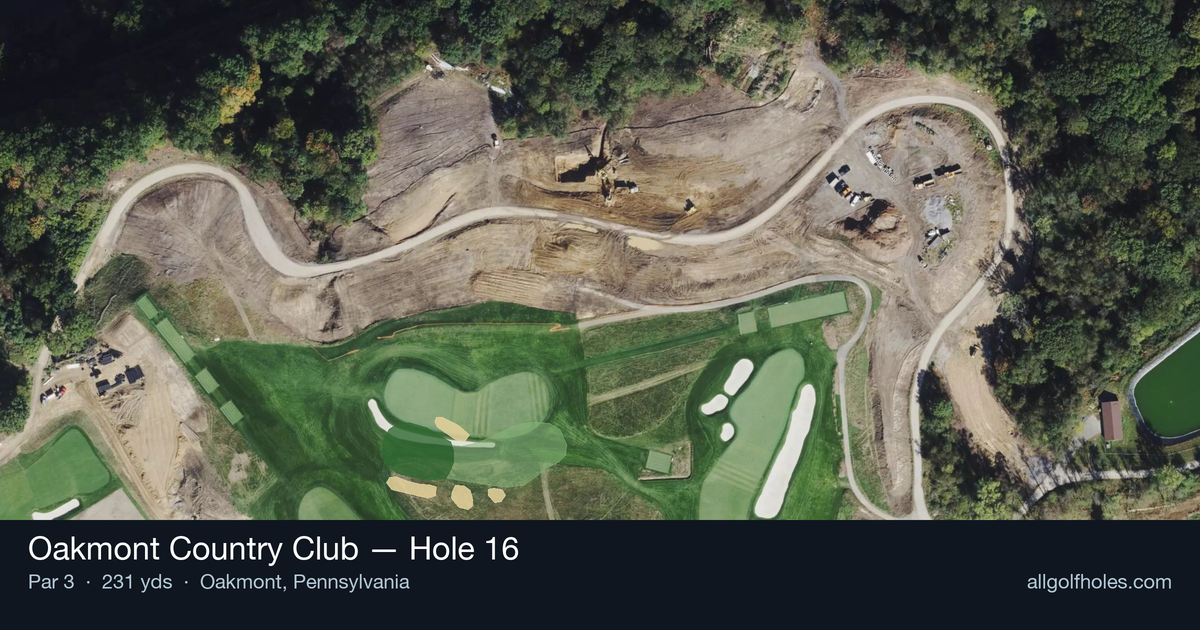
Aerial source not provided
Green size: 39 yds deep × 36 yds wide
Scorecard yardage is for Championship tees. The aerial shows its labeled reference position; distance rings measure to the green.
Championship tees · Par 3 · 231 yards
The plan for No. 16
Oakmont Country Club's 16th hole stands as a testament to the course's reputation for precision and mental fortitude. This deceptively challenging par 3 stretches 231 yards to a small, elevated green that demands both distance control and unwavering accuracy. The tee shot must carry over rolling terrain to find the putting surface, with the hole's straight layout offering no room for error or strategic alternatives. What makes this hole particularly treacherous is its position late in the round at one of golf's most demanding venues. The compact green provides minimal margin for error, requiring golfers to commit fully to their club selection and execution. The absence of significant hazards ironically heightens the pressure – there are no bailout areas or recovery options, only the stark choice between finding the target or facing a difficult up-and-down from the surrounding slopes that define Oakmont's unforgiving character.
Off the tee
From the tee, this hole requires your longest iron or possibly a hybrid/fairway wood depending on conditions and your distance capabilities. The target line should favor the center of the green, as the small target leaves little room for creative pin-hunting. Take extra time to assess wind conditions, as they'll significantly impact club selection at this distance. Commit fully to your club choice - tentative swings from this distance rarely find their target. Focus on a smooth, controlled swing rather than trying to muscle the ball, as tempo becomes crucial when swinging harder clubs.
Approach & recovery
Since this is a par 3, your tee shot IS your approach shot. The key is accepting that the center of the green is your friend, regardless of pin position. With Oakmont's typically elevated and well-protected greens, any shot that finds the putting surface should be considered a success. Avoid the temptation to attack pins cut close to edges - the small green size means even center-green putts will be manageable distances.
On the green
Oakmont's greens are legendary for their speed and subtle breaks that can fool even tour professionals. Once on this small green, focus on lag putting to ensure you don't leave yourself a knee-knocking second putt. Read putts carefully, as the breaks may be more pronounced than they appear. Two-putting from anywhere on this green should be your primary objective, with any birdie opportunities being a bonus. ## RISK VS REWARD The risk/reward calculation here is straightforward: there's significant reward for finding the green in regulation, but substantial risk in missing it. The small target means aggressive pin-seeking carries high risk for minimal additional reward. The smart play is always toward the green's center, accepting a potential 25-30 foot putt rather than risking a difficult chip or pitch shot. ## DIFFERENT SKILL LEVELS **High-handicap players** should focus entirely on making solid contact with whatever club gets them closest to the green. Don't worry about reaching the green in one shot if it requires an uncomfortable club - a well-executed layup followed by a good wedge shot can often yield better results than a mishit long iron. Consider playing to the front edge or even short of the green if that's within your comfortable distance range. **Low-handicap players** should treat this as a scoring opportunity despite its length. With proper club selection and committed execution, birdie chances are realistic. However, resist over-aggressive pin-hunting - Oakmont's reputation for punishing slightly offline shots means even skilled players benefit from conservative target selection. Focus on course management and accept that par is an excellent score on this demanding hole.
Watch for
- Crossing center
Hole 16 Green Complex
Mapped green boundary
Green size: 7,863 sq ft
Course coverage
Tournament and creator videos about Oakmont Country Club — shared course coverage, not hole-specific clips.
Featured by these creators
Creator videos about this course
YouTube creators who filmed or featured Oakmont Country Club. · Stats as of Oct 12, 2026 · 6d ago
The World's Hardest Golf Course: Oakmont Country Club
Deep Dive: Oakmont Country Club | Designing Golf
The Architecture of Oakmont Country Club | 2025 U.S. Open Preview
How did Hole 16 play?
How did this hole play today?
Frequently asked questions
Yardage reference: Championship tees · 231 yards.
What club should I use on this par 3?
↓
At 231 yards, most golfers will need a fairway wood or hybrid to reach this green. Adjust for elevation, wind, and pin position.
How difficult is hole 16?
↓
This hole is a moderate challenge for most golfers. Key challenges include: long par 3, large green requiring good lag putting.
How big is the green on hole 16?
↓
The green is large and can play quite long. Three-putt territory if you don't manage your approach distance well.
What's a good score on hole 16?
↓
This hole is a challenging par where bogey is acceptable. This longer par 3 will test your long iron or hybrid game. Par is a good score.