Hole 9 at Aronimink Golf Club
- Par
- 5
- Yardage
- 556 yds
- Stroke index
- 7
- Hazards
- 5 bunkers
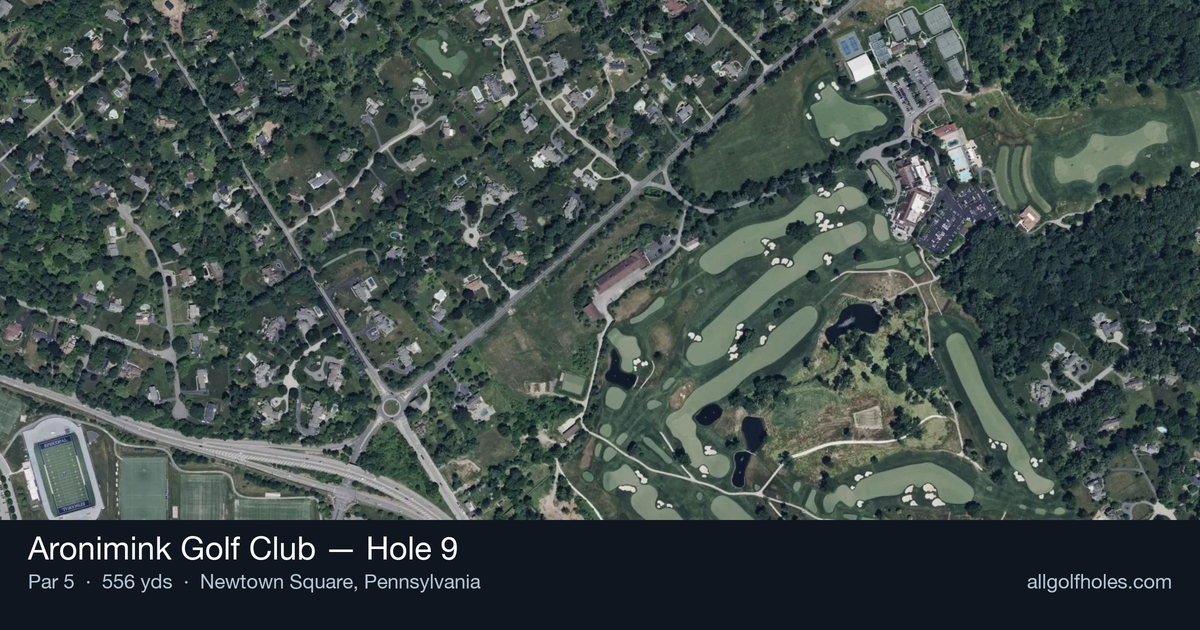
Aerial source not provided
Green size: 36 yds deep × 32 yds wide
Scorecard yardage is for Championship tees. The aerial shows its labeled reference position; distance rings measure to the green.
Championship tees · Par 5 · 556 yards
The plan for No. 9
The finishing hole of the front nine at Aronimink Golf Club presents a strategic par 5 that showcases the course's rich architectural heritage. At 556 yards, this straight hole demands precision navigation through four alternating fairway bunkers that create a chess match from tee to green. The tee shot must find the optimal angle while avoiding the first set of hazards, setting up the approach strategy for this Donald Ross-designed gem. Gil Hanse's recent restoration work has enhanced the hole's original character, where the alternating bunker placement forces golfers to think two shots ahead. The small green complex rewards accurate iron play and punishes wayward approaches, making this an ideal crescendo to Aronimink's challenging outward nine that tests both power and precision.
Off the tee
The opening shot requires careful target line selection to avoid the first set of bunkers while positioning for the optimal angle to navigate the remaining hazards. A controlled driver or strong 3-wood should target the right side of the fairway to avoid early trouble, setting up the ideal line for the second shot. Distance control is more important than maximum length here - finding the short grass in good position trumps extra yardage that could lead to bunker trouble or awkward angles.
Approach & recovery
The second shot presents the hole's key strategic decision point. Longer hitters may consider going for the green in two, but the small target and alternating bunkers make this a high-risk proposition. The safer play involves laying up to a comfortable wedge distance, approximately 100-120 yards from the pin, while avoiding the final set of bunkers guarding the green. This approach shot should favor the side that provides the clearest angle to the day's pin position, as the small green offers little margin for error.
On the green
The compact putting surface demands precision with approach shots and careful speed control with the putter. Given the green's small size, most approach shots will leave mid-range putts that require reading the subtle breaks typical of Gil Hanse's restoration work. Focus on leaving putts below the hole when possible, as uphill putts on this green are generally more manageable than downhill attempts on the firm surface. ## RISK VS REWARD The primary risk/reward decision comes on the second shot - attempting to reach the green versus laying up strategically. While the hole's length makes it reachable for stronger players, the combination of alternating bunkers and small green makes the conservative three-shot approach often the smarter play. The reward for successfully navigating the bunkers and finding the green is a potential eagle or easy birdie, but the penalty for missing includes difficult bunker shots or challenging chips from tight lies. ## DIFFERENT SKILL LEVELS **Lower Handicap Players:** Can be more aggressive with driver off the tee and may consider going for the green in two under favorable conditions. Should focus on precise distance control and angle management through the bunker complex. **Higher Handicap Players:** Should prioritize position over distance, using fairway woods or hybrids for accuracy. The three-shot approach removes much of the hole's danger while still providing birdie opportunities. Focus on keeping the ball in play and avoiding the alternating bunkers that can lead to big numbers. **All Players:** Regardless of skill level, course management is paramount on this hole. Study the bunker positions carefully and commit to conservative target lines that ensure advancing the ball while maintaining good angles for subsequent shots.
Watch for
- Course conditioning and mapped hazards may affect line selection; confirm from the aerial.
Hole 9 Green Complex
Mapped green boundary
Green size: 7,019 sq ft
Course coverage
Tournament and creator videos about Aronimink Golf Club — shared course coverage, not hole-specific clips.
Featured by these creators
Creator videos about this course
YouTube creators who filmed or featured Aronimink Golf Club. · Stats as of Oct 12, 2026 · 6d ago
2026 PGA Championship Preview: Who Will Win at Aronimink Golf Club? | The Fried Egg Golf Podcast
How did Hole 9 play?
How did this hole play today?
Frequently asked questions
Yardage reference: Championship tees · 556 yards.
Can this par 5 be reached in two?
↓
At 556 yards, A true three-shot hole for most players. Position your layup to leave a comfortable wedge distance.
How big is the green on hole 9?
↓
The green is fairly large with multiple pin positions. Lag putting becomes important on longer putts.