Hole 4 at Aronimink Golf Club
- Par
- 4
- Yardage
- 466 yds
- Stroke index
- 1
- Hazards
- 5 bunkers
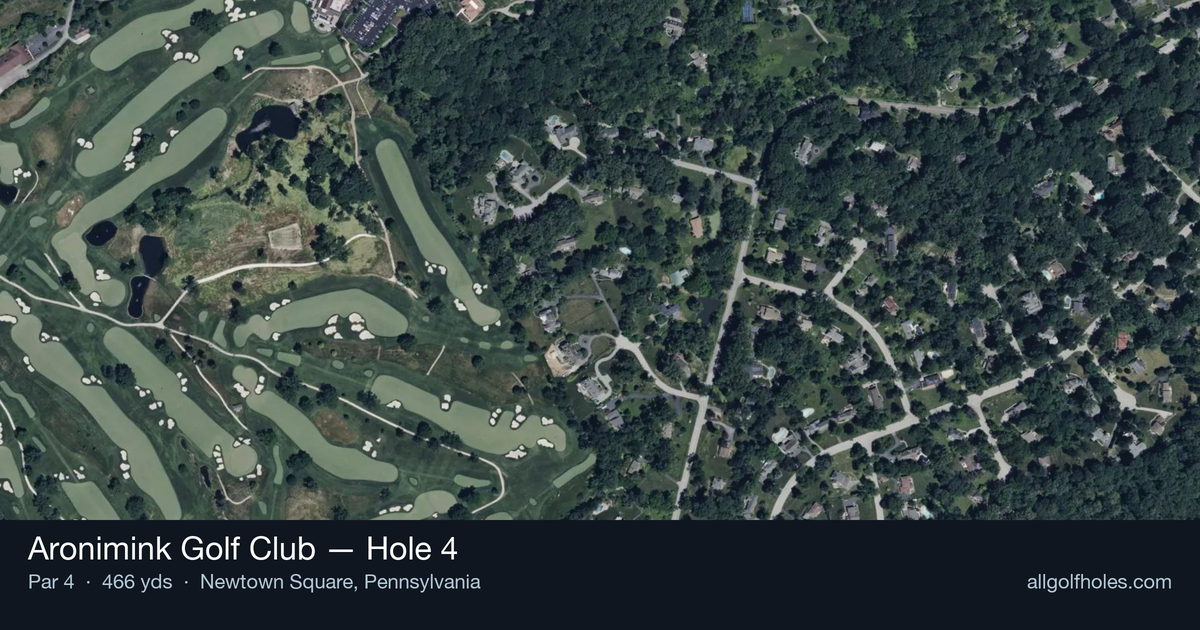
Aerial source not provided
Green size: 29 yds deep × 32 yds wide
Scorecard yardage is for Championship tees. The aerial shows its labeled reference position; distance rings measure to the green.
Championship tees · Par 4 · 466 yards
The plan for No. 4
Aronimink Golf Club hole 4 stands as the course's most formidable test, earning its number one handicap rating through sheer length and relentless demand for precision. This straight par 4 stretches 466 yards through the club's signature tree-lined corridor, where thick rough awaits any wayward shot. The tee shot requires both distance and accuracy to position properly for the lengthy approach into a deceptively small green complex. With no fairway bunkers to distract, golfers must focus entirely on threading the narrow landing area between towering trees. The approach shot becomes the hole's defining moment, demanding a long iron or fairway wood struck with surgical precision to find the compact putting surface. This quintessential golden-age parkland hole exemplifies Aronimink's reputation for consistent excellence without gimmicks.
Off the tee
The tee shot strategy centers on maximizing distance while staying within the tree-lined fairway boundaries. Given the 466-yard length, most players will need their driver to leave a manageable approach distance. Aim for the center of the fairway, as the straight layout doesn't require working the ball either direction. The absence of fairway bunkers means the primary concern is avoiding the thick rough that characterizes Aronimink's design. A successful drive should carry about 250-280 yards for better players, leaving a mid-iron approach.
Approach & recovery
The approach shot is where this hole shows its teeth, particularly given the small green size. With likely 150-200 yards remaining after a good drive, club selection becomes critical. The small target demands precision over power - it's better to be slightly short with the correct line than to fly the green with too much club. Focus on the center of the green regardless of pin position, as the small surface leaves little room for error. The golden-age design likely features subtle slopes and contours that can reject poorly struck approaches.
On the green
The small green size means putting becomes a premium skill on this hole. Expect subtle breaks and potential tier changes typical of Donald Ross-era design. Focus on lag putting to the correct level of the green, as three-putts can quickly turn a well-played hole into a bogey or worse. Pin positions on this small surface will create varying degrees of difficulty, with back pins being particularly challenging given the approach distance required. ## RISK VS REWARD This hole offers limited risk/reward opportunities, instead demanding steady, strategic play. The main decision point comes with tee shot aggression - pushing for extra distance to shorten the approach versus ensuring fairway position. Given the #1 handicap rating, the conservative approach often proves wiser. Par represents an excellent score here, and avoiding the big number should take precedence over aggressive pin-hunting. ## DIFFERENT SKILL LEVELS **Low Handicappers:** Can be more aggressive off the tee, aiming for 280+ yard drives to leave short-iron approaches. Should still prioritize fairway position and target green center on approach shots. **Mid-to-High Handicappers:** Should focus on keeping the ball in play off the tee, even if it means using a 3-wood or hybrid for accuracy. Accept that this will likely be a two-shot approach hole, planning for a layup and wedge rather than forcing a long-iron approach. Treat par as a victory and avoid the temptation to get overly aggressive. The #1 handicap rating tells the story - respect this hole's difficulty, play within your capabilities, and remember that even tour professionals often settle for par on holes of this caliber.
Watch for
- Course conditioning and mapped hazards may affect line selection; confirm from the aerial.
Hole 4 Green Complex
Mapped green boundary
Green size: 5,229 sq ft
Course coverage
Tournament and creator videos about Aronimink Golf Club — shared course coverage, not hole-specific clips.
Featured by these creators
Creator videos about this course
YouTube creators who filmed or featured Aronimink Golf Club. · Stats as of Oct 12, 2026 · 5d ago
2026 PGA Championship Preview: Who Will Win at Aronimink Golf Club? | The Fried Egg Golf Podcast
How did Hole 4 play?
How did this hole play today?
Frequently asked questions
Yardage reference: Championship tees · 466 yards.
What's the best strategy off the tee?
↓
For this 466-yard par 4, most players will hit driver to set up a comfortable approach.
How difficult is hole 4?
↓
This hole is a moderate challenge for most golfers. Key challenges include: long par 4, heavily bunkered.
How big is the green on hole 4?
↓
The green is medium-sized with moderate targets. The green is wider than it is deep, rewarding shots that find the correct tier. Pay attention to pin placement when selecting your approach club.
What's a good score on hole 4?
↓
This hole is one of the tougher holes where par feels like birdie. A challenging par 4. Accept that bogey happens and avoid big numbers.