Hole 5 at Bethpage State Park (Black Course)
- Par
- 4
- Yardage
- 451 yds
- Hazards
- 4 bunkers
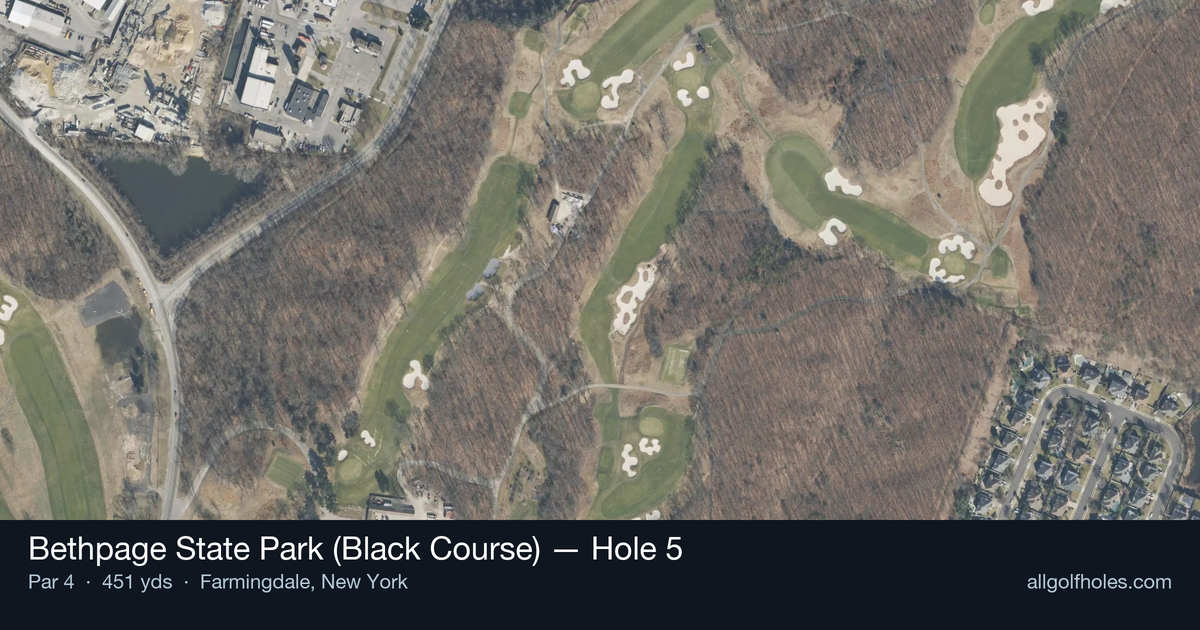
Aerial source not provided
Green size: 28 yds deep × 31 yds wide
Scorecard yardage is for Championship tees. The aerial shows its labeled reference position; distance rings measure to the green.
Championship tees · Par 4 · 451 yards
The plan for No. 5
The fifth hole at Bethpage State Park (Black Course) presents one of golf's most intriguing strategic paradoxes - a 451-yard par 4 that serves as the course's signature handicap hole yet reveals the stark difference between professional and amateur golf. Originally designed as a short par 5, this famous hole demands two precise long shots through a straight corridor lined with towering trees. The tee shot requires commitment and accuracy to set up the crucial approach to a small, well-protected green complex. What makes this hole legendary is its dual personality: while professionals often find it among the easier tests during major championships, everyday golfers consistently rank it as Bethpage Black's most challenging encounter, earning its stroke-play designation as the number one handicap hole.
Off the tee
Your tee shot strategy must prioritize both distance and accuracy to set up a manageable approach. The fairway offers a relatively generous landing area, but positioning is crucial for the long approach shot ahead. Aim for the center-left portion of the fairway to provide the best angle and shortest distance to the green. Driver is typically the right choice here, as you'll need every yard you can get to make the approach shot more manageable. The straight layout means course management is less about avoiding trouble and more about maximizing distance while staying in the short grass.
Approach & recovery
The approach shot is where this hole reveals its true character. With the green sitting at a considerable distance even after a good drive, most golfers will face a long iron or hybrid into a small target. Club selection becomes critical - it's better to be slightly long than short, as the small green demands precision but offers little room for error. Focus on committing fully to your swing, as tentative shots from this distance rarely find their target. The key is accepting that this approach will be one of the longest you'll face and trusting your preparation and club selection.
On the green
The small green size means putting strategy centers around lag putting and avoiding three-putts. With the long approach shots required, many players will find themselves putting from considerable distances. Focus on speed control over line, as getting your first putt close is more important than trying to hole everything. The green's compact nature means that even slight misreads can result in putts running well past the hole, so err on the side of caution with your speed. ## RISK VS REWARD This hole presents a unique risk/reward scenario where the reward comes from simply making par. Unlike holes with clear aggressive lines or shortcuts, the 5th hole rewards patience and execution over bold strategy. The risk lies in trying to overpower the hole - attempting to drive it too far or forcing approach shots can lead to big numbers quickly. The reward is in playing within your capabilities and accepting that a well-earned par here is a victory. ## DIFFERENT SKILL LEVELS **High-Handicap Players:** Accept that this hole will likely play longer than your typical par 4. Consider laying up with your approach if you can't comfortably reach the green, turning it into a three-shot hole. Focus on keeping your tee shot in play and avoiding the temptation to swing harder than normal. A bogey here should be considered a good score. **Low-Handicap Players:** This is where you can gain strokes on the field if you execute properly. Use your distance advantage to make the approach shot more manageable, but don't sacrifice accuracy for extra yards off the tee. The key is treating this as a scoring opportunity while respecting the precision required. Your ability to hit long irons consistently will determine your success on this famous test. The 5th hole at Bethpage Black exemplifies why course management and realistic expectations are crucial to good scoring. Understanding your limitations and playing within them will serve you better than trying to match the professionals who find this hole relatively easy.
Watch for
- 4 mapped bunkers influence club selection and recovery options on this hole.
- Fairway width is roughly 34 yards at the landing zone.
Hole 5 Green Complex
Mapped green boundary
Green size: 4,978 sq ft
How did Hole 5 play?
How did this hole play today?
Frequently asked questions
Yardage reference: Championship tees · 451 yards.
What's the best strategy off the tee?
↓
For this 451-yard par 4, most players will hit driver to set up a comfortable approach.
How difficult is hole 5?
↓
This hole is a moderate challenge for most golfers. Key challenges include: long par 4, heavily bunkered.
How big is the green on hole 5?
↓
The green is medium-sized with moderate targets. Pay attention to pin placement when selecting your approach club.
What's a good score on hole 5?
↓
This hole is one of the tougher holes where par feels like birdie. A challenging par 4. Accept that bogey happens and avoid big numbers.